Wednesday, 28 February 2018
Aqueous storage device needs only 20 seconds to go
How to Control a Relay using Raspberry Pi?
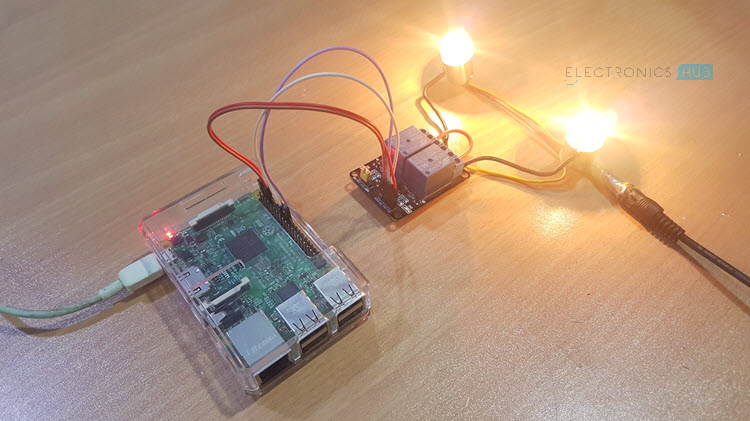
In this project, we will learn about Relay and Relay Module, interface a Relay with Raspberry Pi and see how to control a Relay using Raspberry Pi. This project could be your first step in implementing your own Home Automation Project using Raspberry Pi.
Overview
Home Automation is one of the popular DIY Projects that hobbyists and electronics enthusiasts love to work on. Part of such home automation projects is to control an electrical load like a light bulb or a ceiling fan.
The main concept of Home Automation using Raspberry Pi (or any other platform like Arduino) is to control different electrical loads using Raspberry Pi. In order to do this, you need to understand How to Control a Relay using Raspberry Pi, as Relay is the main component in controlling electrical loads.
If you a little bit of experience in electronics, you might have already known about the importance of Relays. In case you are a beginner in electronics, then I’ll explain what a Relay is, and how can you use a Relay Module with Raspberry Pi or Arduino.
Similar Project: HOW TO USE 5V RELAY ON ARDUINO?
A Brief Note on Relay and Relay Module
What is a Relay?
In layman terms, a relay is a switch. Technically speaking, a relay is an electromagnetic switch where a small control signal (usually from a microcontroller) at the input of the Relay will control a high voltage supply (usually AC mains).
Since this is a Raspberry Pi based project, let us talk with respect to Raspberry Pi. The Raspberry Pi computer, although a powerful device, works on a 3.3V Logic.
If you want this powerful computer to control your electrical loads, like an LED strip running along your garden or kitchen, you cannot interface them directly as the electrical loads work on AC Mains supply and the Raspberry Pi works on 3.3V DC (technically).
Here comes the Relay. A simple electromechanical device that consists of a coil and few electrical contacts. When the coil is energized, it acts as an electromagnet and closes a switch. If the coil is de-energized, the coil loses its magnetic nature and releases the switch.
So, by controlling the coil, you can control a switch, which in turn will control an electrical load. You can control the coil of the relay with the help of Raspberry Pi (although not directly, but with additional circuitry) as all you need is a small current to energize the coil.
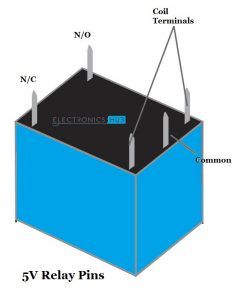
The following image shows a typical 5V Relay. It has 5 pins namely: NO (Normally Open), NC (Normally Closed), COMM (Common) and two coil terminals.
Relay Module
Even though the Relay Coil needs a small current in order to get energized, driving it directly from Raspberry Pi (for that matter, any Microcontroller like 8051 or Arduino) is not a good idea.
A simple way is to drive the Relay Coil through a Transistor. The following image shows the connections required with respect to a Relay.

The circuit shown above will drive a relay with minimum number of components (a Transistor, a current limiting resistor, a Relay and a Diode).
If you have all these components, then you can build the circuit yourself. But if you feel that this might be tedious job, we have an alternative: a Relay Module.
A Relay Module is a simple circuit board that consists of the relay itself and all the necessary components that are required to drive a relay and also the required connectors to connect the load.
I have used a two channel relay module in this project. It is basically, two relays with all the circuitry on a single board.
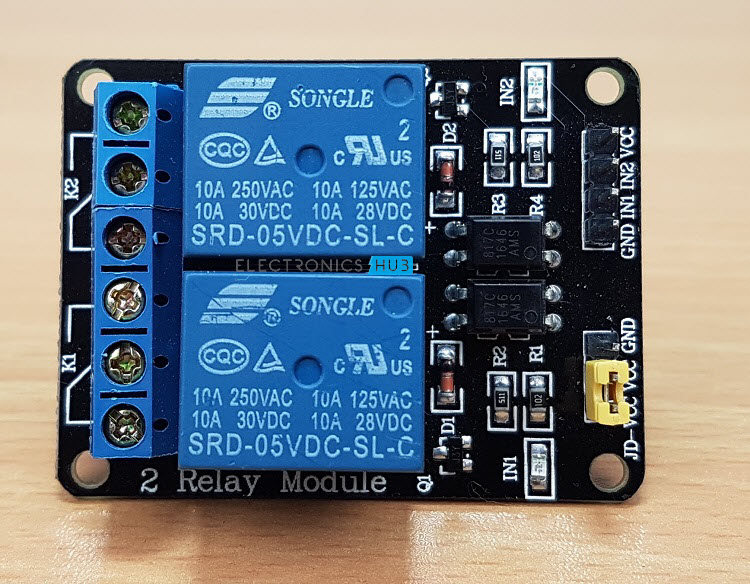
I suggest you to pick up a relay module like this one as you might be dealing with AC Supply in a future project and connecting with screw terminals will make your job easy.
How to Control a Relay using Raspberry Pi?
Till now, we have seen about relay, what is the necessity of relays, how relay works and also about relay modules. Now comes the interesting part i.e. How to Control a Relay using Raspberry Pi?
If you understood the concept of a relay, then it might be clear that all you need to do is to control the coil of the relay i.e. if the Raspberry Pi wants a load to be turned ON, then activate the relay by energizing the coil (sending a HIGH signal from Raspberry Pi).
Similarly, if the Raspberry Pi wants to turn the load OFF, then de-energize the coil by sending a LOW signal.
Circuit Diagram
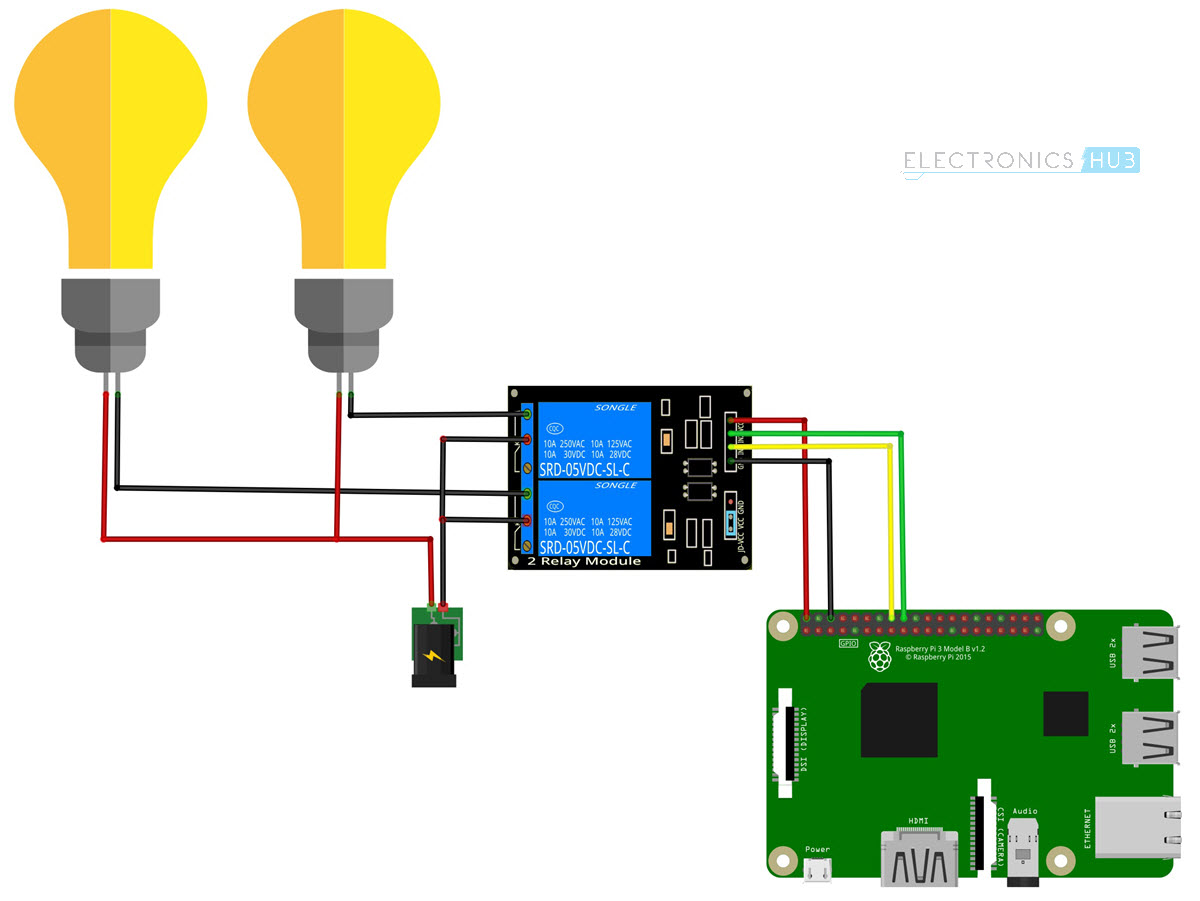
The following image shows the connections with respect to the project of How to Control a Relay using Raspberry Pi.
Components Required
- Raspberry Pi 3 Model B
- 2-Channel Relay Module
- Two Small Incandescent Bulbs (for demonstration in the output)
- Connecting wires
- Power Supply
- Computer
Circuit Design
Connect the inputs to the two relay channels to GPIO16 and GPIO18 of the Raspberry Pi. Then connect the loads as shown in the circuit diagram.
CAUTION: To keep this project simple, I haven’t connected any AC Loads (like a CFL Bulb) to the Relay Module. But if you want to control an electrical load, be extremely careful when connecting to AC Mains supply. If needed, take help from an expert.
Code
The Python Script for the project How to Control a Relay using Raspberry Pi is given below.
Working
The main concept behind this project is to understand the working and use of a relay and also control a relay using Raspberry Pi.
There is nothing special going in the project. All you need to do is to control the GPIO pins connected to the Relay Module. If the GPIO Pin is made HIGH, the corresponding load will be switched ON.
To turn OFF the load, make the GPIO pin LOW.
Applications
- By controlling a Relay with Raspberry Pi, you can control different electrical loads like:
- Lights
- Fans
- LED Strips
- Also, you can implement a Home Automation Project using Raspberry Pi with an additional feature of controlling the load from the internet.
The post How to Control a Relay using Raspberry Pi? appeared first on Electronics Hub.
Monday, 26 February 2018
Printing of flexible, stretchable silver nanowire circuits
Is it really just a wire?
 The inductor is one of those components I’ve always found weird.
Circuits with inductors often have an explanation with lots of mathematical formulas.
But when it comes down to it…
…an inductor is really just a coil of wire.
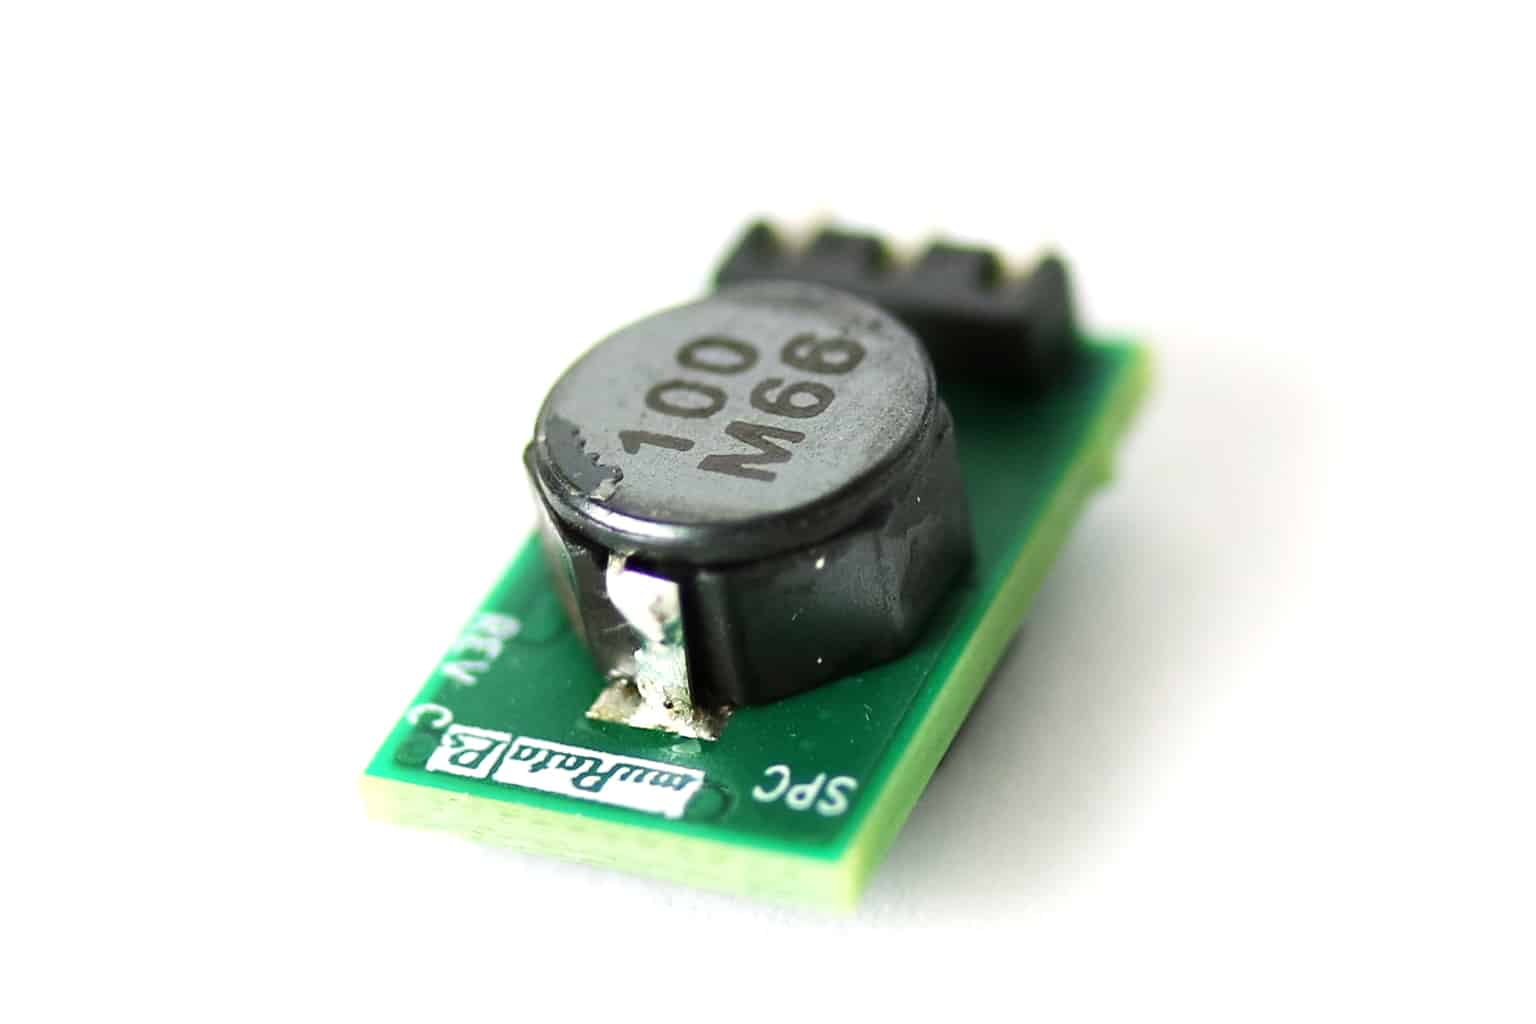
If you take a wire and wind it up into a coil, you’ve created an inductor. To me, it’s almost a bit magical that a simple wire can do this:
When you apply a current through the coil, a magnetic field is created around it.
And this field stores energy.
When the current through the inductor stays the same, the inductor does nothing.
It just lets the current pass through.
Just like it was a normal wire.
But when the current through the inductor changes, the built-up energy in the magnetic field will resist this change by changing the resistance of the inductor.
Resistance to change is a good thing for example to create a filter to reduce noise.
Noise can be anything from sounds that are not supposed to be there in a musical recording, to small changes in the voltage of a power supply that shouldn’t be there.
But honestly, I don’t use inductors a lot.
I use them sometimes in power supplies or radio transmitters.
But mostly, the values I need to use are already given by the manufacturer of whatever chip I am using.
That’s one of the reasons electronics has become easier in many ways.
You don’t need to know all the heavy calculations with complicated math to build advanced things with electronics.
If you want to get started building circuits, check out my eBook 9 Circuits that contains 9 fun projects for beginners:
https://ohmify.com/get9circuits/
Keep On Soldering!
Oyvind @ build-electronic-circuits.com
Copyright Build Electronic Circuits
Sunday, 25 February 2018
Reinventing the inductor
Friday, 23 February 2018
Engineers advance capability of wearable tech
PIR Motion Sensor using Raspberry Pi | Interfacing Tutorial
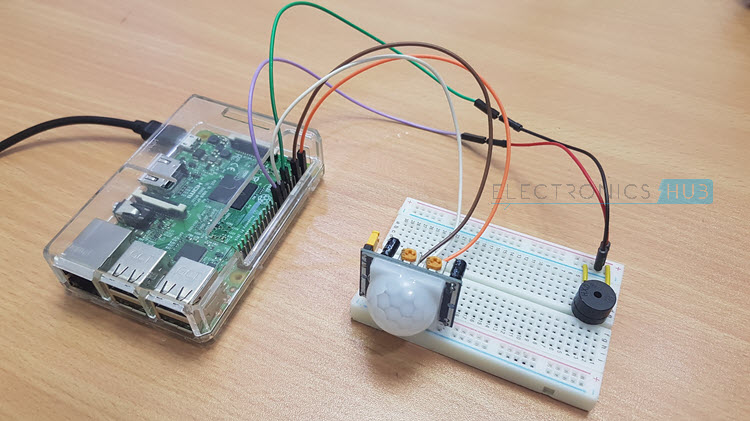
In this project, we will see how to implement a PIR Motion Sensor using Raspberry Pi by learning how to interface a PIR Sensor with Raspberry Pi. In this project, when the PIR Sensor detects any human motion, a buzzer is activated. With this interface, you can implement a simple Motion Detection Alarm as a DIY Project.
Overview
Passive Infrared Sensors, often referred to as PIR Sensors (also IR Motion Sensors and Pyroelectric Sensors), are Motions Detectors that basically detects the changes in Infrared Radiations emitted by a person.
Every living and non-living thing which has a temperature greater than absolute zero will emit infrared radiations. Since the emitted energy is in the form of infrared radiation, whose wavelength is greater than that of our visible light, we humans cannot see those radiations.
But PIR Sensors are built to detect those infrared radiations. Hence, they are employed in a variety of applications like Motion Detectors, Security Systems, Intruder Alert and so forth.
The term “Passive” in the PIR Sensor means that the sensor will not emit any infrared energy but rather detects infrared radiations emitted by other objects. This is in contrast to active sensors, which perform both the actions (emitting and detection).
A Brief Note on the PIR Sensor
The PIR Sensor used in this project consists of a Pyroelectric Infrared Sensor, BISS0001 PIR Motion Detector IC, Fresnel lens and a few other components.
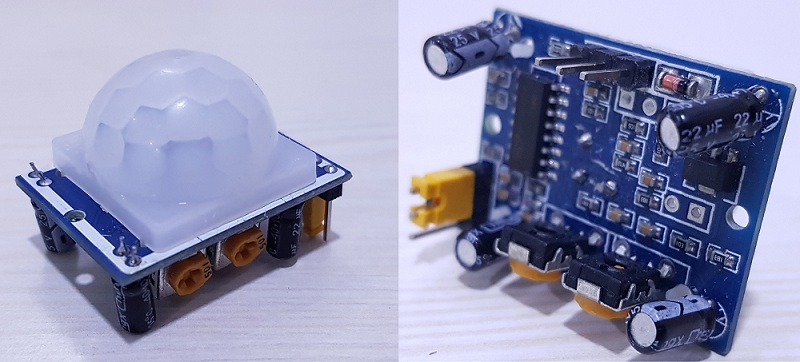
For connections, the PIR Sensor has three pins namely VCC, DATA and GND. Also, the PIR Sensor has two potentiometers: one for adjusting the sensitivity of the sensor (or rather the sensing distance of the sensor) and the other for adjusting the time for which the Output stays high upon detecting any human movement.
The Fresnel lens covering the Pyroelectric Sensor play an important role in focusing the infrared energy onto the sensor. With the help of this lens, the PIR Sensor can detect objects in 1200 angle. The range of the sensor is 8 meters i.e. it can detect human movement up to 8 meters.
PIR Sensor Adjustments
As mentioned earlier, there are two potentiometers for manually adjusting the sensitivity and output timing.
With the help of the first potentiometer, you can adjust the Sensitivity i.e. the Sensing Distance of the PIR Sensor. The range can be adjusted from 3 meters up to 8 meters. To increase the sensing distance, turn the POT in clockwise direction and to decrease, turn it in anti-clockwise direction.
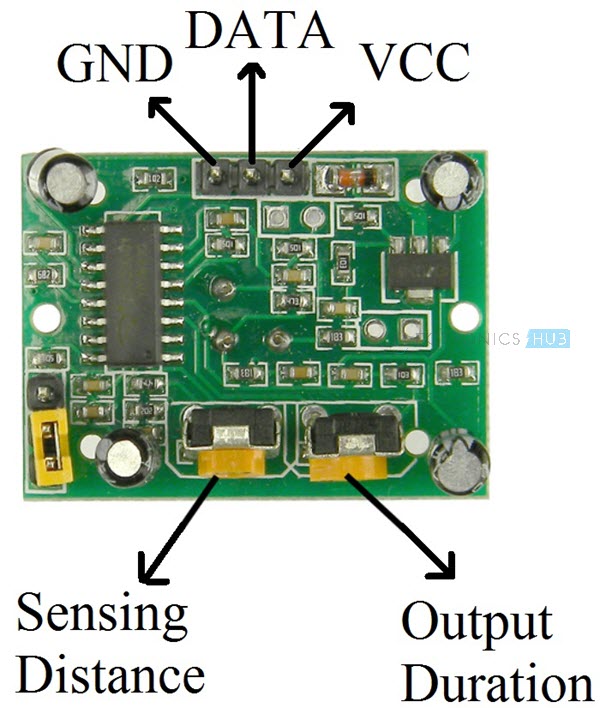
Coming to the second potentiometer, you can adjust the duration for which the Output of the PIR Sensor stays HIGH. It can be varied anywhere between 0.3s to 600s. To increase the time, turn the POT in clockwise direction and in anti-clockwise direction to decrease the time.
PIR Motion Sensor using Raspberry Pi
As mentioned in the introduction, the aim of this project is to interface a PIR Sensor with Raspberry Pi and implement a PIR Motion Sensor using Raspberry Pi and Python Programming.
I have already implemented PIR Motion Sensor Module in several other projects like Automatic Room Lights using Arduino and PIR Sensor, Automatic Door Opener using Arduino and PIR Sensor, Arduino PIR Sensor Tutorial and GSM Based Home Security Alarm System Using Arduino.
The main advantage of the PIR Motion Sensor using Raspberry Pi over all the above mentioned projects is that Raspberry Pi can be easily connected to the Internet and allows IoT based application of the project.
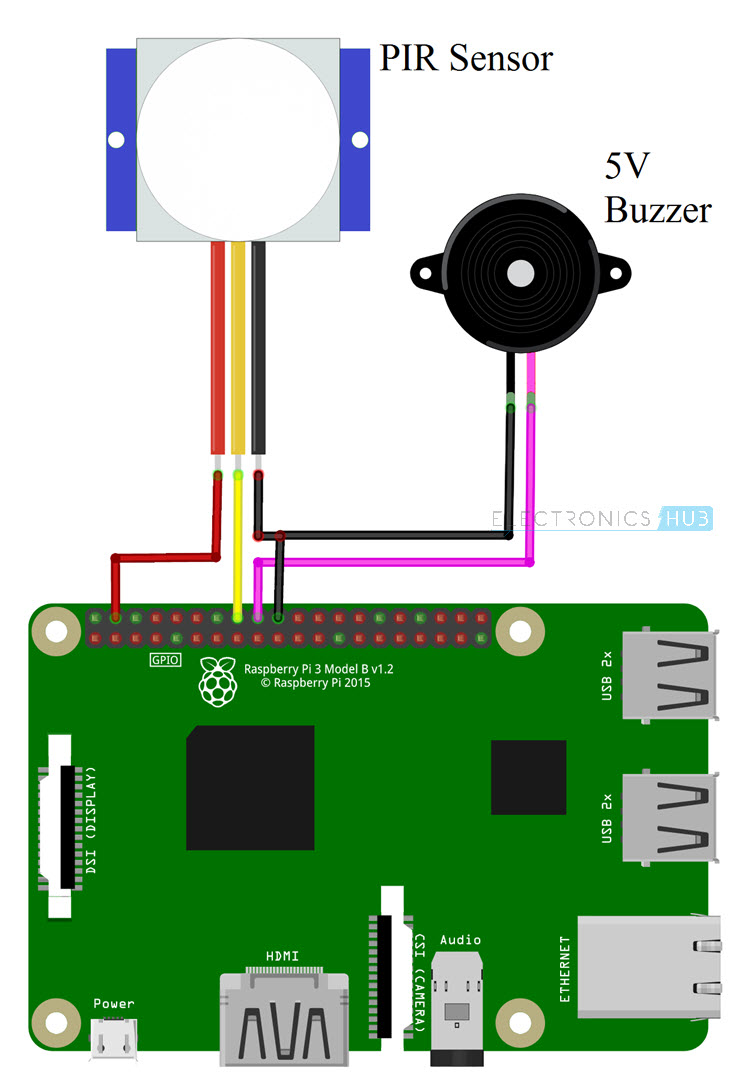
Circuit Diagram
The following Fritzing based images shows all the connections with respect to the PIR Motion Sensor using Raspberry Pi.
Components Required
- Raspberry Pi 3 Model B
- PIR Sensor
- 5V Buzzer
- Connecting Wires
- Mini Breadboard
- Power Supply
- Computer
Circuit Design
Connect the VCC and GND pins of the PIR Motion Sensor to +5V and GND pins of the Raspberry Pi. Connect the DATA Pin of the PIR Sensor to GPIO23 i.e. Physical Pin 16 of the Raspberry Pi.
A 5V Buzzer is connected to GPIO24 i.e. Physical Pin 18 of the Raspberry Pi. The other pin of the buzzer is connected to GND.
NOTE:
- I have directly connected the Buzzer to Raspberry Pi. But if you are not sure, connect it through an NPN Transistor.
- From the previous Raspberry Pi Projects, you already know that Raspberry Pi Input pins are 3.3V tolerant i.e. they work on 3.3V Logic.
- If you are wondering why I connected the output Data pin of the PIR Sensor directly to the Raspberry Pi, then you need to be confused as I have checked the output levels of the PIR Sensor on HIGH state and got a result of around 3.5V.
- You can also check for the same and then proceed with a level converter circuit (voltage divider) if it is required.
Code
The Programming part of the project is implemented using Python. The following is the Python Script for the PIR Motion Sensor using Raspberry Pi.
Working
The working of the PIR Motion Sensor using Raspberry Pi is very simple. If the PIR Sensor detects any human movement, it raises its Data Pin to HIGH.
Raspberry Pi upon detecting a HIGH on the corresponding input pin, will activate the Buzzer.
Applications
The applications of the PIR Motion Sensor using Raspberry Pi project have already been mentioned. Some of them are:
- Automatic Room Light
- Motion Detection
- Intruder Alert
- Automatic Door Opening
- Home Security System
The post PIR Motion Sensor using Raspberry Pi | Interfacing Tutorial appeared first on Electronics Hub.
Thursday, 22 February 2018
Raspberry Pi Ultrasonic Sensor HC-SR04 Interface Tutorial
Ultrasonic Sensors, particularly HC-SR04 Ultrasonic Sensor, are very popular among electronic hobbyists and are frequently used in a variety of projects like Obstacle Avoiding Robot, Distance Measurement, Proximity Detection and so forth. In this project, we will learn about HC-SR04 Ultrasonic and see how to interface one with Raspberry Pi.
Overview
The HC-SR04 Ultrasonic Sensor is marketed as a Ranging Module as it can be accurately used for measuring distances in the range of 2cm to 400cm with an accuracy of 3mm.
The range of this Ultrasonic Sensor seems very less but it is sufficient for the applications it is implemented in i.e. Proximity Detection and Obstacle Avoiding, for example.
I have already used this Ultrasonic Sensor several of my previous projects like: PORTABLE ULTRASONIC RANGE METER and OBSTACLE AVOIDING ROBOT.
The Raspberry Pi Ultrasonic Sensor Interface is different from interfacing LED, Button, LCD, Motors, etc. with Raspberry Pi. This is because the output of the HC-SR04 Ultrasonic Sensor is at a 5V logic level whereas the Raspberry Pi works on a 3.3V logic level.
A Brief Note on Ultrasonic Sensors
If you refer to the previous projects based on the Ultrasonic Sensor Module, I have briefly discussed about the working of the module. We will take a brief note once again before continuing with Raspberry Pi Ultrasonic Sensor Interface.
The HC-SR04 Ultrasonic Sensor (or any Ultrasonic Sensor for that matter), works on the principle that is similar to RADAR and SONOR i.e. transmits a signal and analyzes the target by capturing the reflected signals.
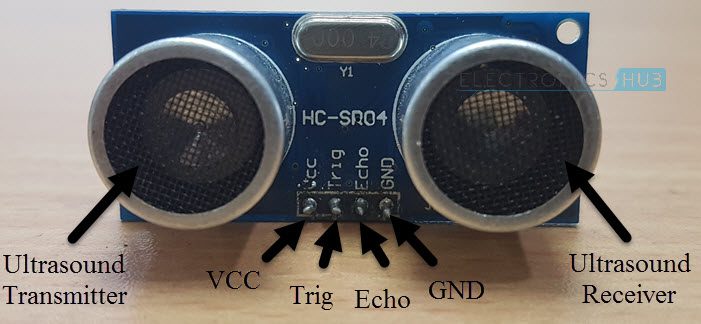
How HC-SR04 Ultrasonic Sensor Works?
Before getting into the working of an Ultrasonic Sensor, lets us see the parts and pins of the HC-SR04 Ultrasonic Sensor.
It basically consists of three parts: an ultrasonic transmitter, a control circuit and an ultrasonic receiver. Coming to the pins of the HC-SR04 Sensor, it has only four pins namely VCC, TRIG (Trigger), ECHO (Echo) and GND.
The basic principle behind the Ultrasonic Sensor is described here. The Ultrasonic Transmitter in the Sensor generates a 40 KHz Ultrasound. This signal then propagates through air and if there is any obstacle in its path, the signal hits the object and bounces back.
This bounced signal is then collected by the Ultrasonic Receiver. Based on the signal’s time of travel, you can calculate the distance of the object as you already know the speed of sound.
How to Calculate Distance?
We will now see how to measure the distance of an object using HC-SR04 Ultrasonic Sensor. In order to send the 40 KHz Ultrasound, the TRIG Pin of the Ultrasonic Sensor must be held HIGH for a minimum duration of 10µS.
After this, the Ultrasonic Transmitter, will transmits a burst of 8-pulses of ultrasound at 40 KHz. Immediately, the control circuit in the sensor will change the state of the ECHO pin to HIGH. This pins stays HIGH until the ultrasound hits an object and returns to the Ultrasonic Receiver.
Based on the Time for which the Echo Pin stays HIGH, you can calculate the distance between the sensor and the object.
For example, if we calculated the time for which ECHO is HIGH as 588µS, then you can calculate the distance with the help of the speed of sound, which is equal to 340m/s.
Distance = Velocity of Sound / (Time/2) = 340m/s / (588µS /2) = 10cm.
Raspberry Pi Ultrasonic Sensor Interface
Now that we have seen how the HC-SR04 Ultrasonic Sensor works, we will proceed with interfacing it with Raspberry Pi. Before making the connections, you have to note a point that Raspberry Pi works at 3.3V Logic while the HC-SR04 Ultrasonic Sensor works at 5V.
The Raspberry Pi needs to read the Echo pin to calculate the time and hence the corresponding GPIO pin on the Raspberry Pi must be configured as Input So, before connecting the Echo Pin to the Raspberry Pi, it must be given to a level converter.
More information about this is provided in the circuit design part.
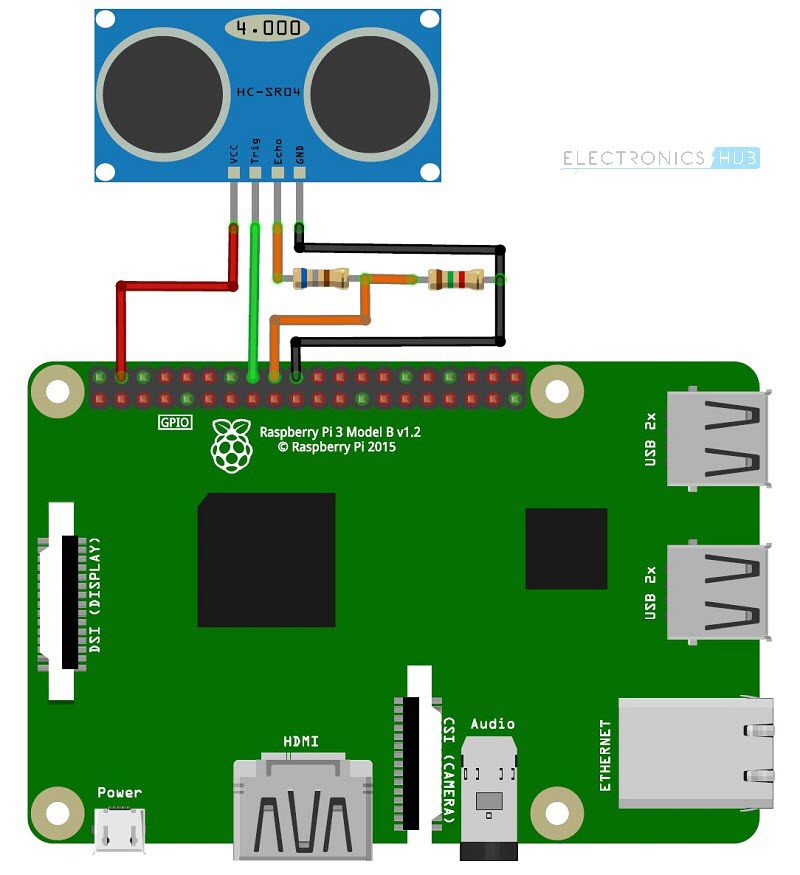
Circuit Diagram
The following image shows the connections between the Raspberry Pi and the HC-SR04 Ultrasonic Sensor. This circuit diagram is made with Fritzing Software.
Components Required
- Raspberry Pi 3 Model B
- HC-SR04 Ultrasonic Sensor
- 680 Ω Resistor (1/4 Watt)
- 1.5 KΩ Resistor (1/4 Watt)
- Connecting Wires
- Mini Breadboard
- Power Supply
- Computer
Circuit Design
Connect the Trig Pin of the HC-SR04 Ultrasonic Sensor to the Physical Pin 16 i.e. GPIO23 of the Raspberry Pi. Use a combination of 680Ω and 1.5 KΩ Resistor to convert the Echo pin to 3.3V Logic (approximately) and connect it to Physical Pin 18 i.e. GPIO24 of the Raspberry Pi.
Finally, provide the +5V and GND connections to the Ultrasonic Sensor from the Raspberry Pi Pins.
Code
The following Python Script is used in the HC-SR04 Ultrasonic Sensor and Raspberry Pi Interface.
Working
A simple project is implemented here, where we have seen how to interface an HC-SR04 Ultrasonic Sensor with Raspberry Pi. The working of the project is already explained in the How HC-SR04 Ultrasonic Sensor Works section.
A simple calculation program is written in Python to detect the HIGH on Echo Pin and produce an equivalent distance.
Applications
In this project, we have seen how to interface HC-SR04 Ultrasonic Sensor with Raspberry Pi. This setup can be used in a lot applications like:
- Obstacle Avoiding
- Proximity Detection
- Distance Measurement
- Range Meter
The post Raspberry Pi Ultrasonic Sensor HC-SR04 Interface Tutorial appeared first on Electronics Hub.
Wednesday, 21 February 2018
8 Best Arduino Starter Kit for Beginners
Best Arduino Starter Kit For a beginner in the world of Arduino, we present some of the best Arduino starter kits which help you to get familiar with all the essential components required to build some basic circuits.The Arduino kits reviewed here are not only good for students but also for people who have very little knowledge in coding who are enthusiastic to learn more. There are hundreds of Arduino starter pack combinations available online for you to choose and buy. We have compiled together 8 of them that are perfect for beginners. The review of each starter kit Arduino is provided with users’ view of the product, Arduino starter kit components, other contents of the kit, possible circuits that can be built with each kit, and a detailed buying guide to assist you throughout. To know more about Arduino Basics: Arduino For Beginners Since each kit is different from the other, it is important to know all minute details about the product, and this, we have done for you!! The Big List of Arduino Starter Kit #1. Arduino Starter Kit from Arduino – Official English Kit with 170 Page Learning Book The official Arduino starter kit from Arduino is by far the best & “Complete Arduino Starter Kit” for a beginner. With over 200 useful components and 50 additional electronic parts, the kit comes with a high quality microcontroller compatible with Arduino Uno R3. The whole kit is available at an economic price. Inside the Arduino Uno Starter Kit Box from Arduino BUY OFFICIAL ARDUINO FROM->> AMAZON The 170 page book comes with all the basics that you need to need to know about the subject, and is also fun to experiment on. The book contains the following projects. GET TO KNOW YOUR TOOLS – Basics of all the components inside this kit is explained in detail. SPACESHIP INTERFACE – A fancy way to learn the basics of blinking LED’s. LOVE-O-METER – Interfacing Arduino & temperature sensor (TMP36) to check hand temperature. COLOR MIXING LAMP – Using RGB LED and light sensors to change colors according to difference in light intensity. MOOD CUE – Controlling a Servomotor using an Arduino & Potentiometer to rotate at different angles. LIGHT THEREMIN – Using a photoresistor and a piezo buzzer to produce a tone according to the intensity of light received by the Arduino. KEYBOARD INSTRUMENT – Producing different tones using switches and a piezo buzzer. DIGITAL HOURGLASS – Using a Tilt switch and some LED’s to denote time. MOTORIZED PINWHEEL – Spinning a motor with a transistor and battery. ZOETROPE – Creating an illusion of motion with a group of still images using an H-bridge motor driver and a DC Motor. CRYSTAL BALL – Using an LCD as a fortune teller. Creating random answers and displaying it on LCD. KNOCK LOCK – Using a buzzer and a servomotor to open a lock after knocking 3 times. TOUCHY-FEELY LAMP – Basically a “thief detector”. Using a metal piece for detection and a LED for warning. TWEAK THE ARDUINO LOGO – Learning the basics of serial communication between Arduino Board and PC. HACKING BUTTONS – Using an optocoupler to hack another device. The Arduino Uno projects book that is provided along with this kit gives you an insight on the basics of programming, by explaining the codes of all the projects in the simplest way possible. For a starter, the book also provides info on the basic components provided along with the kit. The book also covers some basic theory on electronics and then runs into 15 pages of fun...
read more
The post 8 Best Arduino Starter Kit for Beginners appeared first on Electronic Circuits and Diagrams-Electronic Projects and Design.
Splitting crystals for 2-D metallic conductivity
Raspberry Pi DHT11 Humidity and Temperature Sensor Interface
In this project, we will learn about DHT11 Humidity and Temperature Sensor and how the Raspberry Pi DHT11 Humidity Sensor interface works. By Interfacing DHT11 Temperature and Humidity Sensor with Raspberry Pi, you can implement a basic IoT Project like a simple Weather Station.
Overview
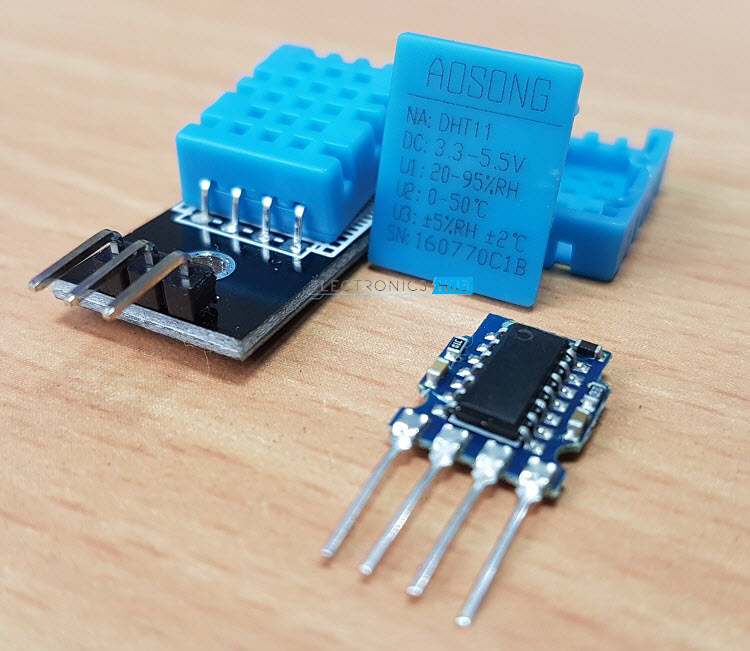
DHT11 is a Digital Sensor consisting of two different sensors in a single package. The sensor contains an NTC (Negative Temperature Coefficient) Temperature Sensor, a Resistive-type Humidity Sensor and an 8-bit Microcontroller to convert the analog signals from these sensors and produce a Digital Output.
I have already worked with the DHT11 Sensor in my DHT11 Humidity Sensor on Arduino Project. In that project, I have mentioned the Pin Configuration of the DHT11 Sensor, how to interface it with a Microcontroller and how the digital Output from the DHT11 Sensor can be decoded.
So, I suggest you to refer to that project once for more information on DHT11 Humidity and Temperature Sensor. I’ll explain a few thing which I have missed in the Arduino Project.
We know that the output from the DHT11 Sensor is Digital. But how exactly we can read this digital data?
Reading Digital Output from DHT11
DHT11 uses a Single bus data format for communication. Only a single data line between an MCU like Arduino or Raspberry Pi and the DHT11 Sensor is sufficient for exchange of information.
In this setup, the Microcontroller acts as a Master and the DHT11 Sensor acts as a Slave. The Data OUT of the DHT11 Sensor is in open-drain configuration and hence it must always be pulled HIGH with the help of a 5.1KΩ Resistor.
This pull-up will ensure that the status of the Data is HIGH when the Master doesn’t request the data (DHT11 will not send the data unless requested by the Master).
Now, we will the how the data is transmitted and the data format of the DHT11 Sensor. Whenever the Microcontroller wants to acquire information from DHT11 Sensor, the pin of the
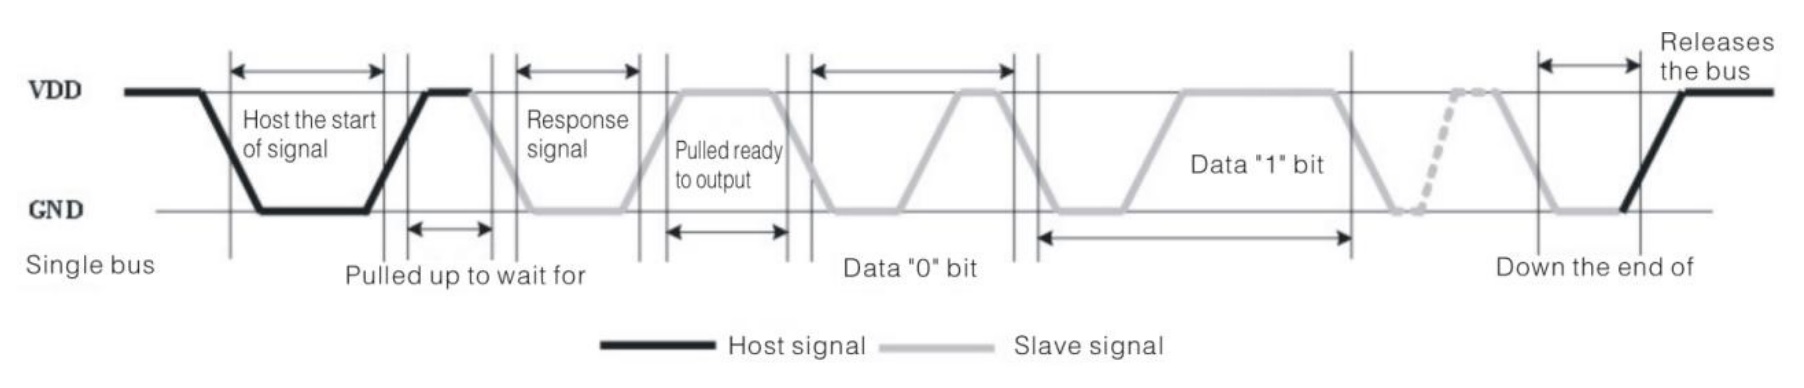
Microcontroller is configured as OUTPUT and it will make the Data Line low for a minimum time of 18ms and releases the line. After this, the Microcontroller pin is made as INPUT.
The data pin of the DHT11 Sensor, which is an INPUT pin, reads the LOW made by the Microcontroller and acts as an OUTPUT pin and sends a response of LOW signal on the data line for about 80µs and then pulls-up the line for another 80µs.
After this, the DHT11 Sensor sends a 40 bit data with Logic ‘0’ being a combination of 50µs of LOW and 26 to 28µs of HIGH and Logic ‘1’ being 50µs of LOW and 70 to 80µs of HIGH.
After transmitting 40 bits of data, the DHT11 Data Pin stays LOW for another 50µs and finally changes its state to input to accept the request from the Microcontroller.
NOTE: We have implemented this logic while programming the Arduino. But for Raspberry Pi, we used a library that takes care of all these things.
Raspberry Pi DTH11 Humidity and Temperature Sensor Interface
By interfacing the DHT11 Sensor with Raspberry Pi, you can build your own IoT Weather Station. All you need to implement such IoT Weather is a Raspberry Pi, a DHT11 Humidity and Temperature Sensor and a Computer with Internet Connectivity.
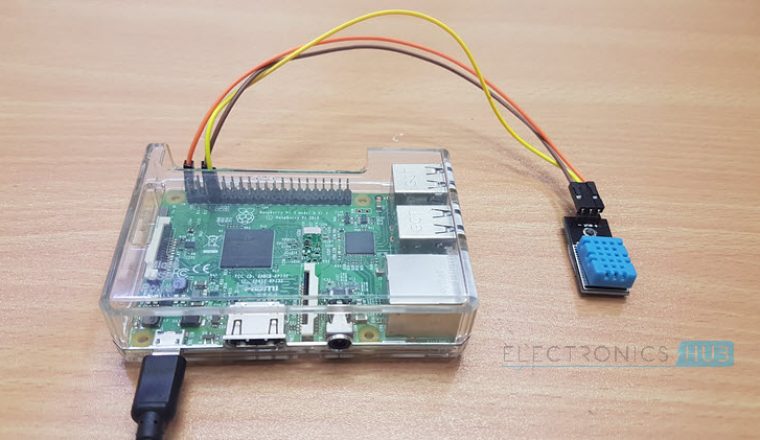
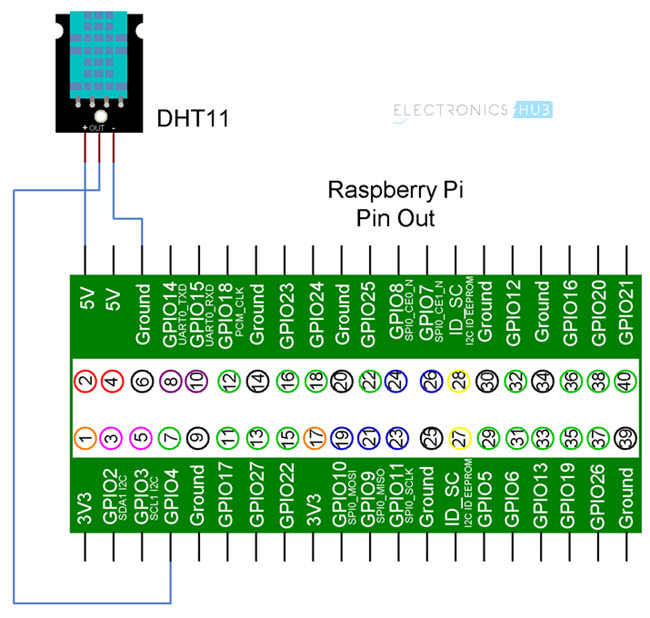
Circuit Diagram
The following is the circuit diagram of the DHT11 and Raspberry Pi Interface.
Components Required
- Raspberry Pi 3 Model B
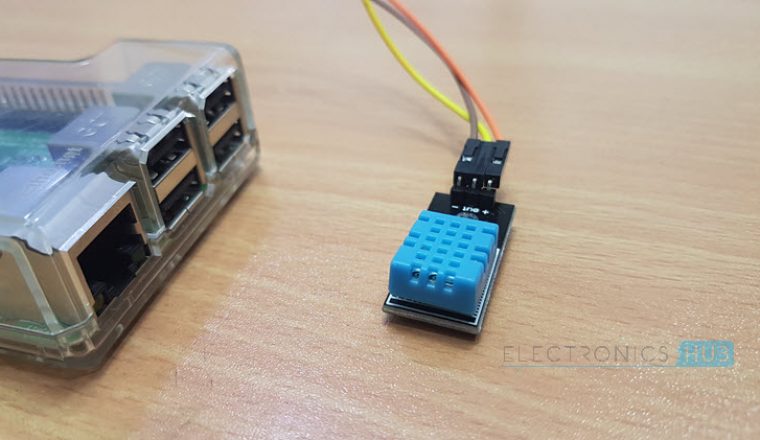
- DHT11 Temperature and Humidity Sensor
- Connecting Wires
- Power Supply
- Computer
Circuit Design
If you observe the circuit diagram, there is not a lot of stuff going on with respect to the connections. All you need to do is to connect the VCC and GND pins of the DHT11 Sensor to +5V and GND of Raspberry Pi and then connect the Data OUT of the Sensor to the GPIO4 i.e. Physical Pin 7 of the Raspberry Pi.
Installing DTH11 Library
Since we are using a library called Adafruit_DHT provided by Adafruit for this project, we need to first install this library into Raspberry Pi.
First step is to download the library from GitHub. But before this, I have created a folder called ‘library’ on the desktop of the Raspberry Pi to place the downloaded files. You don’t have to do that.
Now, enter the following command to download the files related to the Adafruit_DHT library.

All the contents will be downloaded to a folder called ‘Adafruit_Python_DHT’. Open this directory using cd Adafruit_Python_DHT. To see the contents of this folder, use ‘ls’ command.
In that folder, there is file called ‘setup.py’. We need to install this file using the following command.

Code
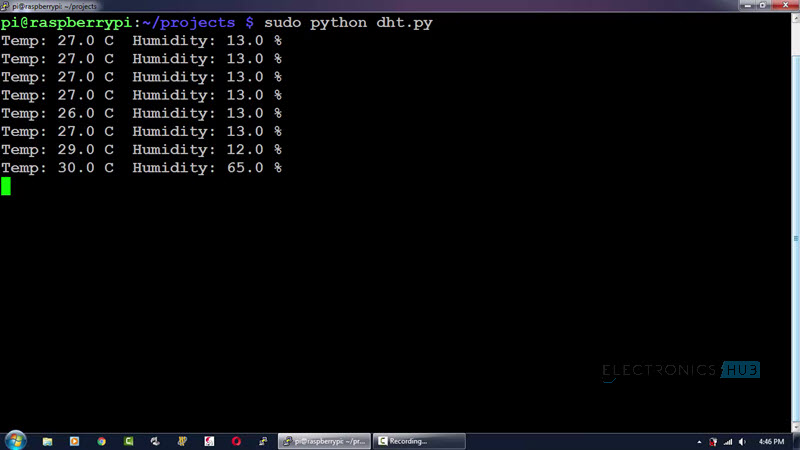
As we are using the library Adafruit_DHT for this project, there is nothing much to do in the Python Programming part. All you need to do is to invoke the library with the Sensor and GPIO Pin and print the values of Temperature and Humidity.
Working
Make the connections as per the circuit diagram and install the library. Use the above python program to see the results.
Applications
DHT11 Temperature and Humidity Sensor is one of the popular sensor modules used by hobbyists for implementing in a lot of IoT Projects. This sensor along with Raspberry Pi can also be used in:
- HVAC Systems
- Thermostats
- Home and Office Climate Control
- Weather Station
The post Raspberry Pi DHT11 Humidity and Temperature Sensor Interface appeared first on Electronics Hub.
10 Best Resistor Kits: Do You Really Need It? This Will Help You Decide!
It’s pretty easy to design exciting fun projects using small electronic components like sensors, capacitors, resistors, processors, controllers, diodes and LEDs. A resistor is one among them.
The main purpose of using the resistor is to reduce the flow of current in a circuit thereby minimizing the huge loss to the electronic devices.
These resistors are available in the market worldwide, for its great functionality to build smart devices like gamers, mobiles, mini-PCs and ensure the people of all ages to explore their knowledge in electronics.
So, when it comes to choosing the resistor kits, it’s hard to decide the right one for each of them is very unique. We have done hours of research on several resistor kits and picked the Best Resistor Kits among the available.
Check them in detail…
1. Projects EPC-102 43 Value Resistor Kit (1Ω- 10MΩ)
The very first one in the list is from E-Projects. It is a very popular brand for designing electronic components and provides quality services to the customers. 96 out of 100 have given 5-star rating for the product quality and performance. For this reason, we have listed number 1 of all the top branded resistor kits.
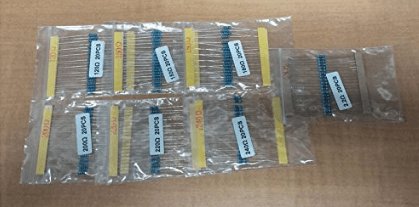
This can be the perfect starter kit for DIYers, electronic enthusiasts, and the hobbyists. When you purchase this kit, it offers the resistance of 1Ω, 10Ω, 15Ω, 100Ω, 150Ω, 1kΩ, 10kΩ, 15kΩ, 100kΩ, 1MΩ & 4.7MΩ.
A resistor color coding chart is also provided along with the kit to make the users understand the color coding concept and effectively assemble the resistors on respective hardware devices.
This is my favorite and best resistor kit at present available in the market. The built quality is good, delivers high performance with less noise signal at the output and very comfortable to use. Other than that it is the most budget-friendly resistor kit compared to others in our lineup.
Buy Now From Amazon
2. Elegoo 17 values resistor kit assortment (1Ω-1MΩ)
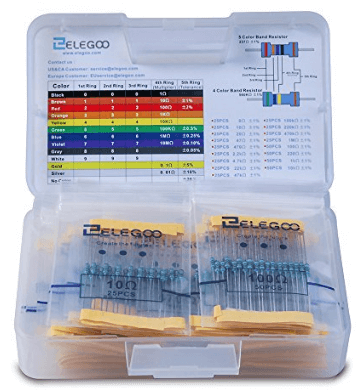
Number 2 on the list is from Elegoo brand. This is a popular brand for manufacturing hardware devices like robots, LED strip lights, remote controllers and many more. It has enough experience in manufacturing and also sells the products at reasonable prices.
This Elegoo branded company is good at providing better customer services. When you purchase this kit, you get a pack of different resistors ranging from 10Ω-10MΩ.
The color coding guide will help you to understand the resistance values and implement on electronic circuits with an ease. Some of the essential features of this 525-pieces Elegoo starter kit are:
- 1/4 W metal film
- 1% of tolerance
- 24-lead SWG pin (0.022 inches, 0.55mm)
- Color coding guide
- RoHS certified
- Plastic case
The amazing components listed in Elegoo starter kit are:
- 10Ω, 20Ω, 470Ω, 2.2kΩ, 4.7kΩ, 22kΩ, 47kΩ, 100kΩ, 220kΩ, 470kΩ, 1MΩ (25-pieces)
- 100Ω, 220Ω, 1kΩ, 10kΩ (50-pieces)
Overall, the Elegoo pack of 525- small resistors kit is very reasonable, has better quality and greater stability. As the resistor components are very small, not recommended for the children below 3-years.
Buy Now From Amazon
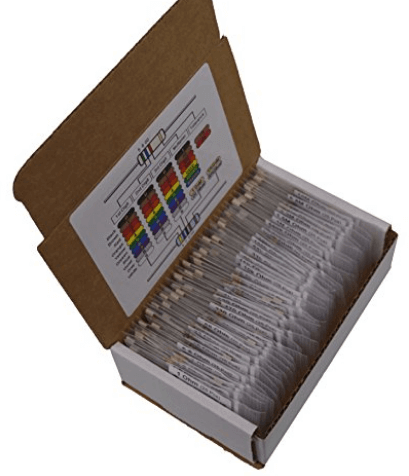
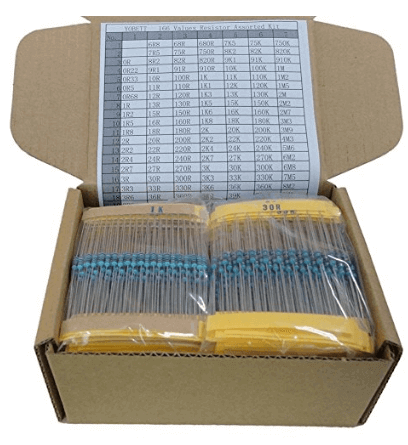
3. Joe Knows electronics 1/4W 86 value 860-pieces resistor kit

Next one in the list is from Joe Knows brand. It is a very popular brand for designing electronic components and offers best services to the customers. That is why it has become an ideal choice for DIYers, hobbyists and the electronic aspirants to design wonderful electronic projects.
As the resistors are made of high-quality copper materials, each specific resistor is neatly packed and labeled accordingly. This Joe knows branded company offers the best price in the industry.
The different resistors offered in the kit are 1Ω, 1.5Ω, 5.6Ω, 10Ω, 100Ω, 560Ω, 1KΩ, 2.2KΩ, 3.3KΩ, 5.6KΩ, 10KΩ, 12KΩ, 15KΩ, 18KΩ, 22KΩ, 100KΩ, 560KΩ, 680KΩ, 820KΩ, 1MΩ, 2.2MΩ, 5.6MΩ & 10MΩ.
The performance of these different valued resistors is fantastic. But the only downside of these resistors is that it cannot handle maximum voltages and currents within the circuit range.
Buy Now From Amazon
4. Yobett 166 values 1/4w resistors pack (0 – 22MΩ) DIP metal film resistor kits
Yobett brand is a choice of professionals and the electronic aspirants. It is affordable, made with the finest materials and very flexible to use on different hardware circuits. That is why we have listed number 4 of all the best resistor kits available in the market.
The main purpose of using these resistors is to regular the flow of current in an active device. The following are the specifications of Yobett resistor kit are:
- Resistance range 1/4W (0 – 22MΩ)
- Resistor tolerance 1%
- Quantities 166 values*10= 1660 pieces.
The different resistance values offered in the kit are 1Ω, 10Ω, 15Ω, 30Ω, 75Ω, 100Ω, 150Ω, 200Ω, 300Ω, 470Ω, 510Ω, 910Ω, 1kΩ, 1.1kΩ, 2kΩ, 3kΩ, 5.1kΩ, 10kΩ, 11kΩ 20kΩ 30kΩ 51kΩ 75kΩ 100kΩ, 200kΩ, 510kΩ, 1MΩ, 2MΩ, 10MΩ, 15MΩ, 20MΩ & 22MΩ
It also contains an instruction manual that allows the users to calculate the resistance values.
The performance of Yobett brand resistor is good because it uses the quality materials for designing the resistors. When compared to others, the cost of this Yobett brand resistor kit is high and very easy to connect with different electronic circuits.
Buy Now From Amazon
5. 22 values 1/4W resistor kit assortment (10Ω – 1MΩ)
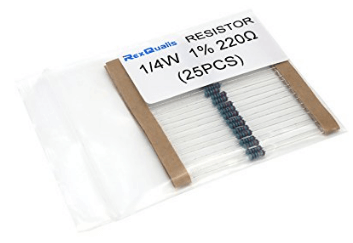
Rexqualis is a professional manufacturer of electronic devices like Arduino and Raspberry Pi. Although there are few reviews for this resistor kit, hundreds of customers buy this product for making science projects or electronic circuit designs.
It is actually a 550-pieces resistor kit with 1% accuracy of metal film resistors ranging from 10Ω to 1MΩ. All these resistor components are packed in a thin cardboard box along with the color coding guide.
The Rexqualis brand resistor package includes 10Ω, 22Ω, 33Ω, 47Ω, 100Ω, 220Ω, 330Ω, 470Ω, 1kΩ, 2kΩ, 2.2kΩ, 4.7kΩ, 5.1kΩ, 10kΩ, 22kΩ, 33kΩ, 47kΩ, 100kΩ, 220kΩ, 330kΩ, 470kΩ & 1MΩ
Overall, the Rexqalis 550-pieces resistor kit is a great choice for DIYer and the engineers because of its greater functionality to craft wonderful projects. It has no major breaking flaws, making it as one of the best resistor kits.
Buy Now From Amazon
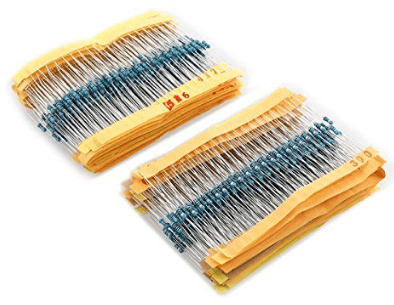
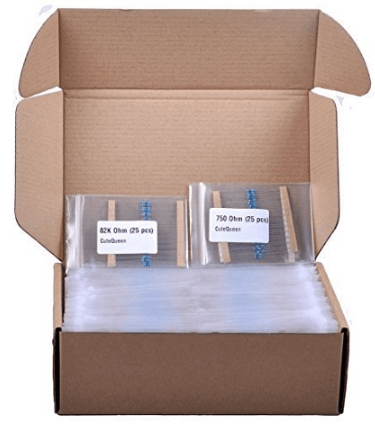
6. Cutequeen 750 pieces, 30 values resistor kit (10Ω – 1MΩ)

Cutequeen is a professional manufacturer for designing LED lights, watches, car robots and many more electronic projects! 73 out of 100 have given good ratings and reviews for this product. That is the main reason for listing number 6 in the best 10 resistor kits.
When you pay money for this kit, you get the resistors ranging from 10Ω-1MΩ (10Ω, 100Ω, 150Ω, 510Ω, 1kΩ, 2kΩ, 5.1kΩ, 10kΩ, 51kΩ, 100kΩ, 300kΩ, 470kΩ, and 1MΩ). All these resistors are neatly packed and labeled accordingly in a thick cardboard box.
You can also place these resistor components on a breadboard for creating your own projects.
The performance of Cutequeen 750-pieces resistor kit is good and also provides wonderful features at affordable prices. The main drawback of this product is that it can resist up to few volts or amperes. If it exceeds the limit then there will be a huge damage to the resistor and will not work effectively.
Buy Now From Amazon
7. WINGONEER 560-pieces 1/4W metal film resistors assorted kit (1Ω-10MΩ)
Number 7 in the list is from Wingoneer brand. As there are only a few reviews for this product, offers better services to the customers. For its easy accessing and low-cost price made us list number 7.
This kit is very easy to access even for beginners and hobbyists who love to start their career in electronics. These resistors are very convenient to use as they are made of durable materials with tolerance 1%.
It is usually a 560-piece resistor kit with 1/4W metal film and the resistors may vary from 1Ω to 10MΩ (1Ω, 5Ω, 10Ω, 100Ω, 220Ω, 270Ω, 330Ω, 510Ω, 1kΩ, 3kΩ, 3.9kΩ, 4.7kΩ, 5.6kΩ, 10kΩ, 15kΩ, 22kΩ, 33kΩ, 39kΩ, 47kΩ, 56kΩ, 1MΩ, 1.5MΩ, 2MΩ, 5.6MΩ, 10MΩ).
Some of the wonderful features of Wingoneer 560-pieces resistor kit are:
- Material is durable metal.
- Total 560 pieces.
- 1/4W metal film resistor accuracy id 1%.
When compared to other resistor kits, Wingoneer brand resistor kits are highly reliable and the functionality is also same; but the only difference is that it can work effectively on complex circuits without getting damaged.
Buy Now From Amazon
8. Ltvystore 3120-pieces (1Ω- 10MΩ) 1/4W metal film resistors assortment kit

The next one in the list is from Ltvystore. It is a very popular brand for designing small electronic components and is committed to providing high customer services. For its wonderful features and portable nature, we have listed number 8.
This is a high-precision resistor kit with stable output and low-temperature coefficient. When resistors are connected to the hardware circuit, generates a low-noise signal at the output.
Some of these resistors aren’t labeled and a bunch of loose resistors in the cardboard box. The major specifications of Ltvystore resistor component kits are:
- Resistance range is 1Ω-10MΩ
- Resistor tolerance is ±5%
- Working voltage is 250V and
- Overload voltage is 500V
This wonderful pack contains 3120-pieces of resistors ranging from 1Ω to 10M Ω (1Ω, 5Ω, 10Ω, 100Ω, 220Ω, 270Ω, 330Ω, 510Ω, 1kΩ, 3kΩ, 3.9kΩ, 4.7kΩ, 5.6kΩ, 10kΩ, 15kΩ, 22kΩ, 33kΩ, 39kΩ, 47kΩ, 56kΩ, 1MΩ, 1.5MΩ, 2MΩ, 5.6MΩ, 10MΩ).
Overall, performance of the Ltvystore resistor kit is good and is much suitable for crafting fun projects. Even a beginner can make use of these resistors effectively and the best way to get the instant resistor collection.
Buy Now From Amazon
9. DIYmall 1/4W metal film resistor variable kit
Last but one in the list is from DIYmall brand. This popular brand is specialized in designing IOT-devices by satisfying the customer requirements and also offers quality services.
These wonderful resistors are made with high-quality materials at reasonable prices. A resistor card is also provided in the kit that will help you to check and analyze the resistance values correctly. All these resistors come in a plastic bag and then enclosed in a cardboard box.
It makes easy for the users to handle effortlessly and the features of these resistor kits are:
- Precision is 1%
- Values 73 and
- With a total of 1460-pieces
Resistors 1Ω to 10MΩ (1Ω, 5Ω, 10Ω, 100Ω, 220Ω, 270Ω, 330Ω, 510Ω, 1kΩ, 3kΩ, 3.9kΩ, 4.7kΩ, 5.6kΩ, 10kΩ, 15kΩ, 22kΩ, 33kΩ, 39kΩ, 47kΩ, 56kΩ, 1MΩ, 1.5MΩ, 2MΩ, 5.6MΩ, 10MΩ).
The performance of DIYmall resistor kit is quite impressive. But the only downside of this product is that it cannot continuously give accurate results at the output for a long time.
Buy Now From Amazon
10. Cutequeen 3325-pieces, 133 values resistor kit (1Ω- 10MΩ)
Yet another important kit from Cutequeen brand. This is the last one in our list of best resistor kits. When compared to others it is very reasonable to buy, quality and performance of the resistors is too good.
Each of these resistor values is labeled individually and packed neatly in a cardboard box. They work really well and all the resistors have been tested within the tolerance.
When you purchase this amazing resistor kit, you get the resistors of ranges (1kΩ, 2kΩ, 5.1kΩ, 10kΩ, 15kΩ, 20kΩ, 30kΩ, 51kΩ, 75kΩ, 100kΩ, 200kΩ, 300kΩ, 510kΩ, 750kΩ, 1MΩ, 2MΩ & 4.7MΩ).
The performance of this cute queen 3325-pieces resistor kit is impressive and is very flexible to work on different platforms. But it does not include a resistor color coding guide. That is why we have listed number 10.
Buy Now From Amazon
Conclusion
This brings to the end of the session, Resistor kits. When it comes to choosing the best one, the Projects EPC-102 43 Value Resistor Kit is our top priority from the list of best resistor kits because of its functionality, greater connectivity, and flexible nature.
Resistor kits offer the values ranging from 1Ω to 4.7MΩ at reasonable prices and provide quality services to the customer at a doorstep. It can be the great starter kit for the engineers and start implementing on various DIY projects.
Go through this amazing resistor kits and share your experience in the comment section given below:
The post 10 Best Resistor Kits: Do You Really Need It? This Will Help You Decide! appeared first on Electronics Hub.
Tuesday, 20 February 2018
Top 14 Best Solar Panel Kits for Homes In 2018
Solar panel kits are a wonderful source for beginners to pros for crafting amazing projects in the physical world. It will brush up your core-skills and also helps to implement the panels on cars, bikes, and ships to reduce the amount of money spent on fuel that has great demand.
The best way to reduce the electricity bill at homes is to make use of solar panel kits in every possible way.
These are very expensive and should be chosen wisely that satisfies all your requirements and compatible with the upgraded systems. So, when it comes to choosing the solar panel kits, you should look into the factors like temperature, efficiency, shading, and thickness.
In this article, I’ve shared the Best Solar Panel Kits that are readily available in the market. Each solar panel kit has unique design and features. Check them in detail!
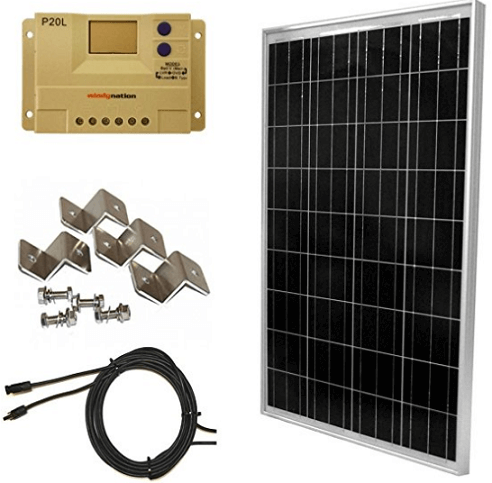
1. Renogy 100 Watts 12 Volts Monocrystalline Solar Starter Kit

Number one on the list is from Renogy brand. The name of the product is Renogy 100-watts monocrystalline solar starter kits. For its easy installation and portable nature made our list in the first place.
It is perfect for the newcomers who are fascinated to learn the interesting concepts and apply to real-time applications like boats, sheds, cabins, and trailers.
You can get this wonderful solar panel kit at reasonable prices. The kit mainly comprises a controller that helps to monitor the solar panel effectively and negative ground controller ensures the safety.
When compared to others, you can expand the power supply up to 400 watts, the input voltage of 12V DC and also implement the PWM (Pulse Width Modulation) technology. When you keep an eye on charge controller, you will be able to see LED indicators and flooded batteries.
A user guide is provided along with the hardware components to guide the newbie starting with an installation process to the maximum amount of power you can apply for performing the specific operations.
The performance of the Renogy solar starter kit is very good and is specially designed for customers who are new to solar technology. Do not damage the rear surface of the solar panel as it will not deliver power to the respective modules.
Pros
- Reasonably priced.
- Battery protection.
- Can charge any other home appliances by supplying a maximum of 12V.
Cons
- Installing solar panel is quite complicated.
- No upgrade option for the microcontroller.
2. HQST 100W/12V Monocrystalline Solar Panel
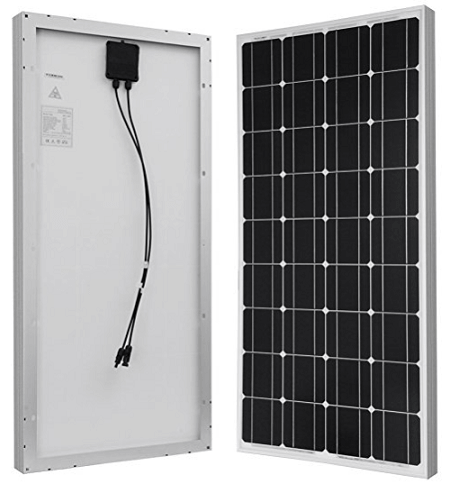
HQST monocrystalline solar panel comes 2nd on our list. This is the popular brand for designing solar panels and sells worldwide. It is committed to providing each customer with high standard services.
In this solar panel starter kit, you will get everything for what you pay for. The price of the solar panel is very reasonable and ensures excellent performance even in low-light areas.
The solar panel makes use of monocrystalline material covered with a tempered glass to provide stiffness. An advanced encapsulation material enhances the performance by providing long service life.
The back of the panel has holes for fast mounting, security purposes and can even withstand high winds & snow loads. Now the specifications for installing a solar-panel kit are given below:
- 100W of maximum power.
- 600V of DC voltage.
- 75A of a short circuit.
- Weighs 16.5 lbs.
Pros
- Highly reliable.
- Easy to install.
- Moderately priced.
- Uses monocrystalline panels that come with greater efficiency.
- Offers 5-years of warranty for materials and 25-years for output power.
Cons
- Occupies maximum space.
3. ACOPOWER 100W Foldable Solar Panel Kit
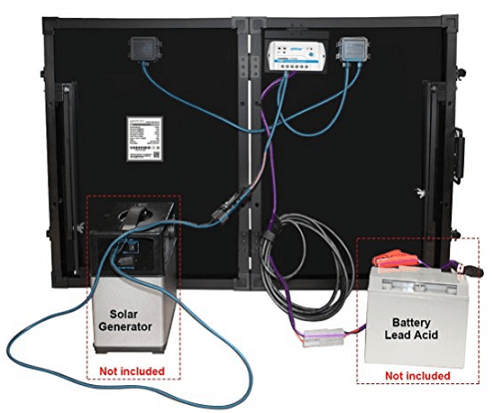
Number 3 on the list is from ACOPOWER manufacturer. The company has 7-years of experience in selling the quality products and serves the customers over 50 countries. For this reason, it has become our top priority.
The solar panel kit contains 2 pieces of monocrystalline panels with 10A charge controller and alligator clips. Additionally, you can also connect to the panel via MC4 connectors to charge the battery faster.
To make the solar panel device work effectively, it should be faced directly to the sunlight. It usually works with 2-different batteries at the same time. The components included in designing the solar panel for home or other appliances are:
- Anderson plug
- MC4 connectors
- Solar charge controller
- And the junction box with
- Handle
- Latches
- Diodes
- Fuse
- Crocodile clips
- Carrying bag and
- Aluminum frame
Although the cost is very high, the performance of ACOPower solar panel kit is excellent. The best part of this product is that it can be connected to different components and produces stable power at the output.
Pros
- Easy to set up.
- Portable nature.
- High-efficiency output.
- Angle adjustment feature.
Cons
- High-cost.
- Made of exotic materials.
- Charge controller doesn’t feature waterproof.
4. WindyNation 100 Watt Solar Panel Off-Grid RV Boat Kit
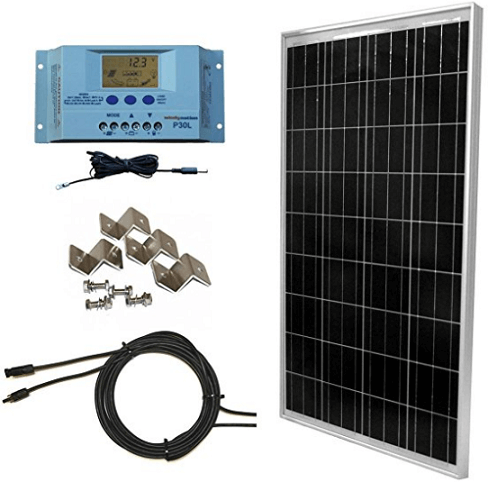
Next one in the list is from WindyNation and the name of the product is WindyNation 100W Solar panel kit. For its uniqueness and budget-friendly nature made us list number 4.
You can charge the panel on an average of 350Wh per day or sometimes it may depend on the availability of sunlight.
The charge controller has adjustable settings to display the readings of voltage, current, and temperature. The controller can handle to a maximum of 4/8-pieces of a solar panel.
Specifications of solar panel kit are as follows:
- 100 watts of maximum power.
- Open circuit voltage is 21.60V.
- Short circuit current is 6.32A.
The windy nation solar panel kit contains the following components:
- Screws
- Clips
- Connecting wires and
- Controller
Pros
- Weatherproof.
- Panels are made of polycrystalline materials.
- Warranty offered by the product manufacturer.
- Adjustable settings of voltages, currents, and temperature.
Cons
- Moderately priced.
5. Flexible Solar Panel MOHOO 100W 18V 12V Ultra Thin Lightweight Cells Solar Charger
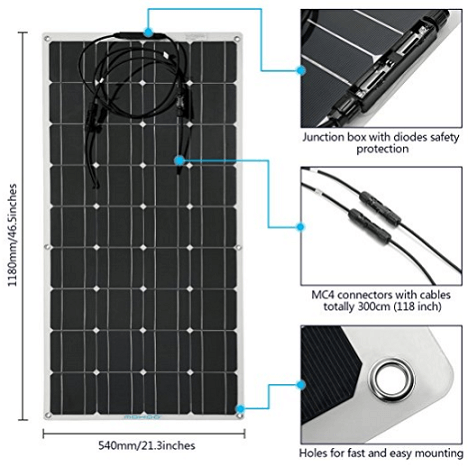
Number 5 is from flexible solar panel kit. It is an updated version of the traditional solar panel kits with a junction box at the front side, unique frameless features, and 4-metal mounting holes. After using this product, customers rated it as 5-star for high-efficiency and durable nature. That is why we have listed 5th position of all 14 solar panel kits.
Although solar panels are not much larger than the traditional model, helps to prevent the interlocking diodes at night. But, when compared to others, it is very affordable and produces high-efficiency results.
Some of the specifications you must maintain when place solar panels on rooftops are:
- Diode
- Voltage is 18V
- Current is 5.5A
- Peak power is 100W
- 21V of open circuit voltage
- Operating voltage is 18V
- Short circuit current is 5.8A
- Working current is 5.5A
- ±5% of Power deviation
The performance of solar panel kit is good and mostly used for bikes, cars, boats, aircraft, solar street lamp and satellites. The major disadvantage of this product is that the hardware parts are made of poor quality materials.
Pros
- High efficiency.
- Greater power supply.
- Water-resistant solar panel.
- Very powerful and light weighted.
Cons
- Did not give any warranty information.
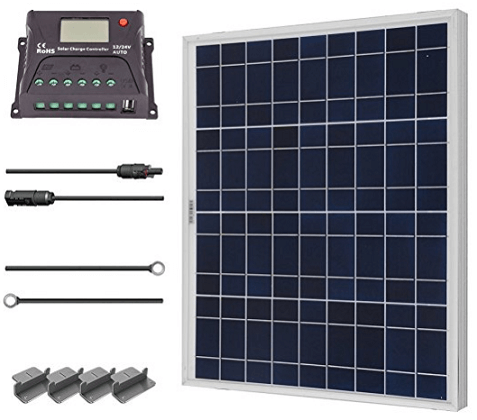
6. ECO-WORTHY 100 Watts 12 Volts Polycrystalline PV Solar Panel

Next one is from Eco-Worthy brand. The name of the product is 110W/12V of polycrystalline PV solar panel. We have listed it number-6 for its Easy installation process and waterproof nature. Let’s get into the details now!
The panel comes with a 12V- battery, pre-drilled holes and M/F connectors. It has advanced water and dust protection system against the environmental parameters.
For charging the battery you can make use wind or solar energy. The polycrystalline panels are ideal for many grid-applications and corrosion resistant aluminum frame is extended for outdoor use also.
The following are the specifications of Eco-Worthy 100W PV solar panel kit:
- Maximum power usage is 100W.
- The output voltage is 20.6V.
- Tolerance is ±3%
- Heavy-duty aluminum frame.
- Temperature ranges from -40°- 80°
Pros
- Waterproof.
- Easy to install and set up.
- Very economical to buy.
- High module conversion efficiency.
Cons
- Poor quality materials.
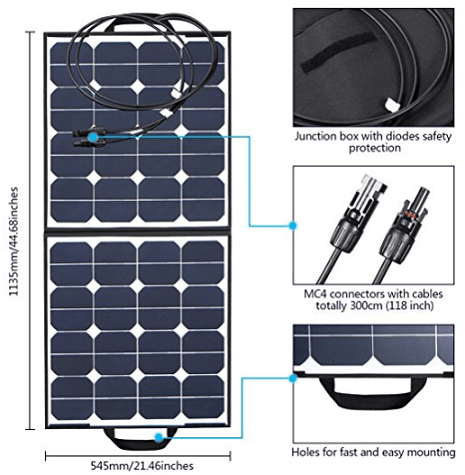
7. Dokio 200 Watts 12 Volts Monocrystalline foldable Solar Panel

Number7 is from Dokio. It is famous for designing high-quality electronic components and my favorite model on the list.
This solar panel comes with thick fabric protection and a carrying handle to move components to other places. Using the solar monocrystalline material it maximizes the output by reducing the loss.
As it is made up of durable materials; very easy to install and make ideal for long-term usages. You can mount the solar panels on boats, cabins, cars, and rooftops. That is why it more suitable for home or outdoor activities and listed number 7 of top 14.
If you wish to use solar panel kits at home or other premises then consider the following parameters:
- Maximum power is 80Watts
- Operating current is 4.44A
- Operating voltage is 18.9V
- Short-Circuit Current is 4.60
- Open-Circuit Voltage is 21.6V and
- Package weighs 2.2kg
The Dokio solar panel kit contents are as follows:
- 80W foldable solar panel
- the solar inverter controller
- User-manual
Pros
- Budget-friendly.
- Low-maintenance cost.
- Can use without batteries.
- 5-years of material warranty and 25-years of output warranty.
Cons
- Occupies more space.
- Solar energy is not consistent.
8. Solar Panel, MOHOO 100W Bendable Foldable Thin Lightweight Solar Panel Battery Charger
When it comes to solar panels, Mohoo has created a brand by providing the finest features available in the market. Though it is of high cost, we made number 8 in the list of best 14 because of its power usage capacity and flexible nature.
If you make use of solar panel then you will get greater power efficiency and is no longer considered as a traditional solar panel kit.
When compared with other solar panel kits, it has high conversion rate and foldable option. This water-resistant solar panel is more durable than traditional models making the panel easy to carry to different places.
The overall performance of Mohoo foldable solar panel is fantastic. But the only thing is you need to connect the solar panel to the controller via MC4 connectors.
Pros
- Foldable.
- Waterproof.
- Flexible nature.
- High conversion rate.
- Made of environmental-friendly materials.
Cons
- Too expensive.
- Require more space.
9. WINDYNATION Complete Solar 100 Watt Panel Kit
Number 9 is Windynation solar panel kit. For its easy handling nature and multiple adjusting options; attracts the users to purchase this wonderful product without any delay. That is why we have listed number 9.
The windy nation solar panel kit is specially designed for boats, cabins, home by providing 100 watts of renewable power.
Its function is very similar to the other solar panel kits. The LCD screen displays the voltage reading, panel status, battery charging state and DC load line.
Solar panels are compatible with lead acid, gel and lithium batteries. It can even provide a maximum of 25Ah of charge per day.
Additionally, it incorporates the controller to monitor the power supply (up to 24V). The major components present in the Windynation solar panel kit are as follows:
- Screws
- Clips
- MC4 connectors
- Mounting hardware
- Connecting wires
- Solar panel and
- Controller
Pros
- Reasonably priced.
- Low-maintenance cost.
- Upgradable options.
Cons
- No warranty information.
10. Renogy 50 Watt 12 Volt Polycrystalline Solar Starter Kit
Yet, another model from Renogy brand with polycrystalline materials. It is similar to the 1st one in the list but the slight difference is the power factor of 50 Watts.
This wonderful kit is specially designed for the customers who are new to solar technology by providing the applications of trailers, boats and small power stations. It is a budget-friendly device that has all the necessary components to convert the solar (light) energy into the electrical energy.
A user-manual is given along with the hardware components to guide the users by providing the electronic concepts with simple diagrams and graphs. Here are the few elements of Renogy polycrystalline solar kit:
- Cable
- Solar panel
- PWM charge controller
- MC4 connector (M/F)
- Power adapter
- Clips and
- Screws and nuts
Pros
- Reduces electricity bill.
- Budget-friendly.
- Offers an instruction manual.
Cons
- The polycrystalline material is not much effective.
11. 30W Panel Foldable HKYH Solar Panel Lighting Kit
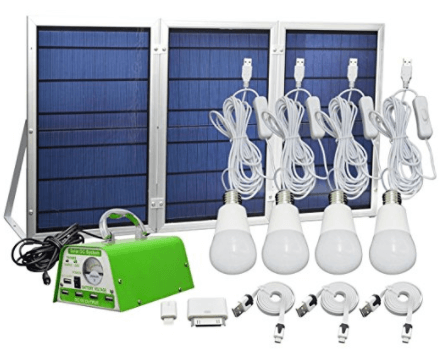
Next one in the list is from HKYH solar panel kit. This branded company is very popular and is committed to providing high customer services.
Just like others, this solar panel kit also provides electricity without any deviation. It is completely an independent power system with a foldable solar panel and large output power. The multiple outlets allow the LED bulbs to work at the same time.
Sometimes it can be used as a portable power supply device and 5V/2A outlet quickly charges cell phone, power banks, shaver and fans.
The parameters you should consider before purchasing the HKYH solar panel kit are:
- Polycrystalline solar panel 11V/30W
- Lithium battery – 7.4V, 13AH
- Light source is 2W LED (2), 3W LED (2)
And the components available in the HKYH solar panel kit are:
- Adapter
- Power cord
- Instruction manual
- DC solar system
- 2W-3W LEDs and
- Foldable solar panel
Pros
- Reasonably priced.
- Flexible to use.
- Uses polycrystalline material.
Cons
- Not a waterproof.
12. ALLPOWERS 100W 18V 12V Solar Panel Kit
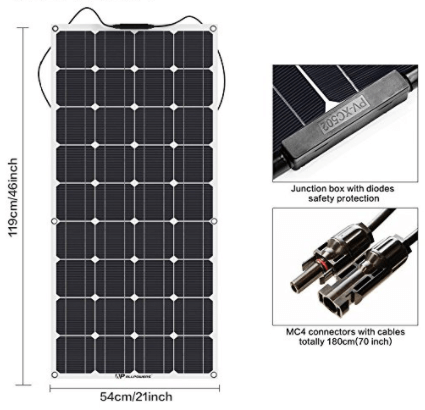
Number 12 on the list is AllPowers manufacturer. The name of the product is AllPowers (100W-18V- 12V) solar panel kit. We have listed in 12th position because of its few limitations.
This wonderful kit can deliver high conversion efficiency, fast mounting and greater power efficiency. When compared to other solar panel kits, it makes use of monocrystalline material and is the reason for the panel to bend.
Maintain the following specifications when you design a project or implement on rooftops:
- Optimal power is 100W
- Working voltage is 18V
- Working current is 5.56A
- Short circuit current is 5.8A
- 20V of Open circuit voltage
- Snow resistance is 113psf
- Air resistance is 50psf and
- Dimensions are 119*54*0.25cm
The performance of AllPowers solar panel kit is good because it is protected with a transparent medium (waterproof too). But the only downside of the product is that the components are made of poor quality materials.
Pros
- Waterproof.
- Flexible and very convenient to use.
- Offers instruction manual.
- 18-months of warranty.
Cons
- Expensive kit.
- Poor built quality.
- Didn’t mention warranty details.
13. Suaoki 100W 18V 12V Solar Panel Charger
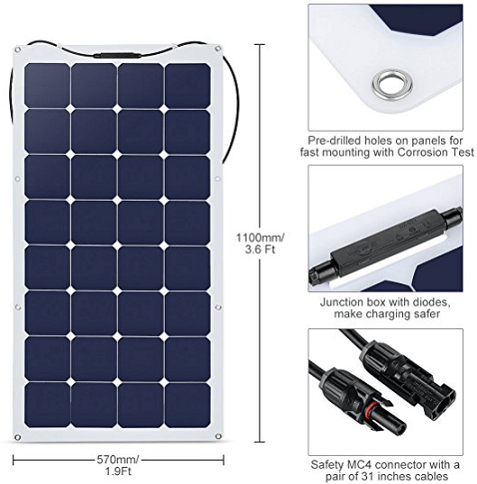
Last but one in the list is from Suaoki and the name of the product is Suaoki (100W-18V-12V) solar panel kit.
The materials or the components used in the solar panel kit are water-resistant and also offer a bendable panel with 30° smooth curve. It is 25% efficient and the diode prevents the reverse drain current at night times.
You can easily mount this on rooftops, boats, cabins or on other surfaces. The following parameters of Suaoki solar panel kit are to be considered:
- MC4 connectors.
- 100W maximum power.
- 8V of optimum voltage.
- 62A of optimum current.
- Working temperature is -40 to +85℃
Overall, the performance of Suaoki solar panel is impressive because of its portable design and water-resistance nature. But the downside of the product is that the hardware parts of the solar panel kit are made with poor-quality plastic materials.
Pros
- Highly durable.
- Water-resistant.
- Bending option.
- Easy to install.
- Heat dissipation capacity.
Cons
- Poor quality plastic is used.
- Not recommended for children below 5-years.
14. Newpowa100W/12 V Polycrystalline Solar Panel

Finally, end up with the Newpowa polycrystalline solar panel. It is a very popular brand that provides quality products and better services to the customers. Though it offers quality products, there are some minor elements that made us list number 14.
When compared to others the performance of the Newpowa solar panel kit is too good because it can work in different environments, portable design and long-lasting. If you see the rating 85 out of 100 have given a 5-star rating and if you want to have the solar panel in your home within your budget then go for it.
Along with the hardware parts, an instruction manual is given to the customers to guide them about the working of a solar panel with neat sketches. The major specifications of Newpowa polycrystalline solar panel are:
- 100W maximum power
- Voltage is 17.2V
- Current is 5.81A and
- 3-feet MC4 cables
Pros
- Portable design.
- High conversion efficiency.
- Can use without battery.
- Very economical to buy
- 25-years of output power warranty by the product manufacturer.
Cons
- Solar energy isn’t consistent.
- Poor panel efficiency.
Conclusion
Of all, my top pick will be Renogy 100W/12V Monocrystalline Solar Starter Kit because it was designed for entry-level candidates to professionals for understanding the concepts without any difficulty.
This starter kit mainly features the controller and PWM-technology that in turn responsible for the overall performance. Though the product is costly, for its easy installation process and portable nature made our list in the first place.
If you wish to have a solar panel in your home then immediately purchase the kit to save time and money spent on other resources.
Solar panel kit is perfect for newcomers who are fascinated to learn the interesting concepts and apply to real-time applications. It will definitely be a great asset for the children to get into the core electronics.
Just get it with a single click and tell us how you are benefitted in the comment section given below:
The post Top 14 Best Solar Panel Kits for Homes In 2018 appeared first on Electronics Hub.
-
CMOS (Complementary Metal Oxide Semiconductor) The main advantage of CMOS over NMOS and BIPOLAR technology is the much smaller power dis...
-
I was first introduced to logic gates when I was around 14 years old. I had heard that computers consisted of ones and zeroes. But I didn’t...
-
Do you need a MOSFET gate resistor? What value should it be? And should it go before or after the pulldown resistor? If you’re a bit impati...


