Tuesday, 30 June 2020
Study reveals magnetic process that can lead to more energy-efficient memory in computers
Understanding of relaxor ferroelectric properties could lead to many advances
Monday, 29 June 2020
Wearable-tech glove translates sign language into speech in real time
Saturday, 27 June 2020
Extensive review of spin-gapless semiconductors: Next-generation spintronics candidates
Chemistry paves the way for improved electronic materials
Friday, 26 June 2020
New boron-lanthanide nanostructure
Thursday, 25 June 2020
Self-powered alarm fights forest fires, monitors environment
Wednesday, 24 June 2020
How to Create Gerber Files in KiCad
Gerber files are actually images of the different layers of your Printed Circuit Board (PCB). And it’s a universal way of sending your design to a PCB manufacturer. In this tutorial, I’ll show you how to create these files in KiCad.

How Gerber Files Work
Gerber files use the Gerber format.
When you design a PCB in KiCad (or any other software), you are drawing different layers. For example, the copper on top of your board is drawn in one layer. And the top silk print is drawn in another layer.
Each Gerber file represents only one of these PCB layers. That means you will usually get seven files for a two-layer board:
- Board Outline
- Top Copper Layer
- Bottom Copper Layer
- Solder Stop Mask
- Solder Stop Mask
- Silk Top
- Silk Bottom
If you want to create a stencil for solder paste, you also need the solder paste layers.
Drill Files
For some reason, it’s normal to use the Excellon file format to create drill files. That’s why you have to create a drill file in addition to the files above.

Creating Gerber Files in KiCad
Start by opening your KiCad design in the Pcbnew (the PCB Editor of KiCad).
Then go to the File menu and select Plot…
A window will pop up.
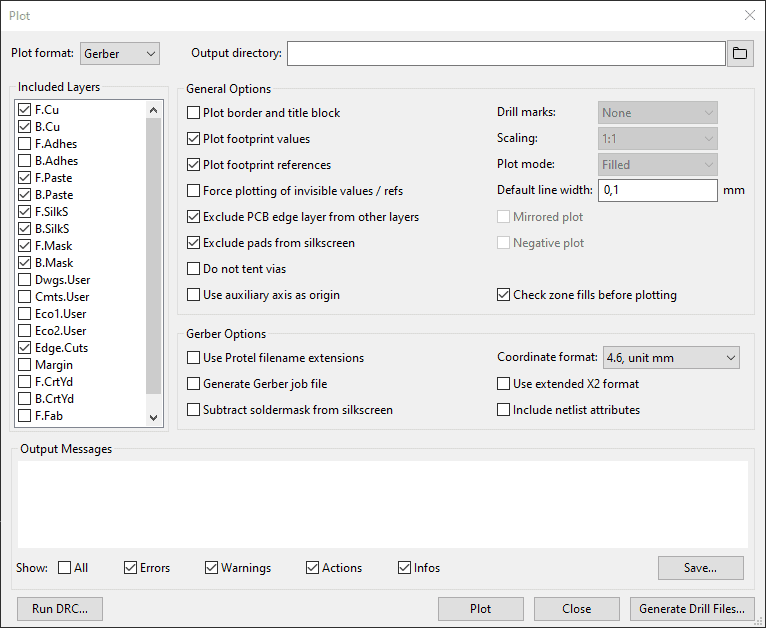
Select the layers you want to include. Then click on the Plot button to create the Gerber files. If you leave the Output directory field empty, the files will be saved in the same folder as your project files.
Creating Drill Files in KiCad
To create Drill files, click on Generate Drill Files… to open the Drill File dialog.
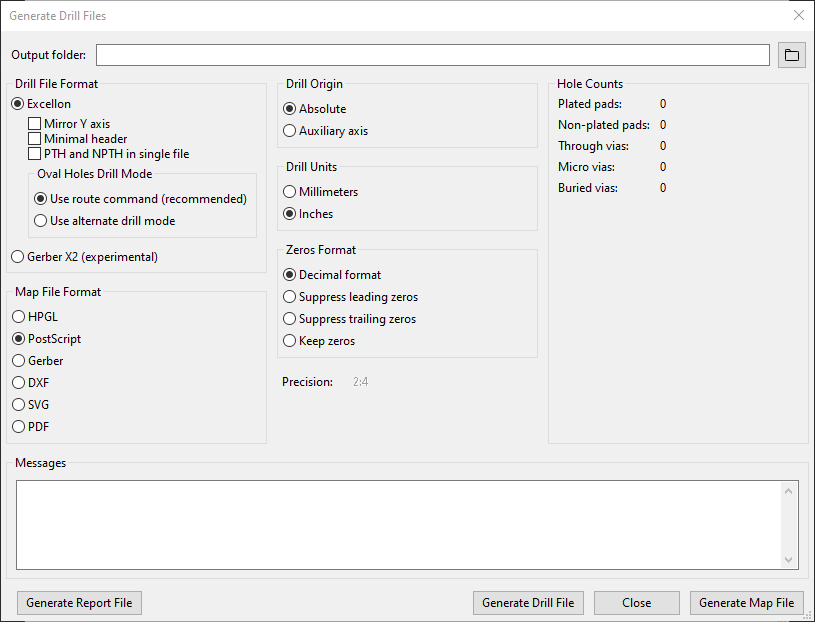
You can usually leave the default options. Then click the button Generate Drill File. In the Messages field, you’ll see a message with the filename of the generated file. It should have a .drl ending.
Instructions For Specific Manufacturers
There are a lot of options when generating these files. Often the PCB manufacturer you want to use will have instructions on what options to choose.
Questions?
Are you struggling with Gerber files? Or are any of the instructions above unclear?
Let me know in the comment field below!
Copyright Build Electronic Circuits
How to learn a new skill this summer
Sometimes when I need to relax and focus, I listen to recordings of nature sounds. Like birds singing and insects buzzing in a summer garden.
But today I realized I could just open the window!
That means the summer has set in for real here in Norway.
The summer is usually a time when we have more time on our hands.
How about you use that extra time to learn a new skill?
To learn a new skill, it’s not enough to read. You also have to practice.
But where do you start?
And exactly what should you practice?
Lately, I’ve spent time updating my website with free lessons:
https://www.build-electronic-circuits.com
With new categories so that you can find the topics you’re most interested in.
You can use it to learn new skills.
Here are a few examples:
Learn a skill: Soldering
- Find some interesting circuits you’d like to try (Category: Circuits)
- Buy the components you need + a prototyping board or two (Category: Basic Electronics)
- Follow the circuit diagram and solder the circuits onto the prototyping board (Category: Practical Skills)
Learn a skill: PCB Design
- Go through the KiCad tutorial on how to make your first PCB (Category: PCB Design)
- Find a circuit diagram for an interesting project (Category: Circuits)
- Design that circuit diagram in KiCad (Category: PCB Design)
- Order board prototypes and the necessary components (Category: PCB Design)
- Then solder up your PCB (Category: Practical Skills)
Learn a skill: Building circuits on a breadboard
- Go through the guide and video on how to use a breadboard (Category: Basic Electronics)
- Find a fun circuit to try. For example, the blinking LED circuit (Category: Basic Electronics)
- Order a breadboard and the necessary components (Category: Basic Electronics)
- Build the circuit (Category: Basic Electronics)
- Find more circuits to practice with (Category: Circuits)
There are lots of skills you can learn this summer. What’s it going to be for you?
If you want to learn with support and become part of a group of friendly hobbyists, musicians, artists, entrepreneurs, teachers, and more – I also want to invite you to check out Ohmify. More info here:
Keep On Soldering!
Oyvind @ build-electronic-circuits.com
Copyright Build Electronic Circuits
The Soldering Tools That Make Your Life Easier

The only soldering tools you really need to get started with soldering are a soldering iron and some solder. If you just want to get started, that’s what I recommend you get.
Even though you can do a lot with just a soldering iron, getting a few extra tools could make things easier.
In this article, I’ll show you what the basic soldering tools are.
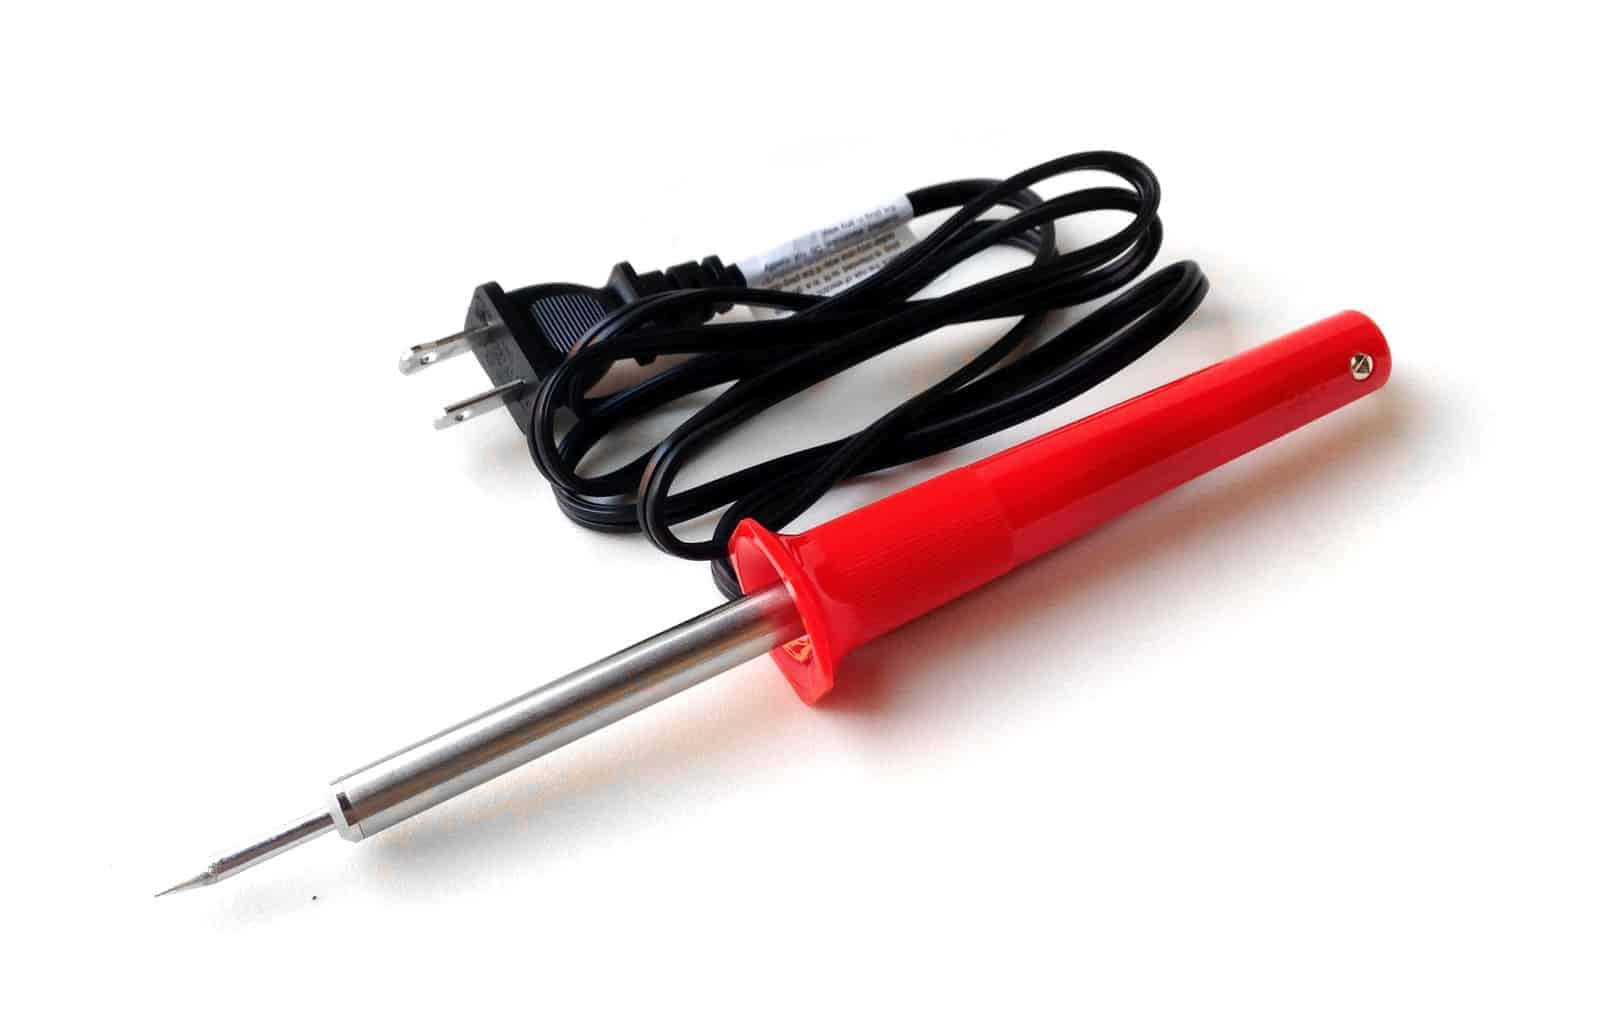
Soldering Iron
You can’t do much soldering without a soldering iron.
But a soldering iron does not have to be expensive. You can find soldering irons for less than $10 that would work for most beginners’ needs. But as you progress and you want to make more advanced boards, you might want to invest a bit more.
I’ve written a guide on how to find the best soldering iron for your needs. Read that article if you want to solder, but have no idea which soldering iron to choose.
Even though not a “tool”, you’d also need some solder wire to solder.
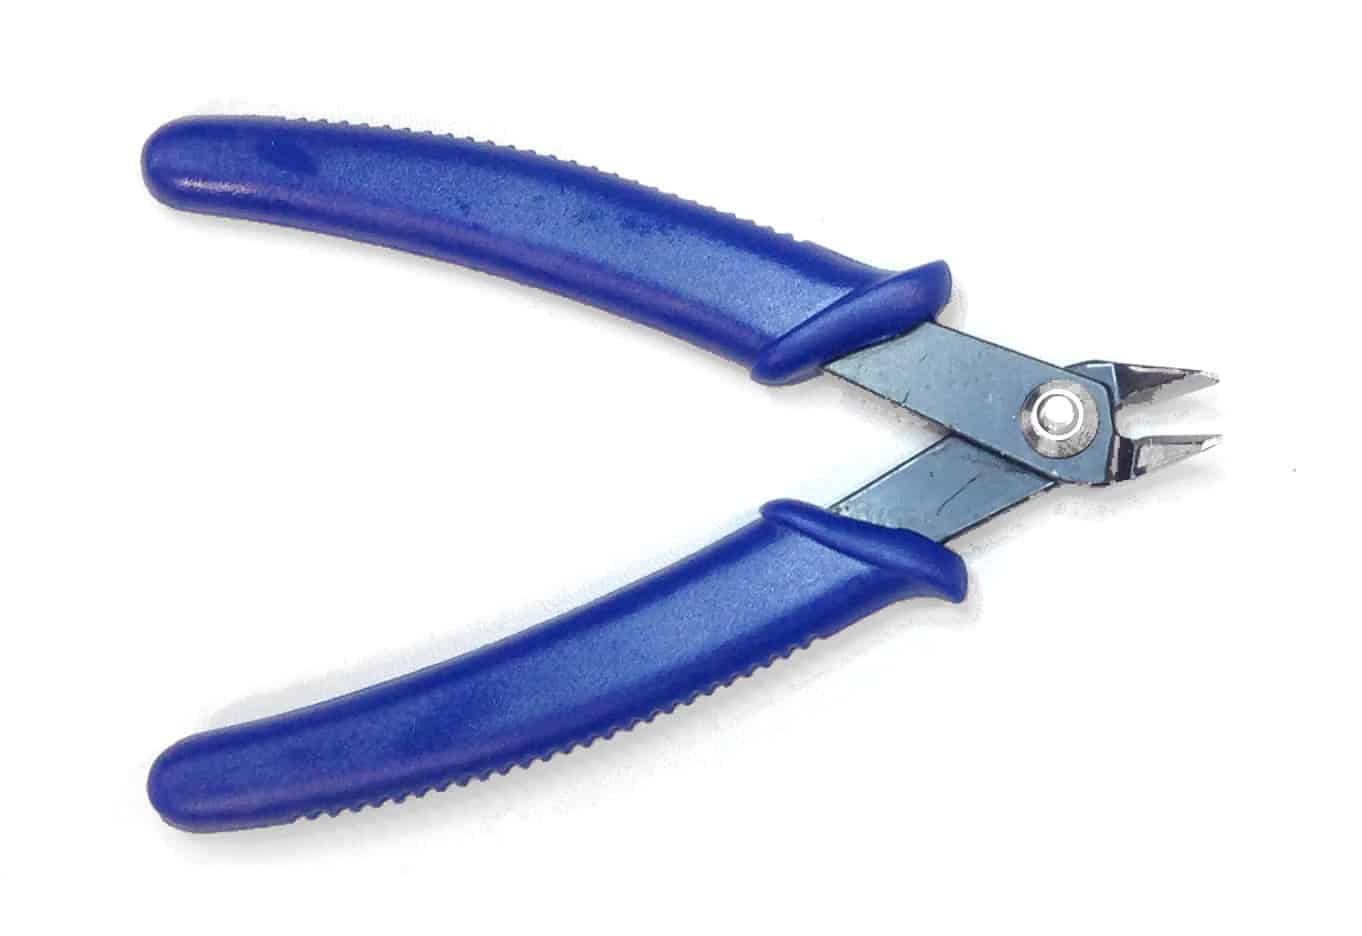
Wire Cutter
The wire cutter is a very handy little soldering tool. Use it to cut long component legs, or to strip the end of a wire.
They also go under the names flush-cutters, diagonal cutters, electronic snippers, clippers, etc.
I’ve never put much money into this tool. The cheapest available is usually good enough for most things. For example this one from Hakko.
I’m old-school and prefer to use a wire cutter. But you can also consider making your life easier with a wire stripper.
Soldering Tools For Desoldering
Sometimes you make a mistake. Or you need to replace a component in a circuit. This means you have to desolder to fix it.
There are two tools I use for desoldering: The solder sucker and the solder wick.
Solder sucker
The solder sucker, or solder pump, is a mechanical vacuum pump. It sucks the solder away from the solder joint. Just heat the solder joint to make the solder fluid, then suck it off with the solder sucker. I use this tool when I need to remove a lot of solder at once.
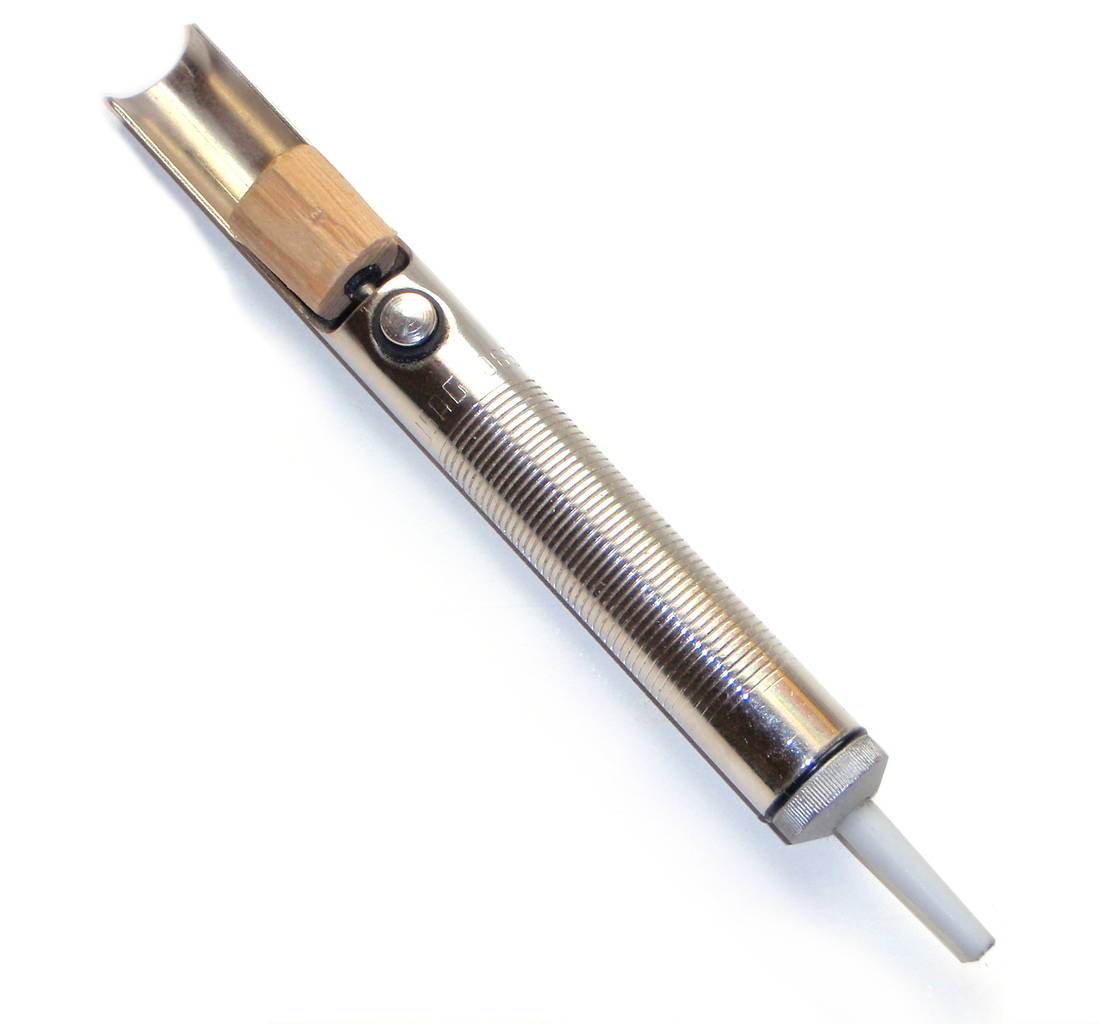
Here’s a nice bundle with both a solder sucker and a solder wick.
Solder wick
The solder wick is another tool for removing solder. It’s made up of copper threads that will absorb the solder from the solder joint.
I use the solder wick for removing small amounts of solder. For example to remove “solder bridges” between pins on a chip. Or if there’s a bit of solder left on a bigger solder joint that the solder sucker just won’t suck.

Here’s a nice bundle with both a solder sucker and a solder wick.
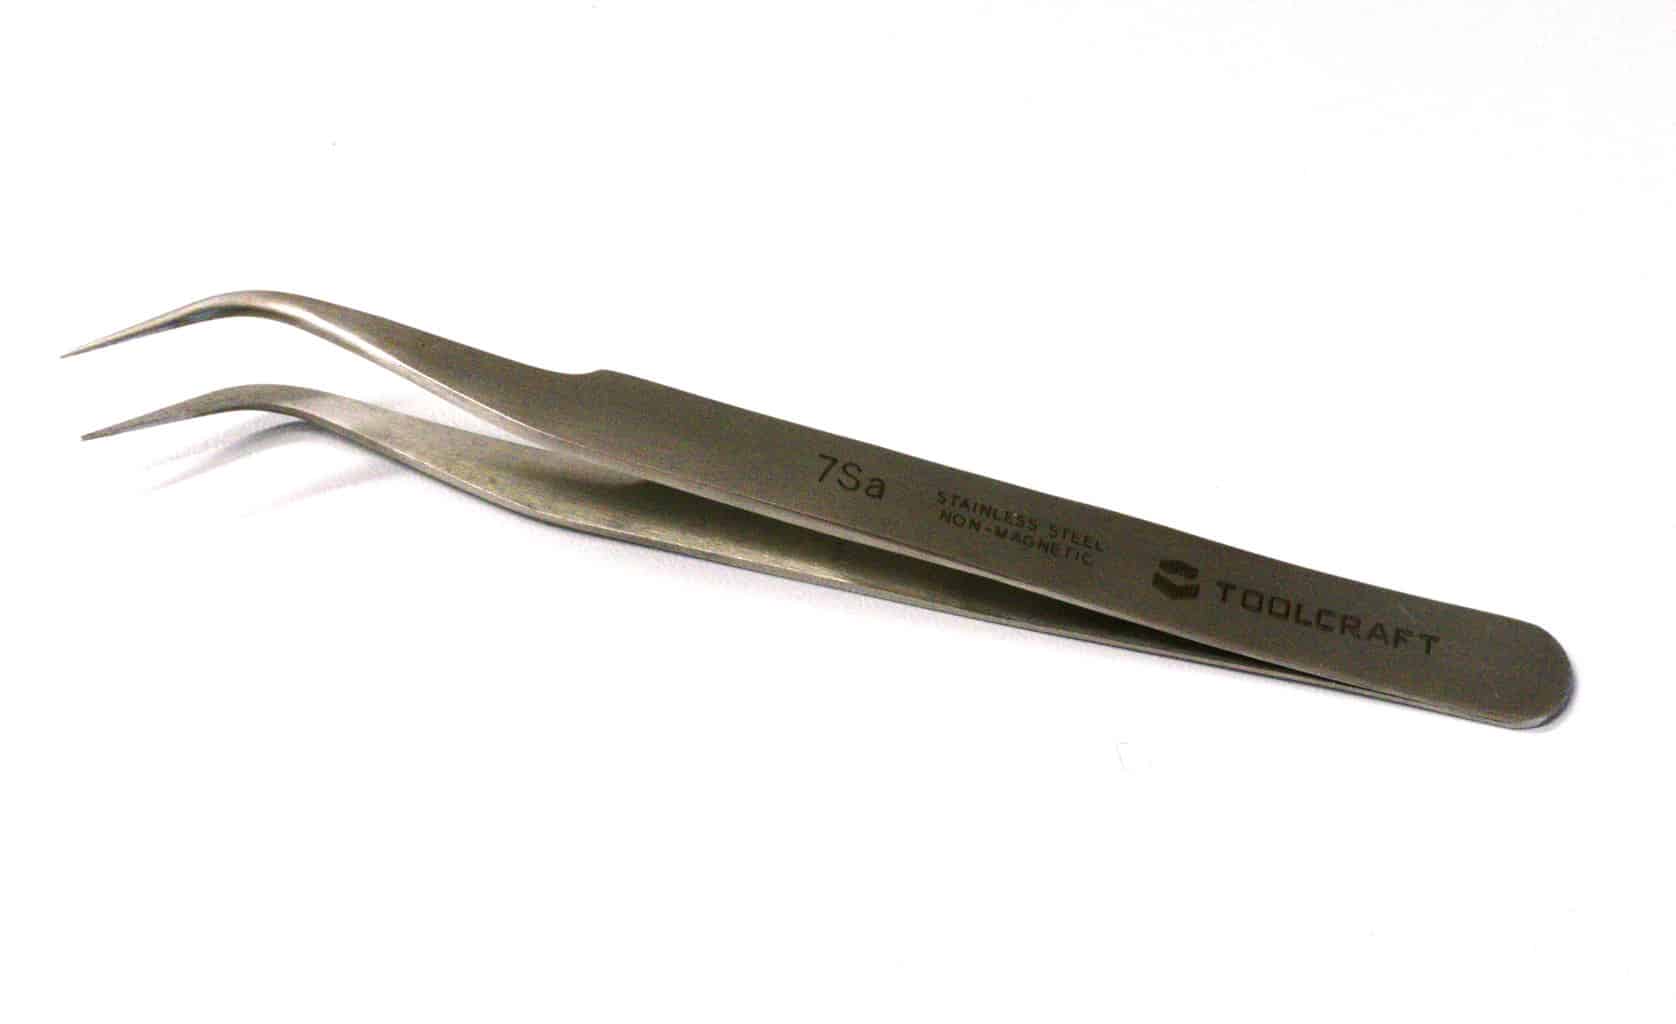
Tweezers
Tweezers are great. You can use them to keep components in their place and to avoid burning your fingers when soldering.
If you ever soldering surface mount components, these are very useful for placing small components.
USB Microscope
My USB microscope has been invaluable in some debugging situations with fine pitch components. With this you can for example discover tiny solder joints between pins that are not supposed to be there. This is also very useful for people who has problems with they eyesight.
This is not something that has to cost hundreds of dollars. You can find microscopes that are good enough for less than 50 bucks. For example this USB microscope for electronics that has gotten a lot of great reviews.

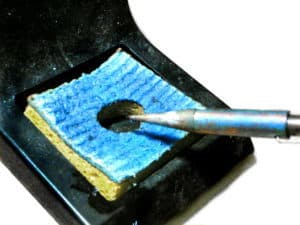
Wet Sponge
A wet sponge is very useful for cleaning the tip of the soldering iron. The tip is hot which means it will oxidize very fast and get dirty. A clean tip transfers heat faster and makes your soldering easier.
A sponge is so cheap anyway, so you should always keep one together with your other soldering tools.
Note that if you buy a soldering iron stand, a sponge is usually included.
Soldering Stand
A soldering iron gets hot, so it’s important to place it in a safe way in between soldering. A soldering iron stand is very handy for this. Since it takes up a lot of space, I don’t bring mine when travelling, but I always have one at my desk in Norway.
It only costs around 5 bucks, so I think it’s worth having one. Here’s a soldering iron stand from Elenco that is perfect for a hobbyist.

Safety Glasses
A pair of safety glasses is something I really recommend when soldering. Okay, I admit that I don’t *always* use them myself. But, the consequences of getting hot soldering splashed into your eye can be terrible. So, please use them. And I will also do my best at remembering to use them from now on.
A pair of normal glasses is better than nothing. But if you want to look like a scientist, here’s a reasonably priced pair from Amston.

Where Do You Buy Soldering Tools?
The tools you need can usually be bought at your local hardware store. But you can also buy the tools from an online shop. I’ve created a list of recommended places to get tools and components for electronics.
You can find the list here: Where To Buy Electronic Components And Tools?
If there are any tools you are using that you can’t find on the list, let me know in the comments field below.
Return from Soldering Tools to How To Solder
Copyright Build Electronic Circuits
Tuesday, 23 June 2020
Laser allows solid-state refrigeration of a semiconductor material
Monday, 22 June 2020
New design for 'optical ruler' could revolutionize clocks, telescopes, telecommunications
Geometry of intricately fabricated glass makes light trap itself
Strainoptronics: A new way to control photons
Friday, 19 June 2020
Unique material design for brain-like computations
Measuring a tiny quasiparticle is a major step forward for semiconductor technology
Thursday, 18 June 2020
Researchers make next-generation, high-toughness battery component
Two-dimensional carbon networks
Wednesday, 17 June 2020
The Sunrise Wake-Up Alarm
In this tutorial, you’ll learn how to build a sunrise wake-up alarm. It’s a light-sensitive circuit that will activate a buzzer when you have light shining directly on it. Place it in your window at night and the alarm will activate in the morning when the sun rises.
This circuit uses an active buzzer that works with 9V. Find the breadboard diagram and full parts list below the video.
The Components You’ll Need
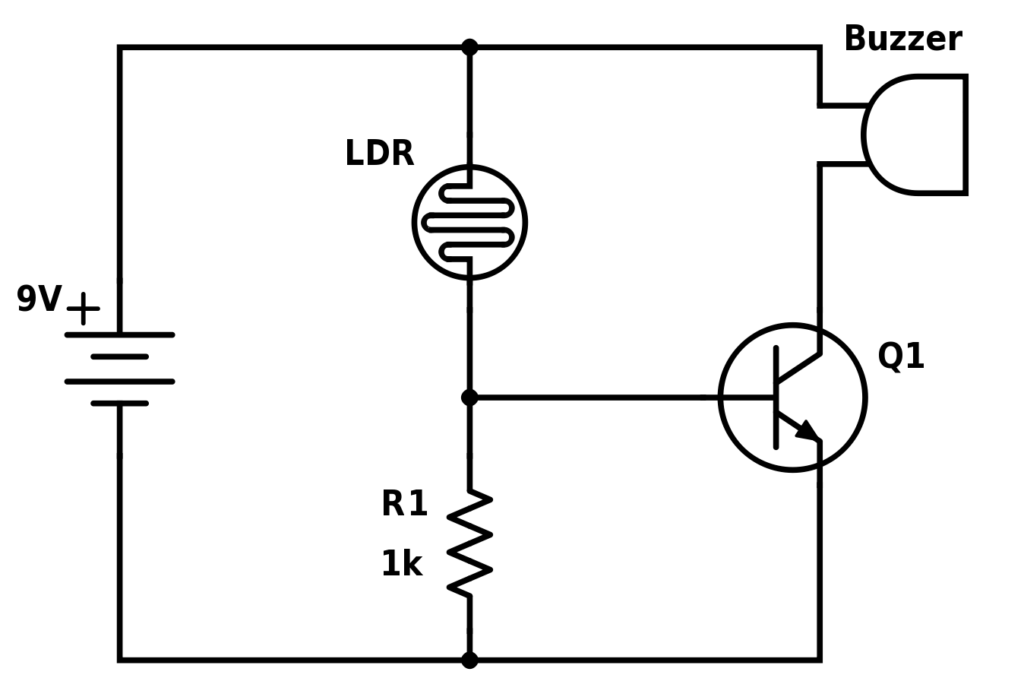
- 9V Battery
- Breadboard
- Wires (For example Dupont male-to-male)
- LDR: Photoresistor
- Q1: Transistor BC547
- R1: Resistor 1 kΩ (replace with a potentiometer to adjust sensitivity)
- Buzzer: Active (9V)
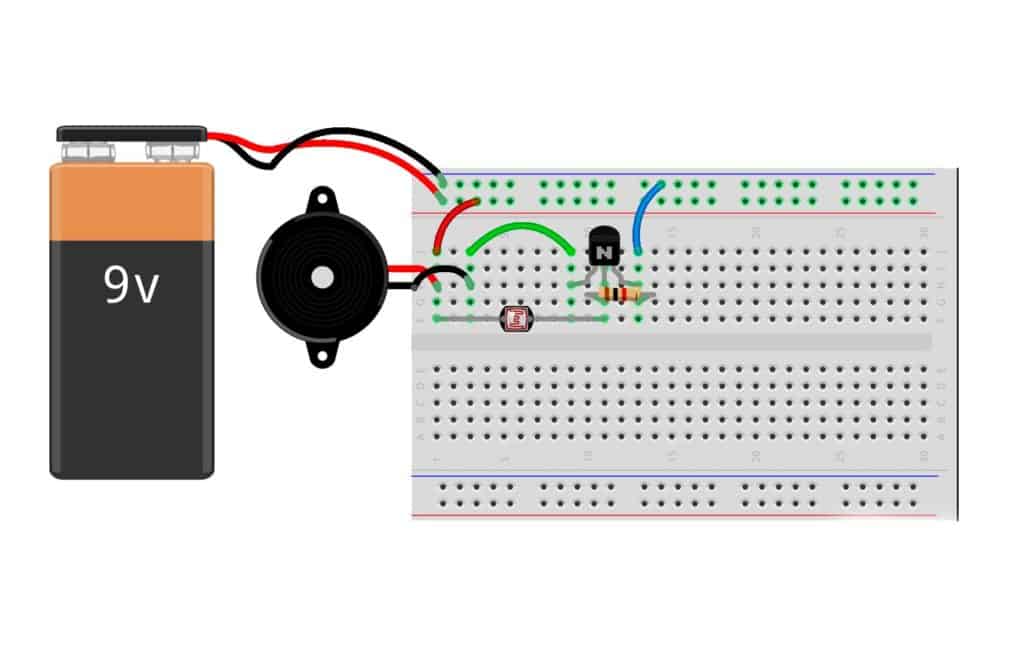
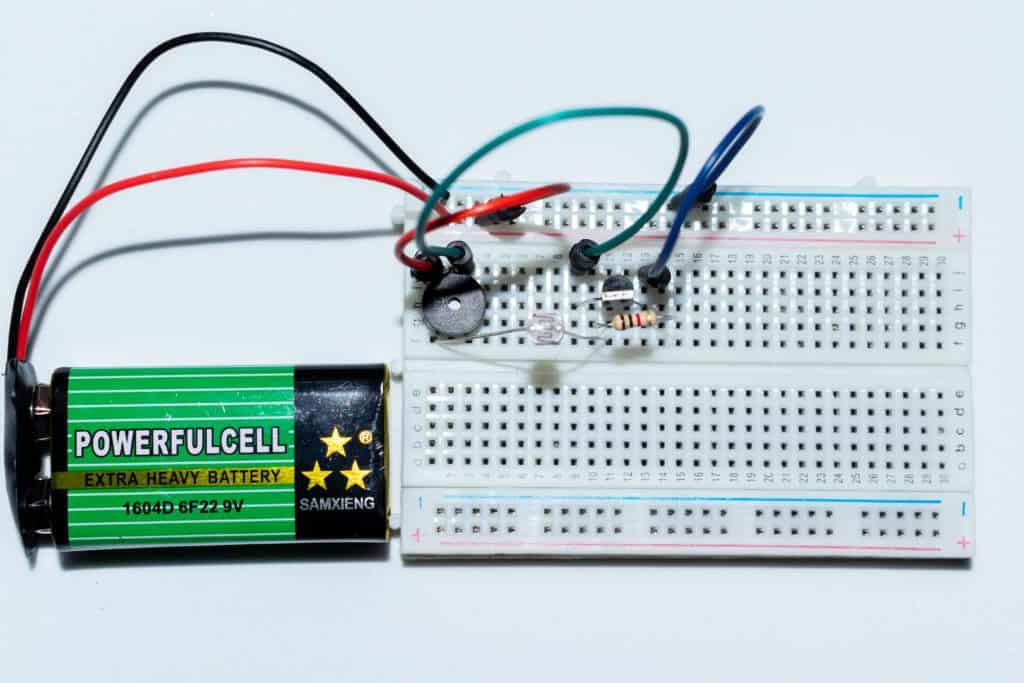
To test this circuit, I recommend you connect it on a breadboard since it’s quick and you can easily try different resistor values. If you decide that you want this more permanent, you can solder it onto a stripboard or even make your own PCB design out of it.
Below you can see how I connected this circuit on a breadboard:
How The Circuit Works
This circuit is very similar to the Automatic Night-Light Circuit. But while the night-light turns on the transistor when it gets dark, this circuit turns on the transistor when it gets light.
The photoresistor and the resistor make up a voltage divider. And to understand it, you should also know how the transistor works.
When it’s dark, the photoresistor will have high resistance – much higher than R1. That means the voltage divider gives a low voltage out to the base of the transistor and it stays off. When the transistor is off, the buzzer is deactivated.
When there is a lot of light shining directly on the photoresistor it will have low resistance. This will give a higher voltage out to the base of the transistor so that it turns on. This means the buzzer gets activated and starts making sound.
Questions?
Did you build this circuit? Do you have any questions about how it works or how to build it? Let me know in the comment section below.
Copyright Build Electronic Circuits
Thursday, 11 June 2020
Sound waves transport droplets for rewritable lab-on-a-chip devices
Wednesday, 10 June 2020
Multilayer PCB
Ever wondered what makes your Smartphone, laptop, or desktop to become compact with each of its new models? What magic makes this possible? One of the reasons your electronic gadgets are getting slimmer is the printed circuit board. Along with the semiconductors, and other power electronic devices, PCBs play a major role in it. Want [...]
The post Multilayer PCB appeared first on Electronic Circuits and Diagrams-Electronic Projects and Design.
Signatures of fractional electronic charge observed in topological insulators
Liquid metals break down organic fuels into ultra-thin graphitic sheets
Sunday, 7 June 2020
Self-assembling, biomimetic composites possess unusual electrical properties
New material, modeling methods promise advances in energy storage
Thursday, 4 June 2020
Breaking the mold: An unusual choice of material yields incredibly long-lasting batteries
Wednesday, 3 June 2020
Graphene and 2D materials could move electronics beyond 'Moore's Law'
Tuesday, 2 June 2020
Molecular circuitry: International team breaks one-diode-one resistor electronics
-
CMOS (Complementary Metal Oxide Semiconductor) The main advantage of CMOS over NMOS and BIPOLAR technology is the much smaller power dis...
-
I was first introduced to logic gates when I was around 14 years old. I had heard that computers consisted of ones and zeroes. But I didn’t...
-
Bluetooth Controlled Electronic Home Appliances is a simple project, where we can control different electrical appliances and electronic de...


