Friday, 30 March 2018
A novel test bed for non-equilibrium many-body physics
Engineers turn plastic insulator into heat conductor
Wednesday, 28 March 2018
Scientists print all-liquid 3-D structures
Knitting electronics with yarn batteries
Tuesday, 27 March 2018
The future of photonics using quantum dots
Paper-folding art inspires better bandages
Tattoo electrodes from an ink-jet printer
Monday, 26 March 2018
Blowin' in the wind -- A source of energy?
Understanding charge transfers in molecular electronics
How to Connect ESP8266 to WiFi | A Beginner’s Guide
In the previous ESP8266 Projects, I have given a brief introduction to ESP8266 WiFi Module, how to get started with ESP8266 and Arduino, what is the pin configuration of the ESP8266 ESP-01 Module and how to program the ESP8266 using Arduino as USB-to-Serial Interface.
I have also shown you how to install firmware (AT Commands Firmware) onto the on-board ROM of the ESP8266 WiFi Module.
One thing (and it is an important thing) that I have missed (not intentionally) is to show you How to connect ESP8266 to WiFi Network.
So, without further ado, let me show you how to connect ESP8266 to WiFi and use it in our IoT (Internet of Things) and other WiFi based Projects.
NOTE:
- Before proceeding, I strongly recommend you to refer to two of the earlier projects on ESP8266 WiFi Module: GETTING STARTED WITH ESP8266 AND ARDUINO and HOW TO UPDATE/FLASH ESP8266 FIRMWARE.
- There are many important things like Pin Configuration of ESP8266 (ESP-01) Module, How to connect ESP8266 to Arduino, and so forth that you must have a prior knowledge on before proceeding to connect ESP8266 to WiFi.
Overview
The tiny ESP8266 (ESP-01) WiFi Module is making wonders in the DIY Community as it allows devices like Arduino to access Web Pages by connecting to the Internet.
The ESP8266 WiFi Module can be interfaced to any other microcontroller (like Arduino or 8051) through UART and with the help of AT Commands, the Microcontroller can control the ESP8266 (connect to WiFi, update Firmware, etc.).
So, in order to use the ESP8266 WiFi Module in our Internet related projects, we need to first connect ESP8266 to WiFi and then access it from the internet.
Before going into the details of how to connect ESP8266 to WiFi, you need to understand the WiFi modes of operation of the ESP8266 Module.
WiFi Modes of Operation of ESP8266
There are three modes of WiFi Operation in the ESP8266 WiFi Module. They are:
- Station Mode (STA)
- Soft Access Point (AP)
- Soft AP + Station
Station Mode (STA)
In Station Mode (STA), the ESP8266 WiFi Module will be connected to a WiFi Network that is already setup by an Access Point, like a WiFi Router.
Soft Access Point (AP)
The second mode of operation is Access Point (AP) Mode. In this mode, the ESP8266 Module acts as an access point and provide WiFi Network to other stations (like mobile or laptop).
Usually, an access point can provide internet through a wired network to its stations but as there is no wired interface, this Access Point mode is called Soft Access Point.
The ESP Module is first setup as Soft AP mode before configuring it in Station Mode. This is helpful when the username (SSID) and password of the WiFi network is unknown.
Soft AP + Station
In the third mode, the ESP8266 WiFi Module is configured to act in both Station Mode and Soft AP Mode.
All these Modes of Operation are set using AT Commands. In this tutorial, I will discuss about the AT Commands that are required to connect ESP8266 to WiFi Network. In a separate tutorial, I’ll talk about some of the important and useful ESP8266 AT Commands.
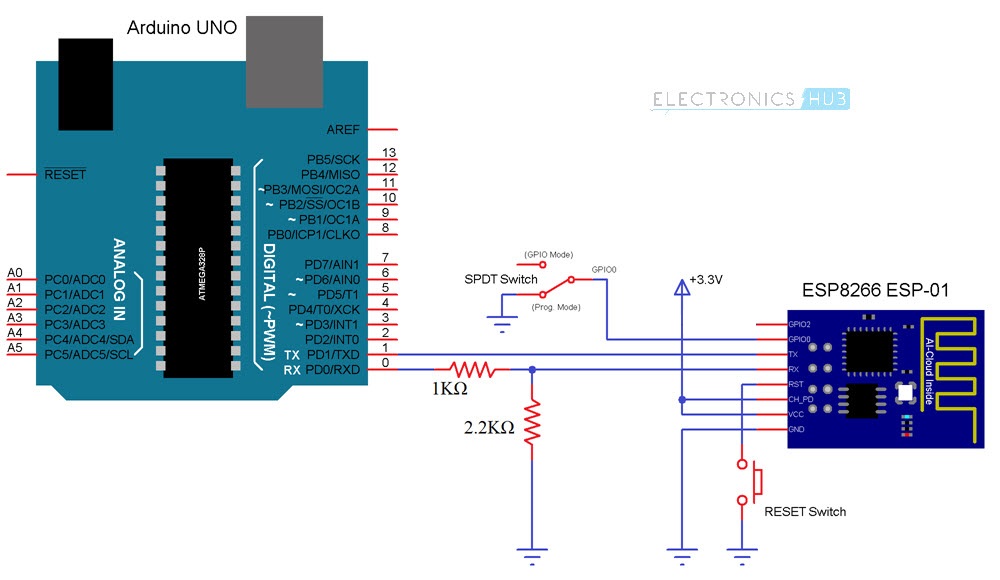
Circuit Diagram
Components Required
- ESP8266 (ESP-01) WiFi Module
- Arduino UNO (an USB-to-Serial Adapter is sufficient)
- Push Button
- Slide Switch
- 1 KΩ Resistor (1/4 Watt)
- 2.2 KΩ Resistor (1/4 Watt)
- Connecting wires
How to Connect ESP8266 to WiFi Network using AT Commands?
Before seeing how to connect ESP8266 to WiFi network, you have to remember that the ESP8266 WiFi Module is loaded with AT Commands Firmware.
Please refer to the project “HOW TO FLASH FIRMWARE ON ESP8266” before proceeding with connecting the ESP8266 WiFi Module to a WiFi Network.
So, after connecting the ESP8266 in Programming Mode and ensuring that it has AT Commands Firmware, connect the Arduino to the Computer and open the Serial Monitor.
In my case, I have set the Baud rate to 115200 and also selected “Both NL & CR” option in the Arduino’s Serial Monitor. Change these settings as per your requirements.
First, type the following command to test whether the communication is successful or not.
Then, I will restart the ESP8266 Module using the following command, just to make sure that I start fresh.

Now, I need to set the Mode of operation as Station Mode. For this, use the following command.
The Mode of Operation has been set as Station Mode (STA). Now, to see the list of all the nearby WiFi Networks, use the command shown below.
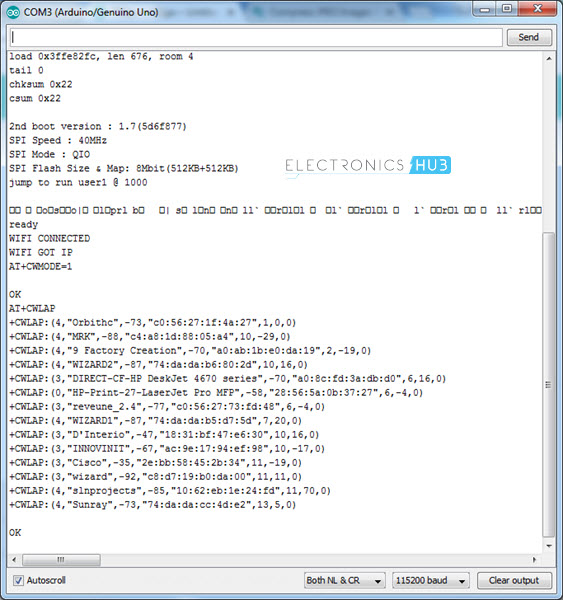
In order to join a network, use the following command.
In place of SSID, type the name of your WiFi Network and in place of PASSWORD, well type the password.
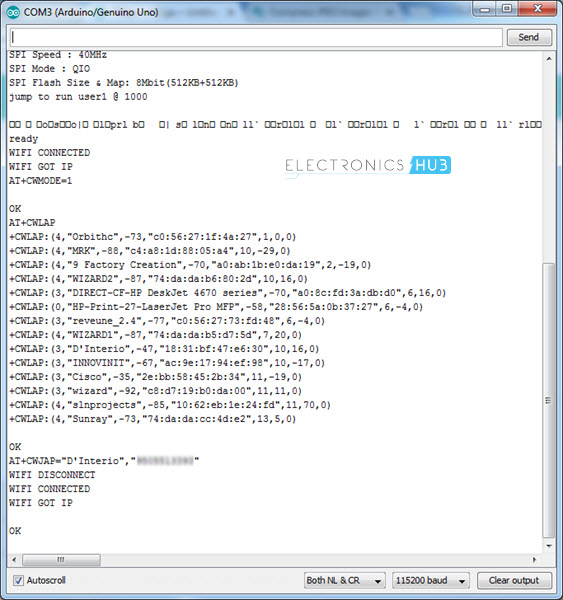
Within few seconds, you will get a confirmation response as WIFI Connected. In order to check the IP Address of the ESP8266 WiFi Module, type the command.
Alternative Way to Connect Your ESP8266 WiFi Module to a WiFi Network
If you are tired of typing all these AT Commands in order to connect ESP8266 WiFi Module to a WIFi Network, then there is an alternative way. In this method, I’ll be programming the ESP8266 WiFi Module (which means the AT Command Firmware will be erased). The code for this is shown below.
NOTE: In the code, enter the details of your WiFi Network in place of “ssid” and “password”.
Before programming, select the “Generic ESP8266 Module” from boards and also select the correct COM Port. More information about programming ESP8266 WiFi Module (Blink example) can be found here: GETTING STARTED WITH ESP8266 AND ARDUINO.
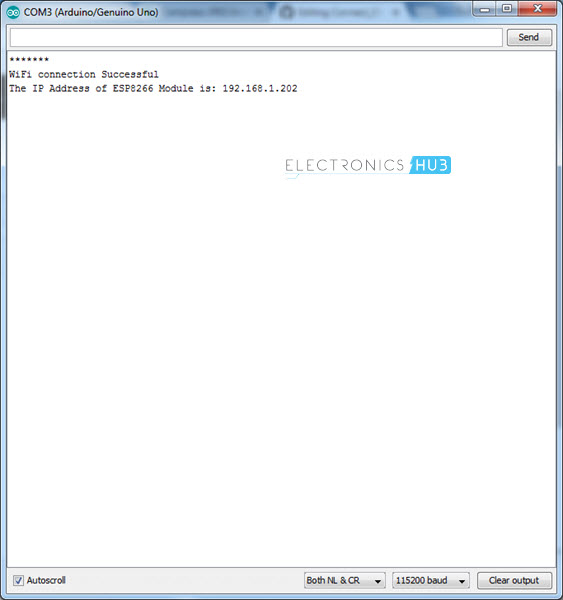
Now, connect the GPIO0 to GND and reset the ESP and hit the upload button. The ESP8266 WiFi Module will be automatically connected to the specified WiFi Network and it also responds with the IP Address.
Conclusion
In this project/tutorial, I have shown you how to connect an ESP8266 WiFi Module to a WiFi Network using both AT Commands and programming. In the next tutorial, I’ll highlight some of the important AT Commands of the ESP8266 Module.
The post How to Connect ESP8266 to WiFi | A Beginner’s Guide appeared first on Electronics Hub.
Sunday, 25 March 2018
Smaller and faster: The terahertz computer chip is now within reach
Friday, 23 March 2018
Flexible ultrasound patch could make it easier to inspect damage in odd-shaped structures
Thursday, 22 March 2018
Generation of a stable biradical
Scientists control molecular alignment on a graphene surface
Electric textile lights a lamp when stretched
How to Control ESP8266 over Internet?
In the previous project, I have shown you a simple setup for WIFI CONTROLLED LED USING ESP8266 AND ARDUINO. In this project, I will show you How to Control ESP8266 over Internet i.e. controlling ESP8266 from anywhere in the World through Internet.
Overview
Even though the main purpose of ESP8266 WiFi Module is to introduce Internet Connectivity into our small DIY Projects, I believe that we haven’t completely utilized the capabilities of the ESP8266 WiFi Module until now i.e. a true IoT (Internet of Things) Project.
I want to take the ESP8266 Projects a step further by actually controlling the ESP8266 over the Internet. In this process, we will learn how to control ESP8266 over Internet by controlling an LED (just to demonstrate the working) connected to one of the GPIO Pins of the ESP8266 WiFi Module over the internet i.e. another network to with the ESP8266 isn’t connected to.
How is this different from the WiFi Controlled LED Project?
Very good question. There are actually two differences between this project and the earlier project. The first difference is how the ESP8266 WiFi Module is controlled. In the previous project, I controlled the ESP8266 through WiFi network i.e. from a computer or phone that is connected to the same network as the ESP8266.
Coming to this project, the aim is to control the ESP8266 over the internet i.e. from a computer or phone anywhere in the World with an internet connectivity.
The second difference is how the ESP8266 WiFi Module is configured. If you remember, I have mentioned particularly that ESP8266 WiFi Module must be flashed with AT Commands Firmware and we will be controlling the ESP8266 through the Program uploaded to Arduino.
But, in this project, I will be directly uploading the code into the ROM of the ESP8266 WiFi Module (the existing program or firmware will be erased).
Now that we have seen the differences, let us proceed with the circuit diagram and the circuit design of the project.
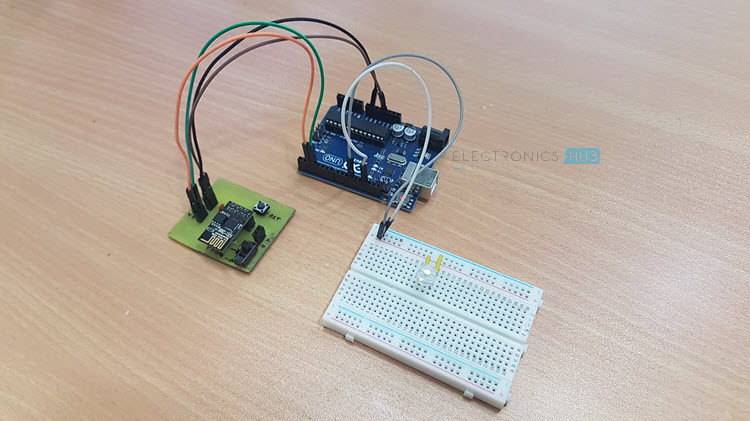
Circuit Diagram
The following circuit is used to control ESP8266 over internet. Let us take a look at the components first and then I will explain the design of the circuit in detail.
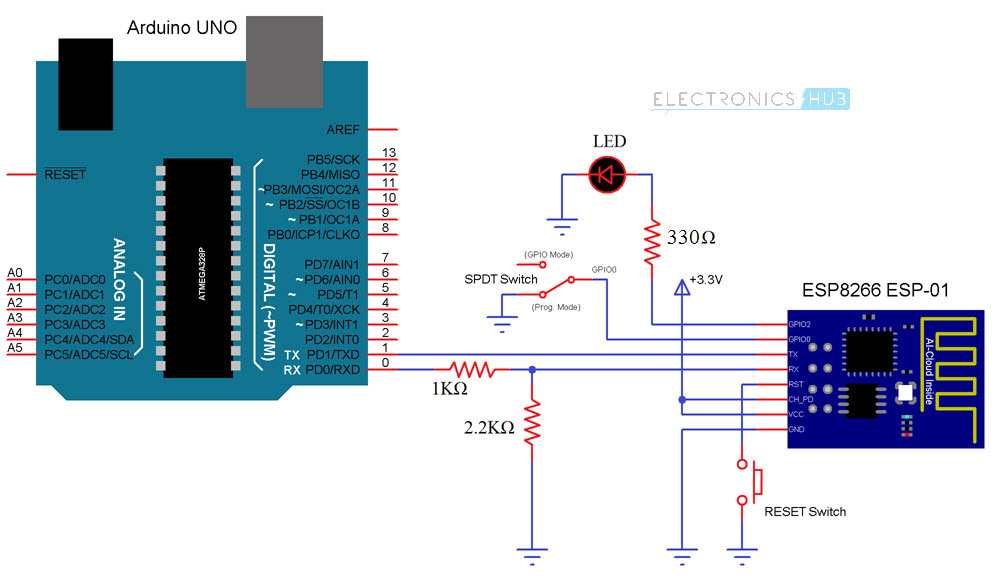
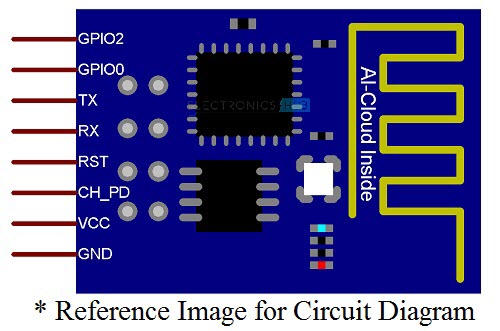
The following image shows the pins of the ESP8266 WiFi Module used in the circuit diagram. For actual pin diagram, please refer to the GETTING STARTED WITH ESP8266 AND ARDUINO Project.
Components Required
- Arduino UNO (as USB to Serial Converter)
- ESP8266 (ESP-01) WiFi Module
- Slide Switch (SPDT Switch)
- Push Button
- 1 KΩ Resistor (1/4 Watt)
- 2.2 KΩ Resistor (1/4 Watt)
- 330 Ω Resistor (1/4 Watt)
- LED
- Connecting Wires
- Mini Breadboard
NOTE:
- Arduino UNO is used as an USB to Serial Converter. So, I have removed the ATmega328p Microcontroller from the Arduino UNO Board. If you have a dedicated USB to Serial Converter (USB-to-TTL), then you won’t need Arduino.
- Also, I have made a simple ESP8266 Breakout Board in an earlier Project called DIY PCB FOR ESP8266. It contain all the important components associated with the ESP8266 WiFi Module. I will be using the same board in this project.
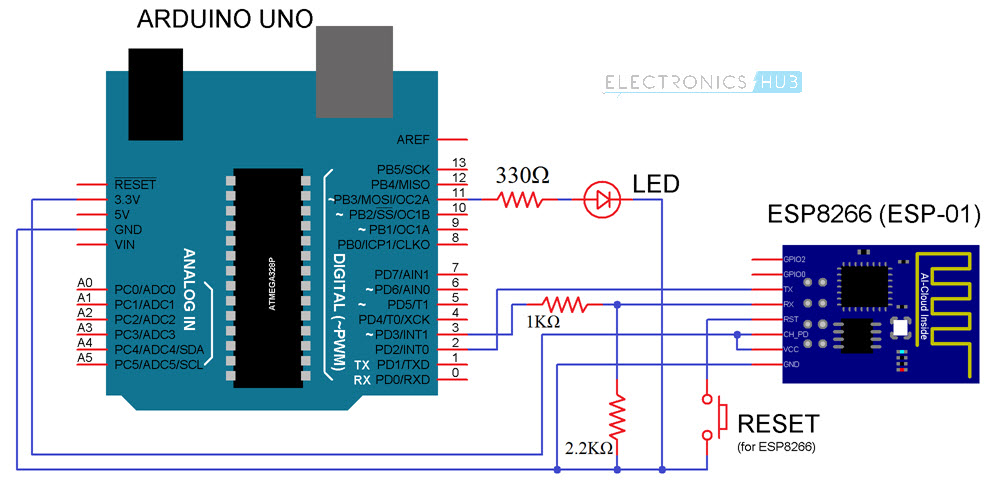
Circuit Design
Connect the VCC and GND of the ESP8266 to 3.3V and GND of the Arduino. The CH_PD pin is also connected to the 3.3V Supply. A Push Button is connected between the Reset Pin and GND.
The TX Pin of the ESP8266 WiFi Module is connected to the TX pin of Arduino and the RX Pin of the ESP8266 is connected to the RX Pin of the Arduino but through a voltage divider consisting of two resistors (1 KΩ and 2.2 KΩ).
An LED is connected to the GPIO2 pin of the ESP8266. Finally, the GPIO0 pin is connected to the Pole of a SPDT Switch (center terminal of the slide switch). One throw terminal of the switch is connected to GND and the other throw terminal is left open but can be used for GPIO connection.
Code
The following program must be uploaded to the ESP8266 WiFi Module. It will setup the WiFi Connection and also creates a simple HTML Page that can be accessed using the IP Address of the ESP8266.
NOTE:
- Before uploading the code to ESP8266, make sure that “Generic ESP8266 Module” is selected in the Arduino Boards section.
- For more information on how to upload a program to ESP8266, refer to the Getting Started with ESP8266 and Arduino Project.
- Enter the details of your WiFi network in the Code.
- I have assigned a Static IP Address for ESP8266 WiFi Module in the code as “192.168.1.254”. I have chosen this address after confirming that there is no other device with this IP Address. You make sure of the same when assigning static IP address.
- Along with the Static IP Address, you must also provide additional information like Default Gateway and Subnet Mask. You can find this by typing “ipconfig” in the command prompt of the Windows.
Working
In order to upload the code, slide the GPIO0 pin to programming mode (connect GPIO0 to GND) and press the RESET Switch. After selecting the correct board and port in the Arduino IDE, upload the code.
Once the code is uploaded, slide the switch to normal mode and push the RESET button once. Open the serial monitor. There you can see the details of the WiFi Connection.
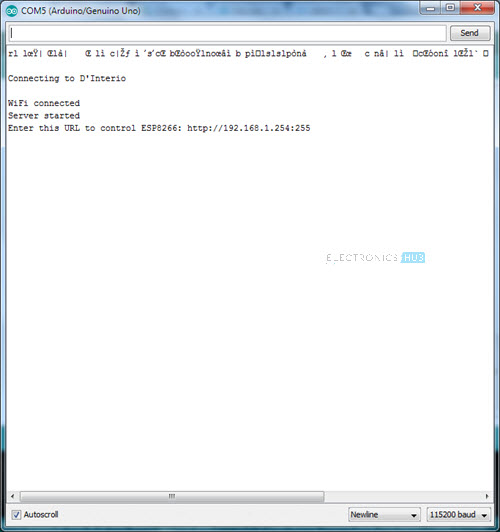
You can also see the IP Address of the ESP8266 WiFi Module. Since I assigned a Static IP Address, I will get the same. If you have chosen not to assign a static IP Address, then use the address assigned by your router.
In the code, I have created the Server at Port 255. So, the URL of the server will be http://ift.tt/2GQHS6N.
Open a web browser in a computer or phone connected to the same WiFi Network and enter the above mentioned URL. A simple HTML page will be opened with few texts and links. The following image is a screenshot of a phone which has opened the URL.
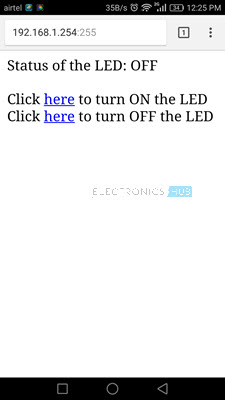
You can click on the specific links to control the LED locally i.e. within the WiFi Network.
How to Control ESP8266 Over Internet?
Now the trick part of controlling the ESP8266 WiFi Module over the Internet. There are two way you can achieve this. One way is to use Port Forwarding, which I will be using in this project and the other way is to use dedicated remote servers like ThingSpeak or aREST.
As I have already set a Static IP Address to my ESP8266 WiFi Module, the next step is to proceed with port forwarding.
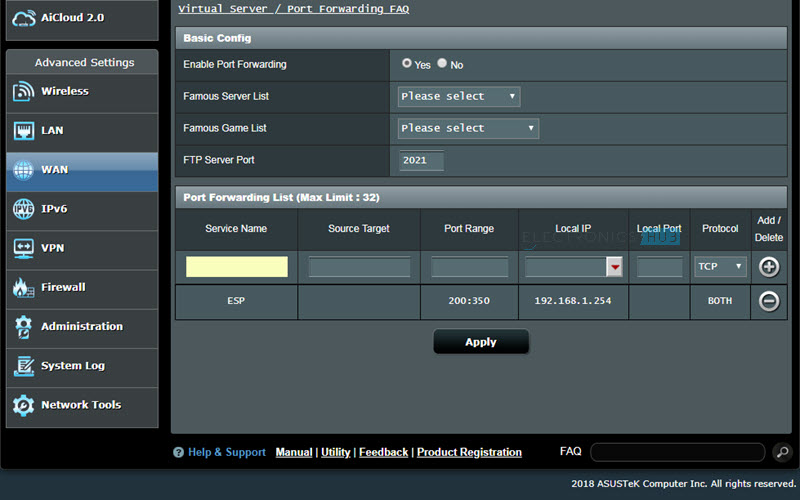
Open your router page from any browser and login using router login details. Go to Port Forwarding page of your router (depends on router, in my case it was I WAN Settings).
Enable Port Forwarding and provide necessary details like Local Server IP Address (static IP Address of ESP8266), Port Number, etc. and save the settings.
Now, go to the Windows Firewall with Advanced Security Settings and add a new inbound rule. Select the rule type for “Port” and specify the port number.
Open any web browser and search for “what is my ip address”. It results in the WAN IP Address of your Router. Note it down.
Now, from another computer (any computer that is not connected to the same WiFi Network as the ESP8266), type the IP Address you just noted down along with the Port number. For example, if your IP Address is 183.92.192.58 and the port number is 255, then type “183.92.192.58:255” in any web browser. You will now get the HTML page to control the LED.
IMPORTANT NOTE:
- Port Forwarding is not recommended as it opens up the computer to outside world and can be easily attacked by virus or malware.
- Also, many ISPs (Internet Service Providers) do not allow port forwarding.
- An alternative is to use the dedicated secure servers like ThingSpeak or aREST.
- In the next project, I’ll show you how to control ESP8266 from the internet using one of those services.
The post How to Control ESP8266 over Internet? appeared first on Electronics Hub.
Wednesday, 21 March 2018
Next-gen X-ray microscopy platform now operational
Make way for the mini flying machines
Tuesday, 20 March 2018
Improving fabrication process of nano-structures for electronic devices
'Candy cane' polymer weave could power future functional fabrics and devices
Don’t get stuck in the cheese
 Hans is a 35-year-old guy who loves to learn about how things work. He has no previous experience with electronics, but now he wants to learn.
He learns about the transistor, the resistor, and the capacitor. And he feels he understands them, at least at a basic level.
But when he thinks about his dream project – an RFID-activated door for his cat – he has no idea how to do it. He figures he has to understand these components even better before he can move on.
So he keeps reading about them.
But still, he can’t seem to see the connection from these simple devices to his dream project.
“There must be something I’m missing,” he thinks to himself.
And he refuses to move on to the next topic until he fully understands the connection.
This is a very typical situation.
But here’s the problem:
You won’t learn to make pizza simply by understanding cheese really well!
If you want to learn to make pizza, you need to study how to make pizza! You need to learn what the basic ingredients are, and how you combine them into a pizza.
If you find cheese really interesting, by all means, study cheese. But don’t forget to study pizza if that’s your goal.
Tomorrow, I will launch my newest online training: Practical Electronics For Beginners (PEFB)
PEFB is an 8-week course where you learn to build your own inventions with electronics.
The course includes the following:
Week 1: Basic Electronics
Week 2: Circuit-Building Boot Camp
Week 3: Flashing Lights And Making Sound
Week 4: Practical Skills In Electronics
Week 5: Designing Your Own Circuit Boards
Week 6: Designing a Project From Scratch
Week 7-8: Build Your Own Project
Enrollment opens tomorrow and will be open until Sunday.
See the promo video here:
https://youtu.be/lFvftsAbpZE
Tomorrow I’ll send out an email on how to enroll.
Keep On Soldering!
Oyvind @ build-electronic-circuits.com
Copyright Build Electronic Circuits
Monday, 19 March 2018
A workshop with a beep
 “Beeeeep!”
That’s the sound we were surrounded by all night.
About a month ago, I did a workshop in Oslo together with two very skilled electronics enthusiasts.
I thought it was a good idea to program all the chips with a beeper-example program.
So when people had soldered their circuit, they would know if it worked.
Oh yes, the beeper worked!
It was beeping all night for two hours straight.
Next time, I’ll choose something less noisy.
But since then, I’ve been itching to do another online class.
I’ve been working hard for several weeks now, but it is finally coming together. And I have decided to open the enrollment on Wednesday.
There will be beeps.
There will be blinks.
And there will be a lot more.
I’ll be more specific next week.
Until then…
Keep On Soldering!
Oyvind @ build-electronic-circuits.com
Copyright Build Electronic Circuits
Saturday, 17 March 2018
WiFi Controlled LED using ESP8266 and Arduino
In this ESP8266 WiFi Module Project, we will learn about WiFi Controlled LED using ESP8266 and Arduino. I will show you how to control an LED connected to the Digital I/O Pin of the Arduino over WiFi Network using the ESP8266 WiFi Module.
Overview
The ESP8266 WiFi Module is an interesting addition to the makers and hobbyists’ community as it allows us to integrate WiFi and Internet into our DIY Projects.
IoT or Internet of Things is one such area which can be implemented using a variety of sensors connected to a Microcontroller like Arduino and ESP8266 WiFi Module to access the sensor data from anywhere in the World.
Before thinking about big IoT projects, let us begin exploring the ESP8266 WiFi Module and implement a small but useful project called WiFi Controlled LED using ESP8266 and Arduino.
I have already introduced to you about the ESP8266 WiFi Module in my GETTING STARTED WITH ESP8266 AND ARDUINO Project. Refer to that project first in order to learn about the basic information on ESP8266 WiFi Module, its Pin Diagram, pin configuration and how to interface ESP8266 with Arduino.
IMPORTANT NOTE:
- In my second project on ESP8266 WiFi Module, I have shown you How to flash the AT Command Firmware onto the ROM of ESP8266 WiFi Module.
- It is very important that you first implement that project i.e. make sure that your ESP8266 WiFi Module has AT firmware installed on it.
- If you have programmed your ESP8266 WiFi Module with other program (like Blink, for example), then you must flash the firmware. If your ESP module is already has the AT Commands firmware, then leave it as it is.
Concept behind WiFi Controlled LED using ESP8266 and Arduino
Before getting into the details of the project like the circuit diagram, components, connections and the code, let me take you through the concept behind the WiFi Controlled LED using ESP8266 and Arduino.
The idea behind the project is very simple. Connect an LED to the Arduino Board. This LED must be connected over WiFi i.e. within a local network through a Smart Phone or a Laptop.
For this, use the ESP8266 WiFi Module and interface it to Arduino through Serial Communication. Arduino will command the ESP8266 module to get connected to a WiFi network and receive data from the client (an HTML page).
Based on the information sent by the client (with the help of a Web Browser), the Arduino will either turn ON or OFF the LED. That’s it.
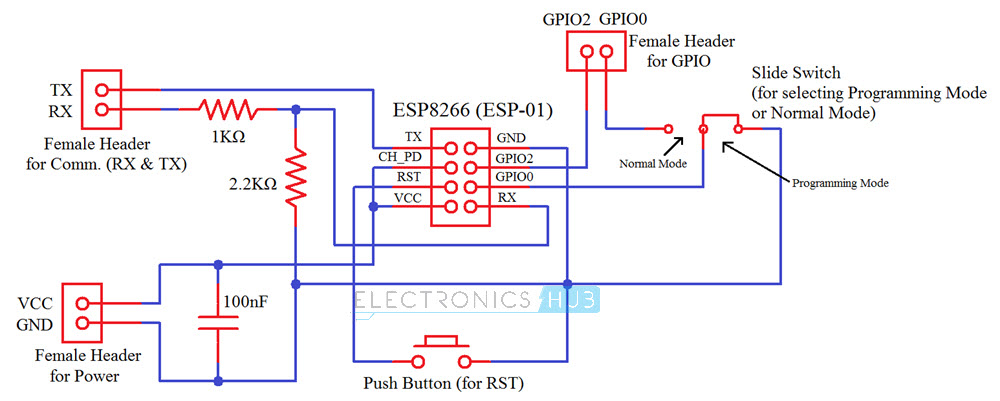
Circuit Diagram
The circuit diagram for the WiFi Controlled LED using ESP8266 and Arduino project is shown I in the image below.
Components Required
- Arduino UNO
- ESP8266 WiFi Module
- LED
- 330Ω Resistor (1/4 Watt)
- 1 KΩ Resistor (1/4 Watt)
- 2.2 KΩ Resistor (1/4 Watt)
- Push Button
- Connecting Wires
- Mini Breadboard
Circuit Design
I have used the software serial feature of the Arduino and made its digital pins 2 and 3 as RX and TX. These pins must be connected to TX and RX Pins of the ESP8266 WiFi Module.
NOTE: I have used a level convertor consisting of a 1 KΩ Resistor and a 2.2 KΩ Resistor before connecting the TX Pin of Arduino (Pin 3) to the RX Pin of the ESP8266.
An LED is connected to the Digital I/O Pin 11 of the Arduino. (This is the LED that we will be controlling over WiFi).
Coming to the rest of the connections with respect to the ESP8266, it’s VCC and CH_PD pins are connected to 3.3V of the Arduino and GND is connected to, well the GND pin of the Arduino. A Push Button is connected between RESET of ESP8266 and GND.
Both the GPIO Pins of the ESP8266 i.e. GPIO0 and GPIO2 are left open as we won’t be using those pins in this project.
Code
The following is the code that is to be uploaded into Arduino. It will configure the WiFi in the ESP8266 Module as well as check for the data from the HTML page (will be discussed later).
HTML Code for Sending Data to ESP8266
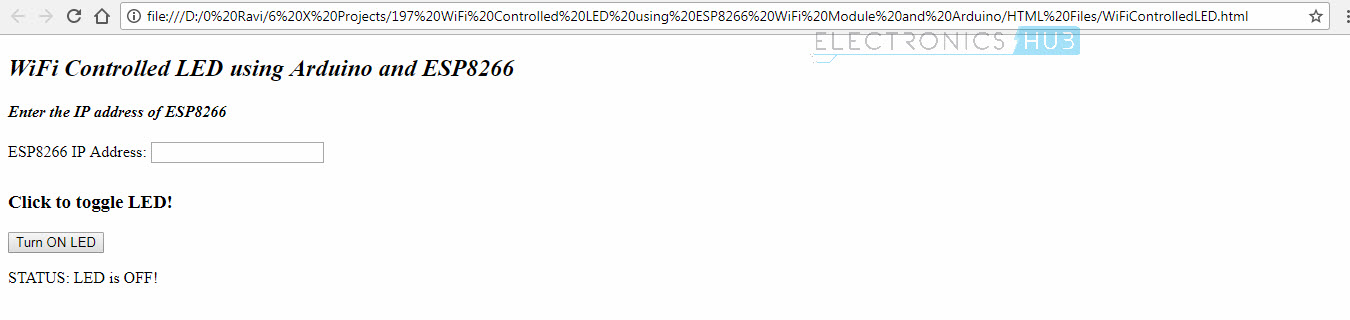
In order to create an interface for the project, I have created a simple HTML based webpage. The HTML code for this webpage is given below.
Download this HTML Code (save it as .html file).
This HTML webpage uses the JavaScript library “jQuery.js”. Download this library from here and place it in the same folder as the .html file.
So, your webpage folder consists of two file: one “webpage.html” file and a “jQuery.js” file. Open the HTML file using any web browser. The interface looks like this.
Working of WiFi Controlled LED using ESP8266 and Arduino Project
Upload the Arduino Code provided above to your Arduino Board after making all the necessary connections. Once the code is uploaded, open the Serial Monitor of Arduino. You can see the progress of the setup done on the ESP8266 WiFi Module.

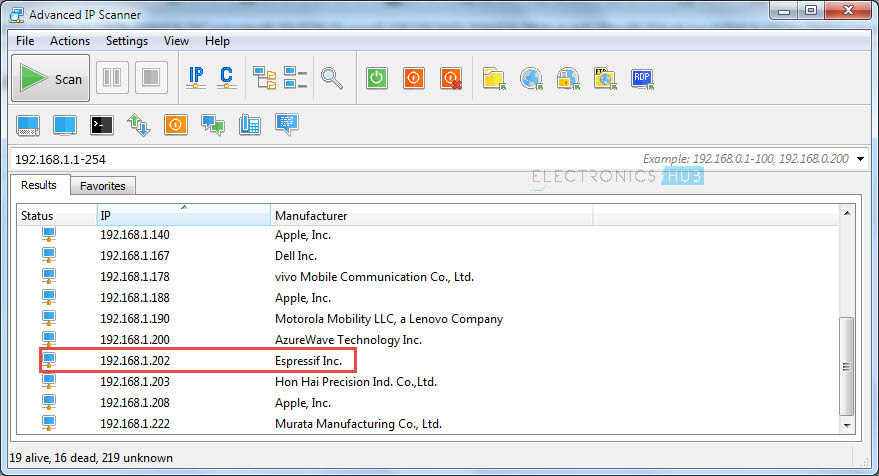
Some of the information in the above image looks garbage but I assure that correct data is transmitted. If you got a clean response, you can find the IP Address of the ESP8266 Module at the highlighted place in the image above.
Since I couldn’t find the IP Address from Serial Monitor, I had to look up for it using another tool called “Advanced IP Scanner”.
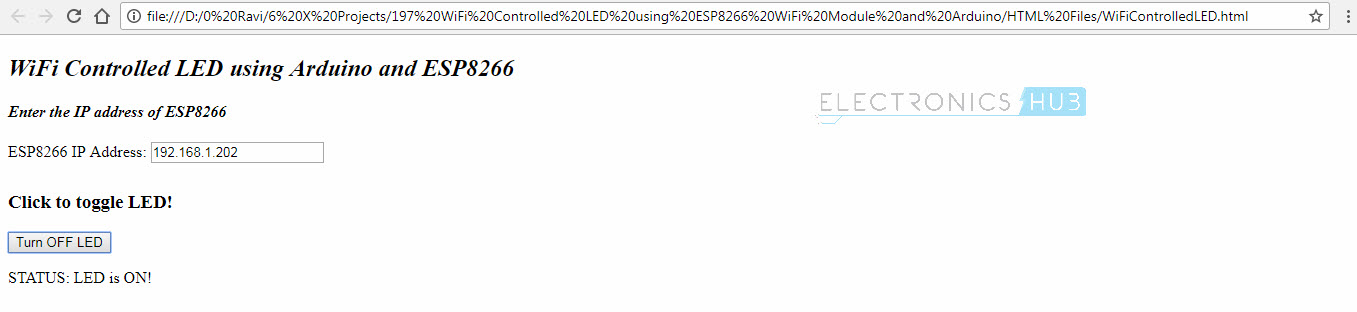
Now, open the webpage that you saved earlier and enter this IP Address in the IP Address field provided. After entering the IP Address, you can click on the Button on the page to turn ON and OFF the LED.
Conclusion
A simple project called WiFi Controlled LED using ESP8266 and Arduino is designed here where an LED connected to Arduino is controlled over WiFi (within the same network).
Any device connected in same WiFi Network can control the LED with the help of a simple HTML webpage.
The next step or an advanced version of this project will be controlling the LED over internet i.e. from anywhere in the World (involves PORT Forwarding).
The post WiFi Controlled LED using ESP8266 and Arduino appeared first on Electronics Hub.
Thursday, 15 March 2018
Graphene flakes for future transistors
Wednesday, 14 March 2018
Existence of new form of electronic matter
Researchers tap problematic e-waste surplus to recover high-quality polymers
DIY PCB for ESP8266 WiFi Module
Overview
In this project/tutorial, I’ll show you how to design and develop a PCB for ESP8266 WiFi Module. If you remember in the “GETTING STARTED WITH ESP8266 AND ARDUINO” project, I have mentioned that the pins of the ESP8266 WiFi Module are not breadboard friendly.
There, I have made a small perf board for ESP8266 WiFi Module in order to insert it in the breadboard, you could call it a Breadboard Adapter.

Even though this perf board served the purpose of using the ESP8266 on a Breadboard, I still had to connect the level converter resistors, push button to reset the module separately.
So, instead of making a PCB for breadboard adapter, I have decided to make a PCB for the ESP8266 WiFi Module with all the required components like connectors for power, GPIO Pins and communication (RX and TX), slide switch for selecting Programming Mode or Normal Mode, Push button for Reset, headers to insert the ESP8266 WiFi Module and the level converter resistors for the RX Pin of the Module.
Let us start the PCB for ESP8266 WiFi Module by taking a look at the circuit diagram with all the necessary components.
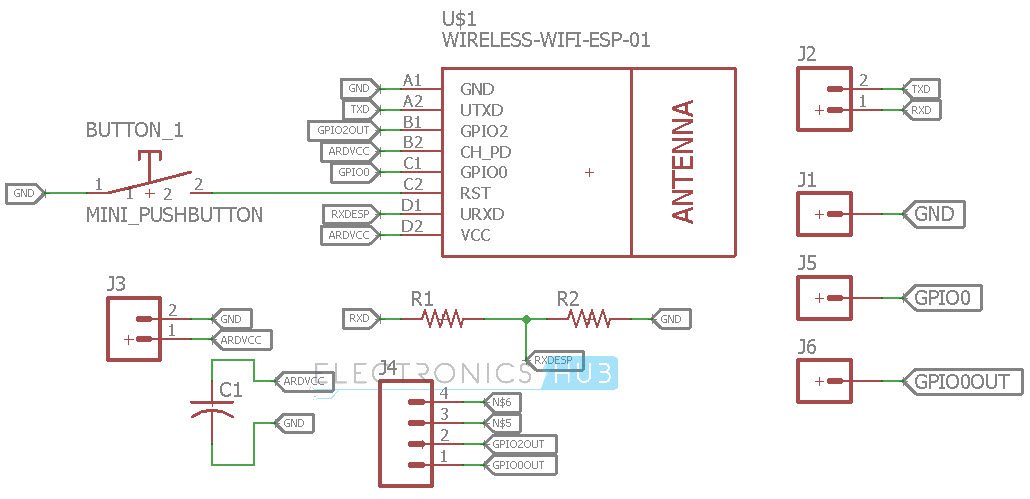
Circuit Diagram
Before proceeding with the PCB Design of the ESP8266 Board, you need to design the circuit diagram with all the components and connections.
The following image shows the circuit connections with respect to the ESP8266 ESP-01 WiFi Module.
I’ll explain the design of the circuit later but first, let us see all the components that are used in the design of the circuit.
Components Required
The following is the list of all the components used to design the circuit of the ESP8266 WiFi Module PCB Board.
- ESP8266 WiFi Module (ESP-01)
- Female Headers (a few strips)
- Push Button
- 1 KΩ Resistor (1/4 Watt)
- 2.2 KΩ Resistor (1/4 Watt)
- 100 nF Capacitor
- Two Way Slide Switch
Circuit Design
First of all, we need to recollect the Pin Configuration of the ESP8266 WiFi Module. The ESP8266 ESP-01 variant has 8 pins, namely: VCC, GND, RX, TX, GPIO0, GPIO2, RST and CH_PD. The pin description is already mentioned in the earlier tutorials.
Coming to the design of the circuit, the VCC and CH_PD pins of the Module are connected to the VCC terminal of the Power Supply header, while the GND pin is connected to GND terminal.
A 100 nF ceramic disc capacitor is connected between the VCC and GND female headers.
The RST (reset) pin is connected to one end of a push button and the other end of the button is connected to GND.
GPIO2 is connected directly to one of the terminals in the female header for GPIO. The GPIO0 pin is connected to the center terminal of a two way slide switch. One end of the switch is connected to the second terminal of the female header for GPIO while the other end is connected to GND.
Next is the communication pins i.e. TX and RX. The TX pin of the ESP8266 WiFi Module is directly connected to the TX terminal of the communication female header. The RX pin on the other hand, is connected through a level converter consisting of a 1KΩ and a 2.2KΩ resistor.
Designing the PCB for ESP8266 WiFi Module
After understanding the requirements and designing the circuit diagram, you can proceed to design the PCB for ESP8266 WiFi Module. I’ve used Autodesk’s Eagle PCB Software for this purpose.
The following image shows a simple layout of the Schematic part of the PCB Design. This image is just a reference and you can draw the schematic as per your convenience using the circuit diagram.
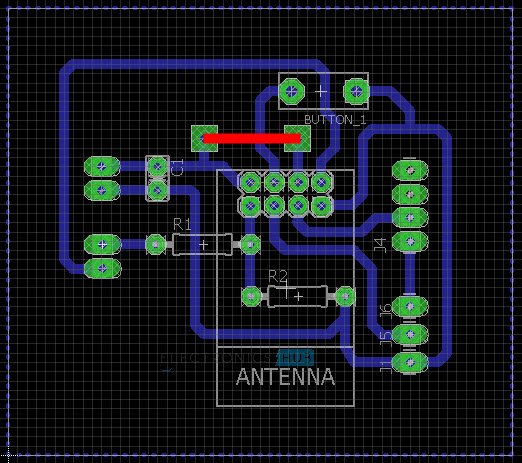
After the schematic is completed, the next step is to proceed with the actual PCB Design. Since this is a DIY PCB, I’ve used a single layer design (although I had to use a jumper at one place).
PCB layout for the ESP8266 WiFi Module is shown in the image below. Once again, this is not a great design but it serves the purpose.
Making the PCB and Assembling the Components
In the “HOW TO MAKE YOUR OWN PCB AT HOME” tutorial, I have already mentioned the necessary steps to be followed for making your own PCB. I would not repeat those steps and instruction as you follow them from that tutorial.
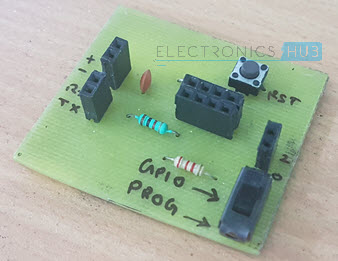
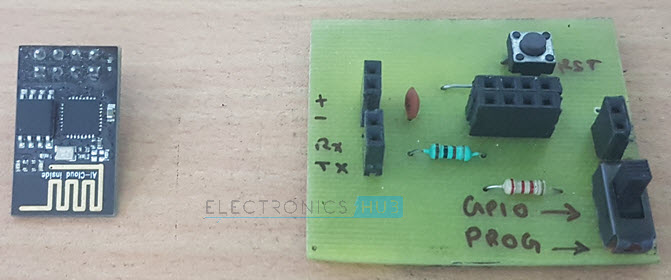
After developing the PCB, you can assemble the components and solder them on to the board. The final board with all the components placed and soldered is shown in the image below.
Working of PCB for ESP8266 WiFi Module
After assembling the components, connect 3.3V supply to the VCC and GND pins on the board. If you want to program the ESP8266 or flash the firmware onto it, slide the switch to Programming Mode position and press the Reset button once.
Now the programming mode is activated and you can proceed with flashing the firmware as shown in this tutorial “HOW TO UPDATE FLASH ESP8266 FIRMWARE” or just upload a blink sketch to blink an LED.
Once you are done with uploading the program/firmware, slide the switch to normal mode and press the reset button. Now the uploaded program/firmware will run.
The post DIY PCB for ESP8266 WiFi Module appeared first on Electronics Hub.
Check the 15 Best Gaming Mouse Tested and Reviewed in 2018
A gaming mouse is a handheld pointing device that detects 2D motion of a pointer on displays, for smooth controlling of the GUI-Graphical User Interface.
The only feature that makes the gaming mouse more special than the regular ones is the use of laser technology, optical sensors and the customized options for faster & precise movements.
In addition to this, it also features DPI Resolution, LED Lights, Stylish Design, Scrolling Wheel, Extra Buttons, and Long Cables.
So, when it comes to choosing a gaming mouse, it is important to select with great care, ensure the basic features and should be compatible with the upgraded system. To know more about how to choose a gaming mouse, read our Buying Guide provided in the article.
| Gaming Mouse | DPI Resolution |
Buttons |
Check the Price |
|---|---|---|---|
| VicTsing MM057 | 2400 | 6 | Check the Price |
| Pictek Ergonomic | 3200 | 6 | Check the Price |
| TeckNet Optical Wireless | 4000 | -- | Check the Price |
| Logitech G600 | 8200 | 20 | Check the Price |
| UtechSmart Venus | 16400 | 18 | Check the Price |
| HAVIT HV-MS672 | 3200 | 6 | Check the Price |
| Perdition Redragon M901 | 16400 | 18 | Check the Price |
| G602 Wireless | 2500 | 11 | Check the Price |
| CORSAIR M65 Pro RGB FPS | 12000 | 5 - 10 | Check the Price |
| Razer RZ01-R3M1 | 16000 | 3 | Check the Price |
| VersionTech | 2400 | 6 | Check the Price |
| ROSEWILL(NEON M59) | 2400 | 6 | Check the Price |
| Redragon M801 | 16400 | 9 | Check the Price |
| CORSAIR HARPOON | 6000 | 6 | Check the Price |
| HIRALIY F300 | 5000 | 9 | Check the Price |
Of all the above-mentioned gaming mouse devices, VicTsing MM057 Gaming Mouse has become our top priority because it has excellent qualities like sweat resistant, anti-slip rubber scroll, wireless technology, and the multicolour options.
1. VicTsing MM057 2.4G Wireless Portable Optical Mouse

The very first one in the list of best gaming mice is from VicTsing brand and the name of the item is VicTsing MM057 portable optical mice. It is a top-rated brand for designing electronics accessories that we use in our daily life.
The manufacturer offers 12 months of warranty and 45 days money-back scheme if the user is not satisfied with the product delivered to him.
This wonderful gaming mouse comes with 5 adjustable CPI levels, cursor control with an accurate laser tracking mechanism to control on any surfaces. It is also equipped with 2.4GHz wireless technology to establish a strong connection between the peripheral devices within 10 meters of range.
When you look at the mouse, you can see an interesting thoughtful design that fits your fingers and provides extreme comfort while operating. The anti-slippery rubbery scroll ball ensures your hand not to slip and move lengthy documents into a spin.
To make use of MM057 gaming mouse the system should possess USB port, Linux, Windows XP/7/8/10, and MAC OS.
The reason for listing on top is because of the energy-saving mode that no one listed in the article doesn’t feature it. It has auto-power off an option that makes the device into sleep mode when no operation is for 8 minutes.
The performance of the gaming mouse is fantastic and there is no doubt in considering as the best gaming mouse available in the market now. It greatly suits anyone who browses the internet or plays games.
Battery life may vary depending on the user and the computing conditions. This is not a major flaw and can be ignored shortly.
Amazing Features
- Precise cursor control.
- Sweat resistant.
- Anti-slip rubber scroll.
- Power saving mechanism.
- 4 GHz wireless technology.
What we like
- 12 months of battery life.
- Long working duration.
- Multi-color (10) options.
- Consumes less power.
- Highly compatible.
What we don’t like
- Battery life may vary.
2. Pictek Ergonomic Gaming Mouse
Next one in the list is from Pictek brand which is committed to providing quality products and high standard services to the customers. Though there are few reviews and ratings, we have given 2nd priority because of the performance it offers.
We are spellbound by the performance of the Pictek gaming mouse as it features 4 DPI switches, rainbow glare breathing lights, gold-plated USB and anti0interference ring. Let’s discuss all the amazing features it has in detail.
When you look at the device for the first time, the rainbow RGB lights catches your attention and drives you on a unique gaming environment. Then the ergonomic design which has anti-fingerprint and sweat resistant gripping.
When compared to other gaming mice it also features 4 adjustable DPI modes (1000/1600/2400/3200-resolutions) that help to change the speed of the mouse. The performance of the device is too good but the only downside to this product is that it is not suitable for shorthand people.
Amazing Features
- Gold plated USB.
- Ergonomic design.
- Delicate structure.
- Dynamic RGB backlight.
- Rainbow glares breathing light.
What we like
- Low-priced.
- Easy to install.
- 2 ounces of item weight.
- Mouse dimensions are 5.2*3.5*1.8 inches.
- 12 months warranty & 30 days money back scheme.
What we don’t like
- Very large size.
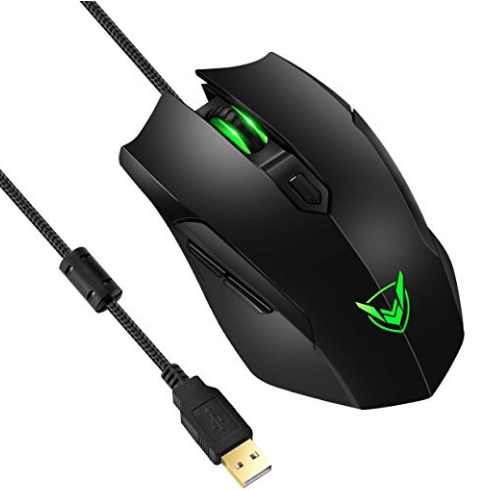
3. TeckNet Ultimate Professional Optical Wireless Gaming Mouse

When it comes to choosing a stylish gaming mouse, no can beat the TeckNet gaming mouse. This branded gaming mouse is sold by Hippidion.US.Store that is committed to providing high standard services.
There are more than 1500+ reviews and ratings for the product, that’s why it has become one of the best gaming mice on the list 15 best. It is an affordable device that comes in black, blue, bronze and red colors.
It has an ultra-sleek design that offers strong grip and comfort when you hold the device. Also, features a 4000DPI gaming sensors that makes the gaming experience much better by delivering high performance.
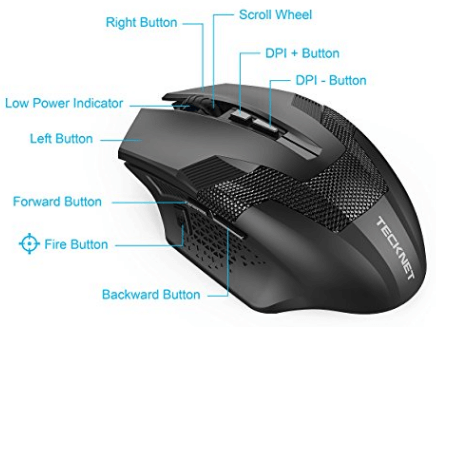
This will surely be a great choice for the die-hard gamers as it has 8 responsive buttons sideward’s and is compatible with the Windows XP/2000/7/8/10. The advanced 2.4GHz wireless technology enables the device to operate within 10-meters of range without any delay in the information signal.
You can clearly see the 5 grade (800/1200/1600/2400/4000) DPI levels and 8 buttons design on a mouse.
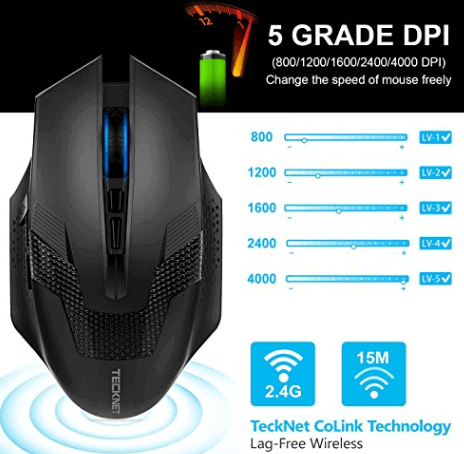
Overall, the performance of the TechNet device is excellent for the wireless technology it featured. But the only downside of the product is that it requires batteries to perform a specific task, else it is of no use.
Amazing Features
- Wireless mouse.
- 4000DPI optical sensor.
- 4 GHz wireless technology.
- Ultra-sleek ergonomic design.
What we like
- Weighs 3.04 ounces.
- Inexpensive mouse.
- 3*1.5*5 inch dimensions.
- Compatible with MAC, Windows operating system.
- Available in 4 different colors.
What we don’t like
- Require 1AA batteries.
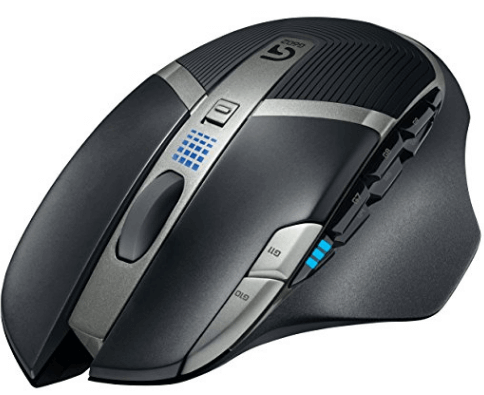
4. Logitech G600 MMO Gaming Mouse

Next one in the list is G600 Logitech gaming mouse. This device is sold by USTechMall that offers good quality products and services to the customers.
The G600 gaming mouse comes with 20 MMO tuned buttons for quick navigation and G-shift button doubles the number of operations you can perform with every button.
It is built comfortably from the user’s point of view and totally personalized with customized panel lightening colors. As the gaming mouse is specially designed for gaming, it is very much compatible with the Windows 7, 8.
When you purchase the gaming mouse that is packed in a box, you get the following:
- Mouse and
- A user manual
The performance of this Logitech gaming mouse is too good as it features buttons that can be programmable and very easy to handle even for a newcomer. But the only thing is that the gaming mouse is available only in black color at very an affordable rate.
Amazing Features
- 20 MMO tuned buttons.
- 25 MP/sec of image processing.
- 16 bits of USB data format.
- G-shift ring-finger button.
- Laser sensor technology.
- Dual dish thumb panel.
- Custom color backlighting.
What we like
- 20 programmable buttons.
- Maximum resolution is 8,200 DPI.
- Maximum speed is 4.06 meters/second.
- 7*5.1*8.3 inches of mouse dimensions.
- Compatible with Windows 7, vista, 8.
What we don’t like
- Available only in black color.
- Didn’t mention the item weight.
- Bit expensive compared to the above-mentioned devices.
5. UtechSmart Venus Laser MMO Gaming Mouse
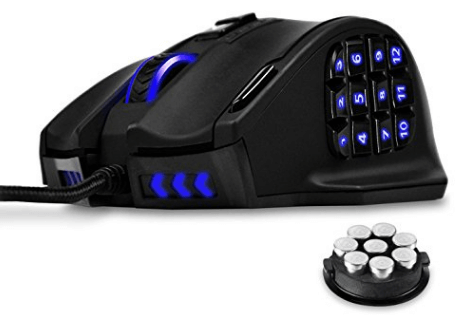
This is an exceptional gaming mouse that you haven’t seen before. The name of the device is UtechSmart Venus gaming mouse. It is a very popular brand for designing technology related products over the years and offers 18 months warranty for quality–related issues.
18 programmable buttons, smooth Teflon pads, special setting switch and ergonomic design in this mouse have grabbed the attention of the users and make them wish for it.
If you see the structure, 12 programmable buttons are on the left side and the remaining 6 on the top. You can also enable/disable the LED lights (5 color option) as per your requirement.
The mouse is placed on the durable Teflon pads for handling the device smoothly at a cursor speed of 100-150 clicks/second.
Though it is equipped with wired technology, it offers high performance without any delay. The only we do not like in this product is the poor LED lighting and is not suitable for small/big hands. Apart from this, it’s totally a good one to add to your Amazon cart.
Amazing Features
- 16400 DPI laser sensors.
- Special setting switch.
- Braided fiber cable.
- Balance tuning feature.
- 18 MMO optimized buttons.
- Gold plated USB connector.
What we like
- Reasonably priced.
- 18 months of warranty.
- Ergonomic right-hand design.
- 8 ounces of mouse weight.
- Smooth Teflon feet pads.
- 9*8.2*3.8 inches of product dimensions.
What we don’t like
- Not suitable for small or big hands.
- LED lighting is not good.
6. HAVIT HV-MS672 Wired Mouse
Number 6 on the list is from Havit brand. It is a famous brand in designing computer parts & other electronic appliances and has gained trust by the thousands of customers.
For this gaming mouse, the manufacturer offers 18-months of warranty from the date of purchase and quality services.
This gaming device features 4 DPI levels, 7 breathing light effects, flashing indicators, and buttons.
You can simply connect the device via USB port as no additional software is required to make the device work on the system. Windows XP/2000/7/8/10, Linux, and MAC OS support this gaming device.
The HAVIT wired mouse parameters are given below:
- USB type interface
- Features 6 keys
- Available resolution is 800/1200/2400/3200 DPI
- Cable length is 1700mm
- Key life is 5,000,000 hours
The performance of the device is quite satisfactory as it is equipped with an ultra-stylish ergonomic design. But the major downside to this product is that it doesn’t suits for shorthands and the poor USB port.
Amazing Features
- Braided cord.
- Ergonomic design.
- Optical sensor technology.
- Gold plated USB interface.
What we like
- Just plug & play.
- 1 ounces of mouse weight.
- Dimensions are 4.8*3.2*1.6 inches.
- 18 months of warranty.
- 7 colourful breathing light effects.
- Inexpensive mouse.
What we don’t like
- Not recommended for shorthands.
- It’s a wired mouse.
7. Perdition Redragon M901-MMO Laser Computer Gaming Mouse

Number 7 on the list is Redragon gaming mouse. It manufactures computer parts or the gaming devices with a great sense of custom design and high output performance.
When you look at the device, it features high-end design, gold plated USB connector, smooth Teflon pads, RGB LED backlighting, and 18 programmable buttons.
It is compatible with the Windows, Linux, and MAC operating system.
This gaming mouse has the capability up to 16400 DPI that can be adjustable, 30 g acceleration and 1000Hz of polling rate. It generates accurate results with greater durability and extreme responsiveness that brings edge over the competition.
The gaming mouse offers 5 different color mode options and the stylish design holds the attention of the users for a longer duration. These wonderful features make the customers slip aside and allow them buy the item immediately.
Redragon M901 gaming mouse performs the operations very accurately. But the only drawback is the materials are made with poor plastic and the noise produced by the mouse wheel is bit irritating when you scroll down.
Apart from this, it’s totally a good one to buy and best suits for the beginner level gamers.
Amazing Features
- Ergonomic design.
- Braided fiber cable.
- Gold plated USB connector.
- RGB LED backlight gaming mouse.
- Total 18; 6 standard mouse buttons + 12MMO programmable side buttons.
What we like
- Highly durable.
- Gaming compatibility.
- Programmable buttons.
- Smooth Teflon feet pads.
- Available in black/white colors.
- 150 grams of mouse weight.
- 95*4.65*1.54 inch dimensions.
- Supports Windows 7,8,10 & MAC OS.
What we don’t like
- Quality is not so good.
- Grinding noise produced by the wheel.
8. G602 Lag-Free Wireless Gaming Mouse
G602 mouse is a very popular gaming mouse all over the world. It is sold by top brands like Outlet Digital, EZMART, MBM sales, DOGO enterprises and much more for its excellent features.
The prices of this gaming mouse vary within the range of $20- $120 from different sellers. Though it offers the functionalities similar to the other gaming mouse, change in price is due to product terms & policies offered by the seller.
In this product itself, there is a wide variety of options for you to decide based on your budget. Let’s get back to its specifications in detail!
G602 gaming mouse is equipped with zero sensor technology, 11 programmable buttons, and the wireless technology to navigate smartly. It has a battery life of 250 hours (20 million clicks), power saving modes, by offering lag-free gaming modes.
The gamer can switch between the performance and the endurance modes to save & optimize the power. This is the major advantage of using G602 gaming mouse. To talk about its cons it has a very low battery life and the programmable buttons are not durable.
Amazing Features
- Power saving option.
- Wireless technology.
- 250 hours of battery life.
- Delta-zero sensor technology.
What we like
- High accuracy.
- Moderate surface friction.
- Can switch 2 modes i.e. performance & endurance.
What we don’t like
- Too expensive.
- Low battery life.
- Buttons are not much durable.
9. CORSAIR M65 Pro RGB FPS Gaming Mouse
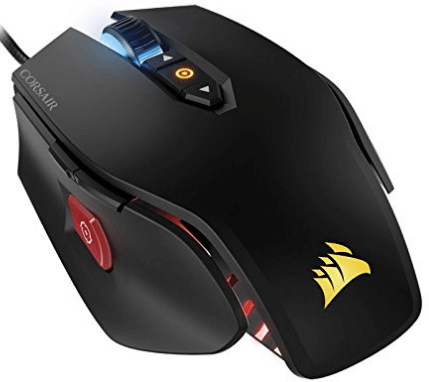
Number 9 is from CORSAIR brand. The name of the product is CORSAIR M65 FPS gaming mouse. It is available at very reasonable prices in black, white and yellow colors.
This CORSAIR M65 gaming mouse comes with light weighted design, durability, mass distribution, and advanced tuning system to set the center of the gravity to match the play style.
12000 DPI accurate sensors are responsible for custom tuning and tracking the pixel precise. The sniper button positioning takes the advantage of On-fly witching to match the speed of gaming demands.
The high capacity Omron switches offer 20 million clicks that ensure high performance.
Amazing Features
- Large PTFE glide pads.
- High mass scroll wheel.
- High-capacity Omron switches.
- Advanced weight tuning system.
- 12000DPI high accuracy sensor.
- Surface calibration tuning utility.
- Aircraft-grade aluminum structure.
- 3 Zone RGB LED backlight customization.
What we like
- Affordable price.
- Light-weighted.
- Highly durable.
- 2-years of warranty.
- 9 ounces of weight.
- Comes with a user manual.
- 6*2.8*1.5 inch dimensions.
What we don’t like
- Looks like an old model.
10. Razer RZ01-02010300-R3M1 DeathAdder – Chroma Enabled RGB Ergonomic Gaming Mouse

Razer gaming mouse has quickly become one of the best gaming mice in the market. Though it costs nothing, offers everything required for a gamer.
The Razer is the first company to introduce Chroma with 16.8 million customized color options. It comes with 16000 DPI that is durable up to 50 million clicks.
It has 7 programmable response buttons with a scrolling wheel that helps to monitor the screen very efficiently. The lighting effects on the mouse offer ultimate gaming experience in a friendly environment.
People who are looking for a smooth, fancy mouse this Razer RZ01 gaming mouse is the best choice. Look at the following features, pros & cons that give a better idea of the product.
Amazing Features
- 16000 DPI resolutions.
- Advanced optical sensor.
- 3 hyper response buttons.
- Highly tactile scroll wheel.
- Razer mouse mechanical switches.
What we like
- Durable up to 50 million clicks.
- Ergonomic right-handed design.
- 7 programmable buttons.
- 450 IPS or 50 g acceleration.
- 5 ounces weight.
- 1*6.6*2.56 inches of mouse dimensions.
What we don’t like
- Low design.
- Inconvenient DPI buttons.
- Driver software requires a sign-in.
11. VersionTech Gaming Mouse

Next one in the list is from a VersionTech brand which is committed to providing high standard services to the customers. It has good reviews and ratings for the product. For this reason, it has become one of the best gaming mice among the listed.
It has 7 breathing light colors that can glow all at once and highlights the gaming atmosphere. 4 adjustable DPI modes (800/1200/1600/2400-resolution) with optical tracking technology offer sensitivity and precise tracking on a wide range of surfaces. Read on to know more about the specifications, pros & cons of a VersionTech gaming mouse in detail!
The specifications of VersionTech gaming mouse are given below:
- USB interface
- Wired transport technology
- Working voltage is 5V
- Key Life is of 5 million times
- Working current is less than 100mA
- 6 buttons with scroll wheel
- 2400 DPI of high resolution
- Optical tracking method
- Made with ABS material
- Compatible with Windows XP, 7/8/10 and Mac Operating System
On the whole, the size of the mouse is pretty perfect for anyone to handle smoothly while playing games or monitoring other essential tasks. As the cost of the item is very cheap, the material quality is not so good.
Amazing Features
- 7 color breathing light.
- 6 programming buttons.
- 2 Anti-skid side pads.
- Durable braided cord.
- Optical tracking technology.
- 800/1200/16 00/2400 DPI resolutions.
What we like
- Very cheap.
- Plug & play device.
- Good compatible nature.
- 84 ounces of mouse weight.
- 1*1.6*2.8 inch dimensions.
- Very comfortable to use.
What we don’t like
- Poor plastic material quality.
12. ROSEWILL with RGB LED Gaming Mouse (NEON M59)

When you talk about the DPI resolution, no one can beat this gaming mouse. The gaming mouse is from Rosewill brand that has established years ago. It brings the quality hardware and affordable prices together.
The gaming mouse comes with the amazing features like ergonomic profile to grip your hands by adhering to all the grip styles. Neon N59 provides ultimate gaming experience with a polling rate upto 1000Hz and acceleration at 20 g.
11 RGB LED backlights modes with a stylish design (special patterns) give immense gaming experience to all the gamers. The adjustable DPI modes & 7 buttons allow quick On-fly changes to sensitivity with a command in every gaming situation.
Though there are very few reviews and ratings for the product, it offers very good performance at reasonable prices. It best suits the beginners and hobbyists who love playing games at free times. But the only thing that we didn’t like in this item is that it starts producing some low-level noise while scrolling the wheel.
Amazing Features
- Ergonomic profile fit.
- 11 RGB backlight modes.
- 6 DPI resolutions 800/1600/2400/3600/5000/10000.
What we like
- Light weighted.
- Adjustable DPI.
- Inexpensive mouse.
- Mouse weighs 9.8 ounces.
- High polling rate (1000 Hz).
- Acceleration at 20G/100IPS.
- Item dimensions are 8.7*6.2*2.7 inches.
What we don’t like
- Low noise.
13. Redragon M801 Mammoth 16400 DPI Programmable Laser Gaming Mouse
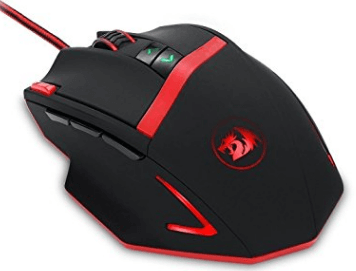
Yes, another model from the Redragon brand. The name of the product is Redragon M801 gaming mouse. It is sold by Challenger Technology limited that has 20 years of experience in bringing high- quality products to market.
This is specially designed for gamers with 16400 DPI resolutions, 1000Hz polling rate, 30 g acceleration and micro switches.
The 9 programmable buttons with dedicated light color for quick identification over 16 million LED color options. Teflon feet pads enable the mouse to move freely on any kind of surfaces.
A user manual is provided along with the device for the convenience of users to make use of the programmable buttons effectively. When you purchase the Redragon M801 gaming mouse, you get the following components:
- High precision gaming mouse
- 8-piece tuning set and
- An instruction manual
Overall this is an awesome gaming mouse that will definitely be everybody’s if they tend to know about the amazing features it offers. But we didn’t like the buttons flexibility and the programmable options.
Amazing Features
- 16400 DPI laser sensors.
- Braided fiber cable (6).
- Gold plated USB connector.
- 10 Optimized programmable buttons.
What we like
- 3 ounces weight.
- 5 color modes.
- User manual.
- 30g of acceleration.
- 1000Hz of polling rate.
- Smooth Teflon feet pads.
- 8*3.2*1.6 inch dimensions.
What we don’t like
- Buttons flexibility.
14. CORSAIR HARPOON – RGB Gaming Mouse
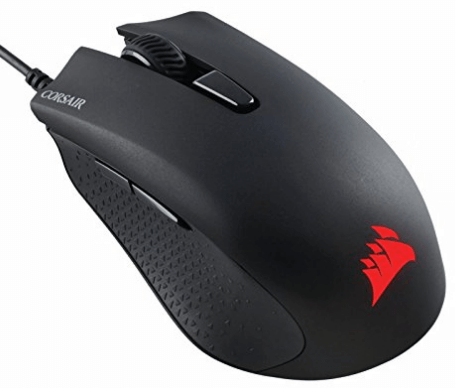
CORSAIR has designed another model for the convenience of users with large hands and the buttons are conveniently placed. Most of its construction is made of plastic material and aluminum at the middle giving the mouse a good heft.
The mouse comes with one of the best gaming sensors in the market like 6000 DPI optical sensor with high accuracy and advanced tracking.
The countered design supports your play style, rubber strips to hold the device perfectly and 6 programmable buttons to enable the custom configuration. Onboard memory storage element offers the custom DPI settings on the mouse.
Performance of the Corsair gaming mouse is good as it features the stylish design, light weight at a very affordable price. If you are gamer and wish for macro keys then this Corsair gaming mouse is for you. Else you can go with the other fascinating models provided in this article.
Amazing Features
- 6000 DPI optical gaming sensor.
- 6 fully programmable buttons.
- Optical sensor technology.
What we like
- Very comfortable.
- Highly durable.
- Light weighted.
- Countered design.
- 7*4.4*1.6 inch dimensions.
- 2 ounces of item weight.
What we don’t like
- Thumb buttons are not ideal.
15. HIRALIY F300 Gaming Mouse Wired RGB Optical Sensor PMW3325
Last product on our list is from HIRALIY. The name of the device is HIRALIY F300 gaming mouse. It has enough experience in selling electronic products and ensures the customer’s satisfaction by offering 18-months of manufacturer’s warranty.
This gaming mouse has 9 programmable buttons to configure for gaming, RGB LEDs for soothing ambient lighting. It is also equipped with the latest gaming chip PMW3325 to capture the fast and accurate precise control.
When you look at the device it has a right-handed ergonomic design with rubber grip for easy handling and the 6-feet braided cable to ensure the data transmission with greater durability. The following are the specifications of F300 gaming mouse:
- PWM3325 sensor
- The key number is 7
- Resolution is (500-1000-2000-3500-5000) DPI
- Maximum acceleration is 20g
- Cable length is about 1.8 meters
Overall this is an excellent mouse for the price as it offers great sensors and the lighting effects. But there is no visibility of laser light at the bottom of the device. Apart from this, it’s totally a good one to buy and best suits for anyone who love to use it for gaming purposes.
Amazing Features
- 5 adjustable DPI levels.
- 9 programmable buttons.
- Ergonomic right-handed design.
- RGB multi-color breathing lights.
What we like
- Low priced product.
- Highly efficient.
- 2 ounces of item weight.
- 18 months of free-warranty.
- Dimensions of a mouse are 5.1*2.7*1.6 inches.
What we don’t like
- Poor plastic quality.
What Factors to consider when you buy a Gaming Mouse
The following are the 7 important factors that should be considered when you buy a gaming mouse.
1. Price
Price is the first and the foremost thing that comes to our mind when buying any product. Apart from the necessity, the price only determines whether you can afford the gaming mouse or not.
If the gaming mouse is within your budget range then you can simply add the gaming mouse to the cart. If you think the gaming mouse you are looking for is expensive or willing to spend less then look for an alternative with the similar features that you wish for.
2. Hardware design
The hardware design is the 2nd important factor while choosing a gaming mouse. Because the hardware design should exactly match with the fingertips else it is totally worthless.
Whenever you opt for a stylish gaming mouse, check whether it is compatible with the hands and also there should be a smooth movement of the device. It is not necessary that the gaming mouse should be of simple or elegant design. What important is the level of comfort when you handle the device.
Most of the simple design gaming mouse come at very low prices whereas the stylishly designed mice at very expensive prices. Take a wise decision before you consider the design factor that matches your requirements while purchasing the gaming mouse.
3. Durability- Higher the durability higher the performance it offers
Durability refers to the ability of a physical device that retains its functionality without any sort of repairs or the maintenance. In other words, it is also referred as the product capable of technological design and developments.
Here the durability of the gaming mouse explains about different concepts like a color option, battery life, simple nature, technology equipped and the number of clicks. With all the amazing parameters, gaming mouse is said to be the good one.
4. Laser Vs Optical Sensors
The main component used in mouse is the sensor. All the gaming mice are equipped with the sensor technology and are capable of working on any kind of surfaces compared to the optical mouse. It creates some problem if the mouse reaches the edge of the pad that has higher lift-off distance.
Lasers are more accurate and are high sensitive to dust or other issues under high acceleration. Whereas the optical mice are less sensitive and have lower lift-off distance is the perfect choice for a professional gamer.
And the latest technology equipped with the mouse is the sensor technology. The sensor is considered as the heart and soul of a good gaming mouse that uses IR sensor to lift off the distance and work smoothly on different surfaces.
5. Connectivity (Wired-Wireless)
Connectivity is another important consideration to look for when you own the gaming mouse. All brands offer unified software platforms to have a better gaming experience by synchronizing.
Now-a-day all the gaming mice are equipped with the wireless technology. Its performance is too good when compared to the traditional wired technology and also overcomes the major problems associated with it.
If you really want to make use of the gaming device smartly then go with the Wireless gaming mice that allow the gamer to move freely and operate at a 30-feet distance.
6.Movable range
With the wired mouse, you are able to move the device only to a small area. But the wireless device enables you to move away from the computer. The best part of the movable gaming mouse is that you can move the mouse to any location in the room of range 30-feet and for wired it isn’t possible.
The major disadvantage of using the wired mouse is that you may feel bit irritative and pain in your hands. When you use the wireless mouse, you can comfortably move to any location you wish for, handle smoothly and enjoy playing the games.
7. Battery life
The battery life of a gaming mouse explains the number of working hours it is inactive. The best gaming mouse has the high battery life compared to the regular ones.
Though there are some gaming mice in the market that cannot operate continuously and need to be charged for every couple of weeks. These kinds of devices have a greater performance at the beginning, as the days go on; the performance of the devices reduces to half which makes your valuable money worthless.
So my best suggestion is to buy a gaming mouse that has excellent battery life. If the battery life of the gaming mouse is too good then it can efficiently work on any platform over a long duration.
8. Illumination
Illumination has become the most important feature in recent times. There are some high-end mice whose lights can be configured & programmed to glow at different patterns. The color options of the mouse will not affect or improve the performance of the game but will surely keep the gaming profiles synchronized.
Different Terminologies you should know
Here are few factors that are responsible for a gaming mouse to perform speedy operations very accurately. Check it out…
- Sensitivity
The mouse sensitivity is usually expressed in characters per inch (CPI) or dots per inch (DPI). The sensitivity of a good gaming mouse should be of hundreds to thousands of DPI. If the gaming mouse has high DPI you can move the cursor on the screen quickly.
- Acceleration
In general, acceleration refers to the increase in speed of the object. In this context, acceleration of a mouse is the ratio of pointer speed to the motion of the hand. It is measured in gravitational force (g) which is equal to the 9.8 meters/second.
- Polling rate
It refers to the number of times the mouse is reporting the current position on the computer. It is usually measured in Hertz (Hz) and has a major bearing on the performance.
The polling rate of a gaming mouse may vary between 250-1000Hz. If you send the information via mouse, it first processes the data and then the action is completed on the screen (within milliseconds).
- Programmable buttons
The traditional mice have 2 buttons- 1 left & 1 right and a scrolling wheel. But now they come with many features. Programmable buttons are one among them. They can easily be turned to hotkeys or short keys to execute a specific task.
For example, sniper buttons on the mice help you to shoot the target quickly in a first-person specific game.
Gripping Style
Grip refers to holding a mouse. Different gaming mice are equipped with the different gripping styles. One must choose the styles that naturally suit your hand grip.
There are actually 3 gripping styles-pal, claw & tip. Although some mice suits for all sorts of grips, most of them are restricted to 1 or 2 gripping styles. Read below what each of the gripping styles offers you.
- Palm grip
Palm grippers prefer large mice and can be adjusted to low DPI. It is a standard grip used by most of the players and is designed in a way that the fingers lay flat on the mouse and the entire palm rests on the body of the mouse.
- Tip grip
In this, the tip of your index, middle, & ring fingers rest on the left, center wheel. The palm doesn’t touch the body of the mouse and thumb grips side of the mouse.
- Claw grip (= Palm + Tip)
Claw grip is the combination of palm and the tip gripping styles. In this gripping style, the palm rests on the back of the mouse with the thumb and fingertips angled towards buttons.
Most of the gamers try to change their gripping style for playing the games effectively. It isn’t a good idea. Use only the gripping style that matches with your finger grips.
Types of Gaming Mouse
Here are few secrets about the gaming mouse and you should know about the different types of gaming mouse available in the market.
- All Purpose
All-purpose mice are a versatile gaming mouse suitable for a beginner level to the pro gamers. It is the most common type of gaming mouse that is compatible with the wide range of applications and comes in all sizes & shapes.
- MMO-Massively Multiplayer Online
MMO is an extraordinary gaming mouse that allows the gamers to play the interesting games like World of Warcraft, Final Fantasy, and the Starwars. There are several buttons on the device that is perfect for firing, rotating up & down.
They come with a bulky design using multiple buttons for playing multiplayer games. Of all the gaming types, MMO is a professional gamers choice and suitable for anyone who wants to get into the world of gaming.
- FPS-First Person Shooter
FPS means the first-person shooter. This type of gaming mouse is suitable to play the games like battlefield, counter strike, call of duty, and much more that allows you to fight against the targeted enemies in the first person view.
The latest FPS mouse is equipped with the sniper button to handle the difficult shots by the gamer.
- Customized
These are flashy and expensive devices compared to the regular ones. It brings a competitive edge over other branded devices with the fine tuning and customized options as per the requirement of a gamer.
Not all the gaming mouse supports games. Before you purchase the gaming mouse you should be aware of its importance and the usage. If you know the specific purpose of using the mouse, you will not waste the time & money for a worthless product.
- RTS- Real Time Strategy is best suitable for real-time strategy games like Starcraft.
Conclusion | what to choose?| Final words
So now you are completely aware of the gaming mouse and decided to purchase the one for your needs. But, which one you are going to choose? High or low price, quality or the performance?
Don’t get confused! We are here to help you out…
Of all the gaming devices, we have chosen VicTsing MM057 Gaming Mouse as the best and also become our top priority because it features excellent qualities like sweat resistant, power-saving modes (8-minutes), wireless technology, and the multicolour options (10) that no one in the list has.
This wonderful gaming mouse is very trendy now and is currently purchased by the more number of customers. We are very sure that the user will not be disappointed with the product as it also offers 12 months of warranty.
It best suits for anyone who loves to play games or use the system on regular basis at homes or offices in your daily life.
If you have any doubts about gaming mouse, feel free to share your doubts in the comment section given below. We are very happy to respond to your queries as soon as possible.
The post Check the 15 Best Gaming Mouse Tested and Reviewed in 2018 appeared first on Electronics Hub.
-
CMOS (Complementary Metal Oxide Semiconductor) The main advantage of CMOS over NMOS and BIPOLAR technology is the much smaller power dis...
-
I was first introduced to logic gates when I was around 14 years old. I had heard that computers consisted of ones and zeroes. But I didn’t...
-
Bluetooth Controlled Electronic Home Appliances is a simple project, where we can control different electrical appliances and electronic de...


