Being a DIY aspirant or an engineer it’s quite difficult to solder the small components like resistors, capacitors, and transistors on a circuit board. So, the best affordable solution to tackle all these complex tasks is by having Soldering Station with you.
Soldering iron station is a hand-held device used to ensemble the hardware components like TV, refrigerators, mobiles, watches, jewelry, etc. This will be a great add on for those who show interest in crafting new designs on circuit boards.
When it comes to choosing the right one for your requirement, you may come across different brands and models available in the market. We have spent 64-hours on researching the soldering stations, reviewing products online and interacting with the customers. Check out the Top 10 Best Soldering Stations that are in great demand now!
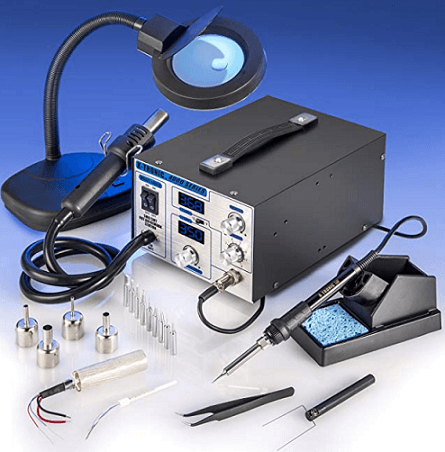
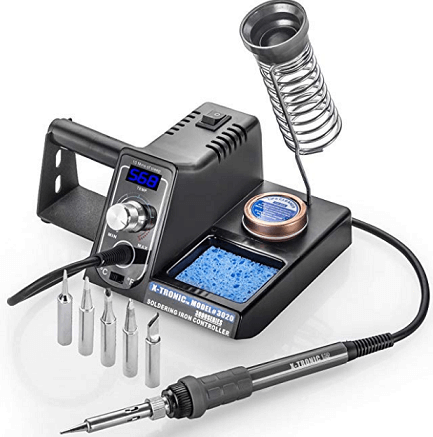
Soldering stations are the one that handles the complex tasks like connecting the peripherals and holds the temperature accurately. The one we’re discussing is about X-Tronic soldering iron station that comes at affordable prices.
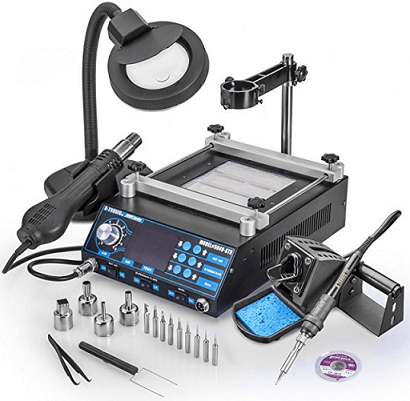
It comes with 9 soldering tips that are designed in different sizes and styles. They’re actually made of high quality copper, nickel materials for strengthening the tips and are absolutely SGS, Rohs certified.
The hot air gun nozzles are available in 2.5mm, 4.4mm, 7mm, and 12mm and a temperature of range 100°C-480°C (or 212°F-896°F/) along with the auto cool down safety feature.
IC popper, anti static pinpoint tweezers helps to pick the IC components while fabricating the circuit and a roll of got wick desoldering easily.
To perform the heating process, the device utilizes 1270 watts power of which 70 watt by soldering iron, 500 watt by hot air gun and the remaining 700 watt by preheating station.
This complete new XR3 model soldering iron station kit includes the following components:
- IC Popper (1)
- Hot Air Nozzles (4)
- Roll of Gootwick (1)
- Main Unit 5040-XR3 (1)
- Anti-Static Tweezers (1)
- Assorted Soldering Tips (10)
- Gooseneck Magnifying Lamp 5X (1)
- Programmable Soldering Iron – 60 Watt (1)
- Programmable Hot Air Gun – 500 Watt (1)
- Deluxe Soldering Iron Holder with Solder Roll Holder (1)
Winding up, this is an all in one soldering station kit that is best for multipurpose. Also, the product is backed with 1year of manufacturing warranty to fix or rebuild the damaged parts.
Buy Now From Amazon
This Yiuha soldering station comes at inexpensive prices and offers outstanding performance with the presence of multiple accessories.
Compared to other branded soldering stations, it has a space saving design and also makes less noise. For this reason, we’ve given the top priority in the list of top 10 best soldering stations in India 2018.
The manufacturer offers warranty card of worth 1 year and a user-friendly manual for the convenience of customers. If you do not like the product or come with a damaged piece, you’ll get full refund within 30-days.
Read the manual carefully and follow the guidelines before you start using the soldering station for connecting the components or handling other complicated tasks.
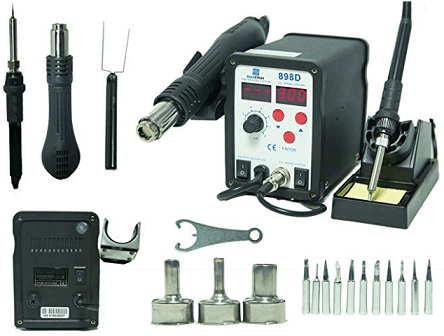
This amazing product incorporates 3 nozzles, extractor, wrench, 11 tips, sponge, plastic stand, and a dual LED digital display for easy accessing and assembling the hardware parts to built interesting projects.
PID technology enhances the temperature stability and you can adjust the airflow, temperature using arrows on the device. When the temperature is below 70˚C, it will automatically stop the rotation while performing a task.
The presence of handle sensor makes the hot air gun turns off when set back and also turns back when picked up. Cooling function protects the hot air gun and thereby prolongs the heaters life.
Moreover, this device comes in an ESD design to protect sensitive components. On the whole, this soldering station is best to use for repairing the cell phones, laptops, circuit boards etc. It also helps to manually mounting of SMD components, and heating shrinks.
Buy Now From Amazon

If you are an electronic enthusiast and willing to craft multiple circuit boards, then Hakko soldering station is a must have appliance with you.
This soldering iron heats up the things incredibly fast i.e. about 10-seconds, preserves the temperature and improves the efficiency while working. Hence, it is the one among the best performing and long-lasting items.
Coming to the product, it has all the necessary accessories that you look in a basic soldering station kit and use it whenever you want to assemble the components.
The display unit looks pretty cool, generates accurate results and is very easy to read. It has got excellent thermal recovery to reduce the heat on peripherals.
You can adjust the temperature within the range 50˚C-480˚C and a digital display makes easy to check the temperature at a glance. The sturdy stand does not allow the components like 7 tips to move around while working.
The iron holder comes with fully loaded functionalities and brings a sense of visual consistency to work in a friendly environment.
It has got only 2-operation buttons i.e. 1 for “up” and the other is “enter” at the center to conveniently handle the tasks. Even though, if you do not know much about the product, you can operate without any hassle.
Overall, this Hakko soldering station is simple and easy to use. They are positioned as such that they’re in contact with the floor where the outer body enhances the device stability and makes the station difficult to fall over.
Buy Now From Amazon
Most of the tech-aspirants love this Mark Ethan soldering station because it is simple to use, produces quality heat, and comes with a user-friendly design.
In contrast with other soldering stations, the components in the kit are made of high quality materials to sustain longer and enhances the performance without damaging the circuit boards.
What is included?
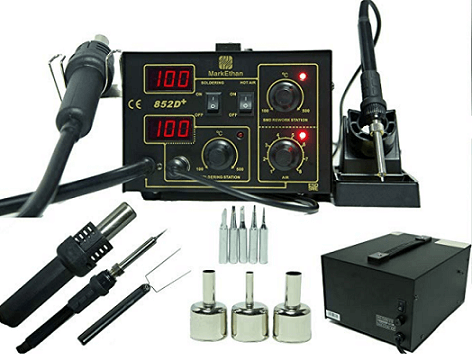
- Nozzles (3)
- Tips (6)
- IC picker
- Hot air gun
- LED display unit
- Soldering microcomputer
The sensitive parts in the kit are protected with the ESD design of the soldering iron. You can simply remove and replace the tips at time for crafting the wonderful design on a circuit board. And a quality control processor maintains the accurate temperature without disturbing the airflow.
The large LED display gives the exact temperature of hot air gun and iron. You can adjust the airflow rate and a temperature control as per the project requirements. Though it is available in affordable price range, the manufacturer didn’t mention about the warranty details.
Buy Now From Amazon
Next one in the list is X-TRONIC soldering iron station. We’re discussing it because it is very much beneficial for electrical and electronic students, engineers, and professionals.
What is included?
- IC popper
- Hot air gun
- Iron holder
- Nozzles (4)
- Tweezers
- Soldering iron
- Roll of gootwick
- Soldering tips (10)
- Heating elements (2-extra)
- Magnifying gooseneck lamp (5X)
Newly added features include brushed aluminum front with LED tube and a temperature switch (C/F) to easily access the settings with a flip.
PID (proportional integral derivative) technology comes with a magic temperature compensation technology to perform the self-test function with fully intelligence during the overloads, over-temperature, and short circuits.
The hot air gun utilizes 500-watt and 60-watts power by soldering iron with a silicon cord (no virtual memory) which works efficiently at a temperature (100˚C-480˚C). Heavy duty soldering iron holder comes with a sponge, side mount roll holder for fabricating the small components like resistors, capacitors, transistors on a bread board.
If any of the electronic device or circuit gets overheated, the auto cool down safety feature settle down by bringing temperature to the optimum level.
Overall, this is one of the best ways to start getting into the electronics using this soldering station kit. You can use this kit effortlessly even if you have no prior knowledge in electronics. The product manufacturer offers 1-year warranty scheme to fix and repair the damaged parts and 30-days money guarantee scheme.
Buy Now From Amazon
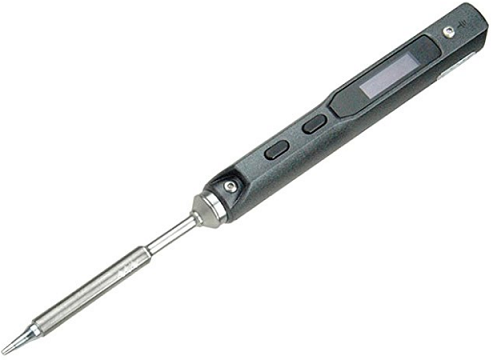
What’re you waiting for, when you got the latest soldering station from the UY CHAN brand. This is a newly established company that designs first-class products in the electronic industry.
This is one of the best ways to dive into electronics as you get all the essential components in a single pack that are required to start working (soldering/assembling) on basic concepts to high level projects.
When you look at the kit, you may come across soldering iron, controller, tip, power supply, hex key and a user-friendly manual that helps for smooth functioning of the device.
The high quality heating element heats up the small components quickly so as to solder on their respective positions.
Temperature reading is displayed on the screen, which is accurate and can easily be adjusted on a scale of 100°C to 400°C. There is an option for you to connect to the computer and rest the temperature rising curves and custom functions.
The temperature and accelerated sensors within the chip monitor the readings. It also features sleep mode and automatic over-heating options to warn you when the device is fed with excess heat.
This portable soldering iron heats up in seconds due to the compatibility options and is very convenient for both home and filed repairs like unmanned aerial vehicle, FPV multi-rotor.
Buy Now From Amazon
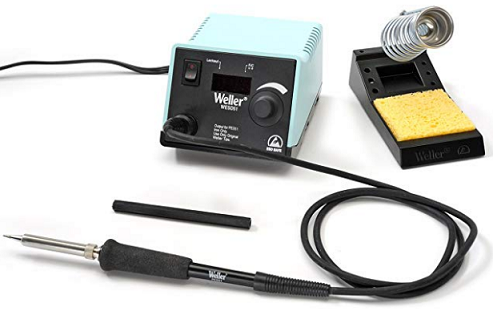
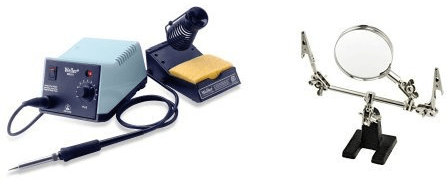
If you fed up with the cheap quality models, then it’s time to upgrade to Weller digital soldering station. Weller is one of the famous brands that offer variety of products from TV to washing machines, with its awesome quality along with a standard customer support services.
This wonderful device solves all the soldering issues as it includes soldering pencil, power unit, ETA tip, and a stand with sponge. It even allows the user to reset the soldering temperature to match with tip sizes & styles.
This digital soldering station is a great combination of heater and sensor that gives you a quick heat-up and rapid temperature recovery. The temperature controller prevents the increase in temperature levels than the standard readings.
Sale
Weller WESD51 Digital Soldering Station
- Station includes WESD51PU power unit, PES51 soldering pencil, ETA tip and PH50 stand with sponge. Add distilled water to the sponge for it expand to the size of the opening in the stand.
- Microprocessor controlled temperature: 350F-850F (175C-450C)
- Digital LED display provides temperature setting and actual tip temperature readout in degrees F or C. Iron is fitted with a non-burnable silicon rubber cord for safety
With this Weller soldering station, you can handle a variety of tasks by adjusting the temperature ranging from 100˚ C to 450˚C.
Moreover, the adjustable temperature settings allow you to pick the right amount of heat and ergonomic handle provide easy accessing of the device. This wonderful soldering iron station is easy to use and well-suited for beginners, electronic enthusiasts and engineers.
Although it comes at affordable prices, best suits for handling a variety of items like working on crafts, toys, mobile devices, watch, electronics, jewelry item, computers, trinkets, and much more.
Buy Now From Amazon
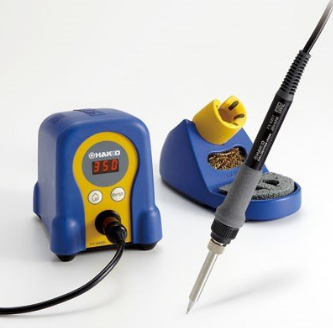
Yet another decent quality model in the list is Hakko digital soldering station. This digital soldering station is best for those who want to craft designs in less time in this modern world.
What made us to list in the best soldering stations 2018 is the presence of exceptional accessories like soldering iron, tip, iron holder, sponge, cleaning wire and an instruction manual that help the customer in handling the projects effortlessly.
This plug and play type device comes without any wiring issues and can be operated at anytime you want. Hence, it has been one of the favorites for most of the customers.
Compared to other convectional soldering station models, this device has excellent thermal recovery. It even allows you to set the temperature as low as possible and thereby reduces the thermal impact on the components.
You can handle the time-taking projects effortlessly with the fast processing nature due to the presence of lightweight pencil and ergonomic handle.
The soldering iron heats up in just 10-seconds and is ready to use now. It offers temperature adjustment, a digital display, cleaning sponge, sturdy stand and 7 extra tips for better functioning of the device.
It uses digital technology to deliver a substantial amount of heat and have longer lifespan because the components are made of durable materials.
To conclude, the performance of Hakko digital soldering station is good as it comes with every basic component that you look in a soldering station. It heats up the components in just a matter of 20-seconds and making more efficient to use at home and other premises.
Buy Now From Amazon
Next one in the list is X-Tronic soldering station. Though it comes at cheap rates, offers exceptional performance by enabling smart accessories present in the kit.
When you purchase this kit, you’ll the components for crafting the wonderful designs. Have a look!
- Soldering iron
- Iron holder
- Soldering tips
- Side roll holder
- Brass sponge tip
- Soldering iron station
This X-Tronic kit includes an LED tube temperature display with C/F standard functions. You can easily change the temperature settings from C F with a flip on the switch.
Wet sponge, brass tip cleaner and a cleaning flux is provided at the bottom of the tin for easy cleaning and maintaining properly. The soldering tips are made of high quality copper and nickel alloy for hardening the tips.
To perform the welding process, the soldering iron uses 60-watts of power within the temperature ranging from 200˚C – 480˚C.
Unlike other brands, this X-Tronic soldering station comes in ultra-stylish and modern look to grab the customer’s attention. Also, the soldering station reviews and ratings are too good. We also liked the 3-years of manufacturing warranty services which help the users in minimizing the repairing costs on a long run.
Buy Now From Amazon
Finally, we end up with the Weller Analog Soldering Station. Enjoy crafting your dream project using this Weller station which comes at reasonable prices. You’ll definitely love and buy this product without any thought after knowing the wide variety of applications.
The sleek and slim design keeps things ergonomic so you won’t suffer from hand-strain after using it for a long-time. It contains a wireless temperature lockout that prevents you from raising the temperature. Further, it eliminates the possibility of damaging the components when the temperature is set too high.
The soldering iron has a comfortable foam grip which makes easy to handle without any hassle. The temperature settings are accurate and sensitive. And the iron pencil is well-weighted, which allows you to make more precise movements.
Winding up, this Weller analog soldering iron is a high quality product that is suitable for hobbyists and professionals. We’re disappointed with the build quality which is not upto the mark. Other than that, its totally a good one to purchase.
Buy Now From Amazon
Conclusion:
The above given information is all about the best soldering stations that are in great demand on the market. When it comes to choosing the best one, we’ve picked X-Tronic Soldering Iron Station that comes at affordable price range.
It comes with 9 soldering tips, hot air gun, nozzles, IC popper, and tweezers for smooth and better functioning of the device. They’re made of durable copper, nickel materials and are SGS, Rohs certified. It best suits for those who’ve zeal in making circuit boards, new projects, etc by giving them a strong support, user-friendly nature, durability and comfort.
Which one you’ve decided? The best price or quality? If you have any doubts share with us in the comment section given below. We’ll clarify them as soon as possible…
The post 10 Best Soldering Stations appeared first on Electronics Hub.