A laser diode is a cool component that you can do a lot of fun stuff with, from engraving wood to creating a light show or giving your robot eyes! They range from super cheap (or even free if you can find one in an old CD player!) to more expensive.
Most types are really easy to use too, once you learn the basics. In this article, you’ll learn the basics of laser diodes and how to use them in your own projects. In the end, I’ll show you how to create your own invisible tripwire!

What Is a Laser Diode?
A laser diode type of diode that creates a very strong and focused beam of light. It is made from a material that can make light waves move in a straight line. This makes the laser beam very powerful and useful for many things, such as cutting or engraving materials, reading data, or even playing with your cat!
A regular Light-Emitting Diode (LED) gives off light in all directions. The laser diode is different because it sends light in only one direction (think of a laser pointer).
How To Use a Laser Diode
You can get laser diodes as standalone components or as modules. For most hobbyist projects, the module is the best choice because it is simpler to use.
Using a Laser Module
If you buy a laser module, you only have to connect it to the right voltage for it to work. That makes it super easy to for example connect to an Arduino.
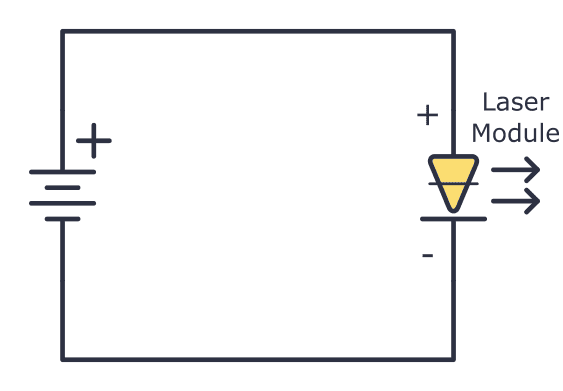
A laser module is an all-in-one device that contains everything you need for the laser diode to work properly. It usually comes in a housing with a black wire and a red wire coming out of it. To turn it on, you just need to connect the correct voltage with plus to the red wire and minus to the black wire.
The exact voltage you need depends on your module. The seller should be able to provide you with that information, or you’ll find it in the datasheet.
Sometimes a laser module comes mounted on a board. On some of these boards, you’ll also find a potentiometer that you can use to adjust the power of the laser.
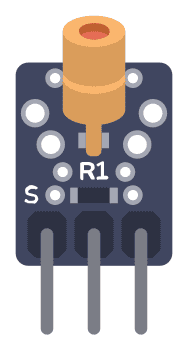
A common low-power laser diode board is the KY-008. It has three pins, but you only need to connect two of them (plus and minus) to power the laser.
Using a Single Laser Diode
If you buy a single laser diode as a standalone component, you need to set up a driver circuit that controls the current through the laser diode.
A laser diode needs a driver circuit to work properly, and the driver circuit needs to give the laser a constant current. Below you’ll find a simple constant current circuit that uses the LM317 voltage regulator.
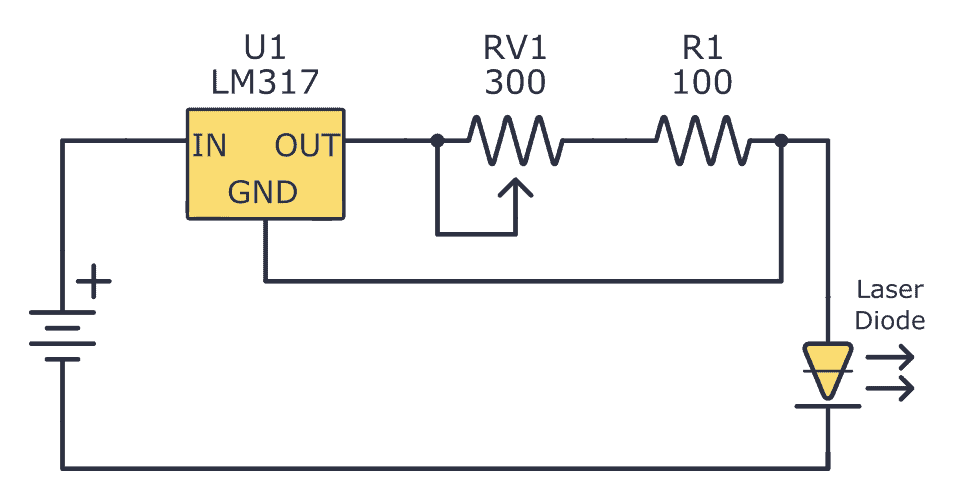
The circuit above was designed to power the OPV332 laser diode. The potentiometer (RV1) enables you to adjust the current up and down to adjust the power of the laser. R1 limits the current to 12 mA, which is the absolute maximum this diode can handle.
If you’re using a different diode, you’ll need to adjust the values so that it fits your specific laser diode. You can learn more about choosing these values from the LM317 datasheet, under section 9.3.3.
Laser Diode With Three Legs
Some laser diodes have three legs:
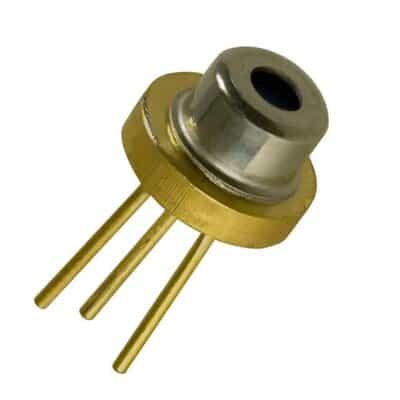
The first pin is the anode, which is the positive pin that provides power to the laser diode.
The second pin is the cathode, which is the negative pin of the laser diode.
The third pin is the monitor photodiode, which is used to monitor the output power of the laser diode. The monitor photodiode measures the amount of light that the laser diode emits. You can feed this back to the driver circuit to ensure that the laser diode is operating at the correct power level.
The monitor photodiode is a key feature of VCSEL laser diodes because it allows for precise control over the output power of the laser. This is important in applications where the laser beam needs to be precisely controlled, such as in fiber-optic communication systems or in 3D sensing applications.
Typical Laser Diode Projects
Laser diodes can be used for a lot of fun projects. Here are a few examples to get you thinking about what’s possible.
Laser engraving and cutting: You can use laser diodes to engrave or cut various materials, such as wood, plastic, and leather. You can do this with a DIY laser engraver or cutter, or by repurposing a laser module from a DVD burner. Check out this DIY laser engraver from Instructables.
Laser light shows: You can use laser diodes to create dazzling laser light shows. By controlling the color, intensity, and pattern of the laser beams, you can create a wide range of visual effects. Check out this instructional video on how to build one.
Robotics: You can use a laser diode as a component in a laser rangefinder to give your robot eyes. You can also use them to create laser-based communication systems between robots or other devices. Here’s an Arduino-based LiDAR project you can check out.
How Much Power Do You Need?
The power of a laser is an important thing to keep in mind. If you want to create a laser cutter that can cut through different materials, you’ll need much more power than if you’re making a simple laser pointer to play with your cat.
Here’s a quick overview of the power needed for different applications:
- Laser pointers: a few milliwatts up to a few hundred milliwatts
- Engraving on softer materials like wood or leather: a few watts
- Cutting harder materials such as acrylic or metal: several watts to tens of watts
You can buy laser diodes for your hobby project in most stores that sell electronic components. If you’re looking for more high-end laser diodes, you can try contacting a laser diode manufacturer directly.
Make an Invisible Tripwire
In this project, you’re going to make an invisible tripwire from a cheap laser module. The circuit is based around the 555 timer in monostable mode. I’ve used a photoresistor in the schematic below, but a photodiode or phototransistor will also work.
What you will need:
- Laser module (such as KY-008)
- Photoresistor
- Active buzzer
- 555 timer
- 10k potentiometer (RV1)
- 2 x 10k resistor (R1-R2)
- 100 µF capacitor (C1)
- BC547 or other NPN transistor (Q1)
The circuit consists of two parts: the laser, which will be on one side of the door or entrance, and the alarm that detects the laser beam, which will be on the other side.
The laser is always on and its beam is aimed at the photoresistor on the other side. When someone walks through the door, the beam is interrupted and the photoresistor turns on a transistor that triggers the 555 timer to sound the alarm for about one second.
Here is the schematic:
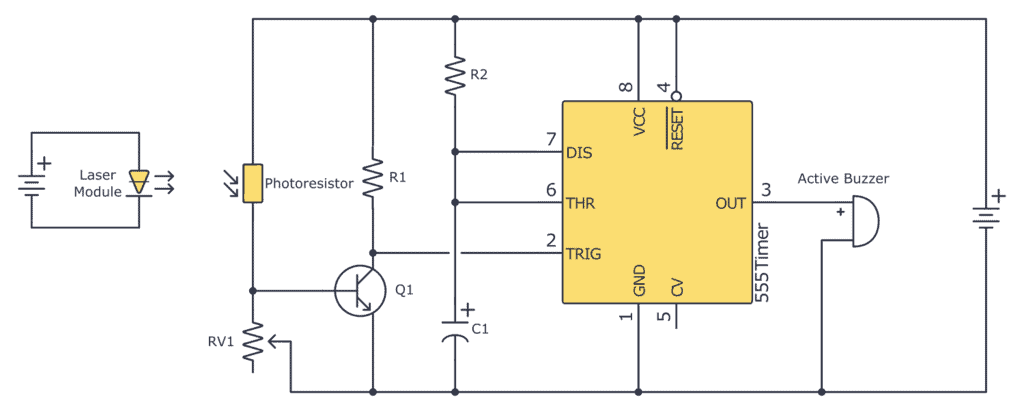
You can increase the value of R2 or C1 to increase the time the alarm is on. Use the 555 Timer Calculator to find the values you need.
Copyright Build Electronic Circuits


No comments:
Post a Comment