If you are into baseball and would like a challenging ‘real-playing action’ baseball game, typically to exhibit your pitching skills, then you might like to construct this one. It is designed around four easily available and inexpensive digital ICs in the 4000 CMOS series along with some passive components.
This circuit was sent to us by a guest contributor – thanks a lot Johnny!
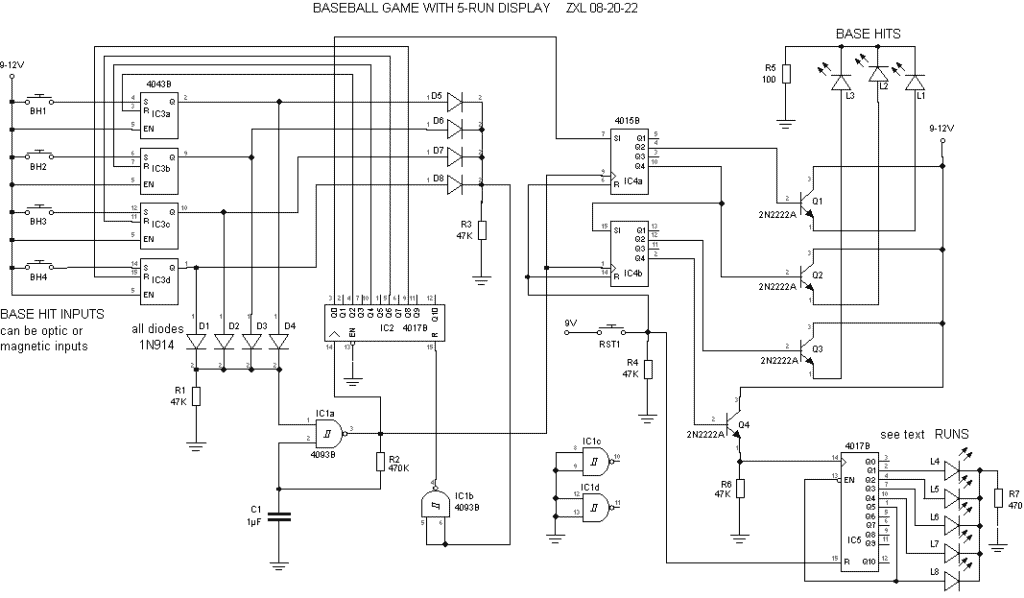
Parts List
- IC1: CD4093 – Schmitt-triggered NAND gates
- IC2 & IC5: CD4017 – Decade Counter
- IC3: CD4043 – RS Latch
- IC4: CD4015 – Shift registers
- D1-D8: 1N915 Diodes
- L1-L8: Light-Emitting Diodes
- Q1-Q4: NPN transistors (2N2222A)
- R1, R3, R4, R6: Resistor 47 kΩ
- R2: Resistor 470 kΩ
- R5: Resistor 100 Ω
- R7: Resistor 470 Ω
- C1: Resistor 1µF
How to Build the Display
The baseball diamond display for this game can be built by anyone with some artistic talent, or you could have it done in a print shop.
It should have the four bases and the pitcher’s mound format. A typical size for the game display is a 3′ x 3′ display size.
The base-hit targets are simply normally open switches placed close together in a North-South-East-West circular format at the pitcher’s mound location. Keep them apart about 4″ so that the pitched ball does not hit two targets at a time. The switches can have identified hits with acrylic covers over them.
The LEDs are placed at the four base locations on the baseball diamond display to light them up indicating men on base and the runs scored LEDs can be placed across the bottom of the display or wherever the builder chooses.
Here are a couple of photos of some example displays for similar games (but not this exact circuit):


How It Works
If you look at the schematic, you can see that the ‘base hits’ are input to each of the associated four ‘flip-flop’ segments of 4043 (IC1). They are interpreted by the 4017 1-of-10 output counter (IC2) as the ‘base hits’ are generated in pulses by the pulse generator 4093 (IC1). This pulse generator is created by using one segment of four 2-input Schmitt triggered NAND gates, wired as a feedback oscillator to pulse at a rate determined by the C1/R2 values. It’s directly wired to both clock inputs of (IC4), a 4015 two-segment shift register, on Pins 1-9.
On each hit input, a ‘man’ is indicated on the associated base via the outputs displayed on the L1-L3 LEDs wired in series on both IC4a-b segments. As men are placed on and advanced across the bases, according to the base hits made, they will cross the home plate and indicate a ‘run scored’ on another 4017 counter (IC5). The game has a five-run limit on this circuit layout, but more runs can be displayed by adding more output LEDs to the higher-numbered output pins.
To ‘reset’ for a new game press the RST1 switch, clearing both the men on base and any runs scored.
For those that aren’t familiar with digital logic ICs and their design functions, we’ll go through what’s going on in detail below.
How a ‘double hit’ is made
As soon as a ‘single hit’ is registered to a flip-flop segment on IC3, its associated output pin goes to a high state. Let’s assume that a single input is hit. Output Pin 2 of IC3a goes high, passes through Diode D4, and enables the clock generator IC1a at Pin 1. This causes the pulse generator to start pulsing, from its normally-off high output state on Pin 3. It will provide pulses to the IC2 clock input at Pin 14 and both clock input Pins 1&9 of IC4.
IC2 will now start counting until output Pin 4 goes high. This happens after a count of two clock inputs from the clock generator that also provided those two output pulses to IC4 clock inputs as well.
Notice that IC2, when at a reset condition, has its output Pin 3 at a high state and it is wired directly to the ‘serial input’ Pin 7 of IC4a. This input must be at a high state to provide a high output on Pin 5. It will only be high until the pulse generator advances IC2 outputs and then it goes low for the continued input pulsing to IC2. This is necessary because you only want to indicate one man going to 1st base and none after that while pulsing continues. The only time input Pin 7 is high is when Pin 3 on IC2 is in a ‘reset’ condition, but it immediately goes low as the input count advances in accordance with the hit made at that time.
Notice that each base hit has two associated counts; single with 2 counts, double with 4 counts, triple with 6 counts, and a home run with 8 counts. This is necessary so that the runs scored appear as ‘low-to-high’ transitions into the clock input (pin 14) of the IC5 counter.
With that in mind notice that when IC2 has counted two pulses, representing a single hit, Pin 4 of IC2 is wired directly to the ‘reset’ Pin 3 of IC3a. This action only allows for a man to appear on 1st base with two input pulses and then, as IC3a is reset, its output Pin 2 goes to a low state, disabling the pulse generator with Pin 1 of IC1a going low.
Also notice that the output pins of each IC3 are also wired to the anodes of Diodes 5-8, which when at high inputs, are passed through and inverted to a low disabling ‘reset’ state on IC2 at Pin 15. As soon as any output pin on IC3 goes low, after a hit input state, IC1b is returned to output a high to reset IC2 counter to be enabled to receive another hit input.
With a single hit made, as indicated by L1 being lit, let’s assume now that a ‘double’ is the next hit input. Using the same logic as with the single input above the ‘man’ on 1st is now advanced to 3rd base and a man advancing from 1st base to 2nd base at the same time with a final display of ‘men’ on 2nd and 3rd base. Further hits to advance those men to ‘home’ will indicate runs scored on IC5.
Potential Modifications
If you want to have larger light displays then use appropriate-sized transistors to turn on larger bulbs, etc. The output pins on IC5 are not shown with transistors but would require them as well.
How you construct the game is up to you but be assured that the game-play logic is sound with this design. You might want to wire output Pin 3 directly to the input Pins 8-9 and/or Pins 12-23 of IC1 and use their outputs to sound a buzzer or other sound device. A transistor wired to the outputs would be in line with good design as well.
Copyright Build Electronic Circuits


No comments:
Post a Comment