In this beginner-friendly tutorial, you’ll learn how to set up an Arduino Speaker circuit where you will play a melody from your Arduino. By the end, you’ll have a basic understanding of how to create Arduino projects that play melodies.
What You’ll Need:
- Arduino
- Speaker (or buzzer)
- Breadboard
- Jumper wires
How To Connect A Speaker to Arduino
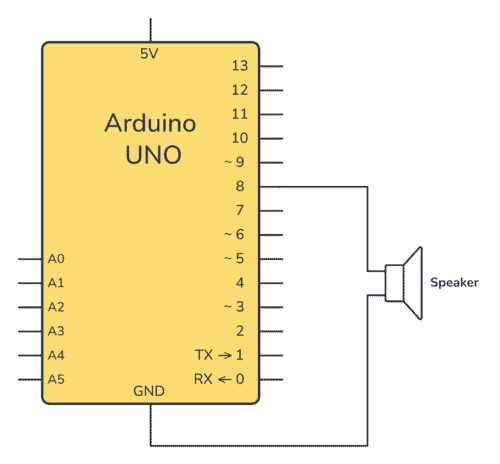
Check out the schematic diagram below to see how you can connect a speaker to your Arduino. Connect one wire of the speaker to digital pin 8 on the Arduino, and the other terminal to the GND (ground) pin.
Should You Connect a Speaker Directly to Arduino?
Note that it’s not recommended to connect a speaker directly to an Arduino pin. For example, if you connect an 8-ohm speaker directly between a digital pin and GND, you’ll get 5V across the speaker whenever the pin is high.
Using Ohm’s law, you can calculate the current (I) that the speaker would try to pull out from the Arduino:

For a resistor of 8 Ω with a voltage of 5 V across it, the current flowing through the resistor is:

So the speaker will try to pull out 625 mA, which is way more than the maximum 20 mA that an Arduino can provide.
This could potentially lead to damaging the pin and/or board. That said, many (including me) have tried connecting a speaker directly without any noticeable damage. So if you want to do a quick test, go for it. But if you want to make a permanent speaker circuit, you should either use a transistor to drive the speaker or replace the speaker with a buzzer.
Connecting the Arduino Speaker Circuit
Check out the below image for a breadboard illustration of the setup. Make sure your speaker is connected properly to pin 8 and GND on the breadboard.
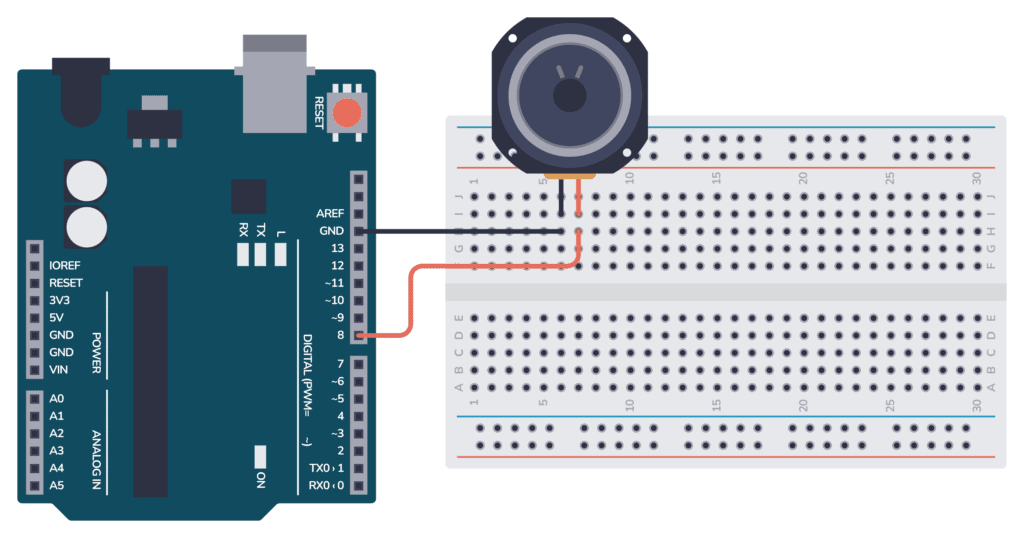
You don’t really need a breadboard for this though, you could connect the speaker directly into the pin headers on your Arduino board.
Arduino Speaker Example Code
The code uses the tone() function in Arduino to play tones. This function has three parameters; pin, frequency, and duration. You define your melody through the array melody[], and you use the array noteDurations[] to control the timing of each note.
If you place a 0 in the melody array, it represents a rest or pause in the melody. The corresponding duration value in noteDurations determines the length of this pause.
Upload the following code to your Arduino. This code will play a simple melody through the speaker.
// Define the buzzer pin
int buzzerPin = 8;

// Define the "Happy Birthday" melody
int melody[] = {
  NOTE_C4, NOTE_C4, NOTE_D4, NOTE_C4, NOTE_F4, NOTE_E4, // "Happy Birthday to You"
  NOTE_C4, NOTE_C4, NOTE_D4, NOTE_C4, NOTE_G4, NOTE_F4, // "Happy Birthday to You"
  NOTE_C4, NOTE_C4, NOTE_C5, NOTE_A4, NOTE_F4, NOTE_E4, NOTE_D4, // "Happy Birthday dear [Name]"
  NOTE_AS4, NOTE_AS4, NOTE_A4, NOTE_F4, NOTE_G4, NOTE_F4 // "Happy Birthday to You"
};

// Define the note durations
int noteDurations[] = {
  4, 4, 4, 4, 4, 2,
  4, 4, 4, 4, 4, 2,
  4, 4, 4, 4, 4, 4, 2,
  4, 4, 4, 4, 4, 2
};

// Note definitions for the melody
#define NOTE_C4 262
#define NOTE_D4 294
#define NOTE_E4 330
#define NOTE_F4 349
#define NOTE_G4 392
#define NOTE_A4 440
#define NOTE_AS4 466
#define NOTE_C5 523

void setup() {
  // Iterate over the notes of the melody:
  for (int thisNote = 0; thisNote < 24; thisNote++) {
    // To calculate the note duration, take one second divided by the note type.
    int noteDuration = 1000 / noteDurations[thisNote];
    tone(buzzerPin, melody[thisNote], noteDuration);

    // To distinguish the notes, set a minimum time between them.
    int pauseBetweenNotes = noteDuration * 1.30;
    delay(pauseBetweenNotes);

    // Stop the tone playing:
    noTone(buzzerPin);
  }
}

void loop() {
  // No need to repeat the melody in the loop for this example.
  // The setup() is enough to play it once.
}
Instructions:
- Assemble your circuit as shown in the breadboard illustration.
- Connect your Arduino UNO to your computer using a USB cable.
- Open the Arduino IDE on your computer.
- Copy and paste the example code provided above into a new sketch.
- Verify and upload the sketch to your Arduino UNO.
- Once uploaded, the melody should start playing through the speaker.
Create Your Own Melodies
In the code above, we only defined the frequencies of the notes that we needed for the melody. If you want to create other melodies, you might need other notes. Copy the code below and save it as pitches.h, then include this file in your code to have all notes available.
#define NOTE_B0  31
#define NOTE_C1  33
#define NOTE_CS1 35
#define NOTE_D1  37
#define NOTE_DS1 39
#define NOTE_E1  41
#define NOTE_F1  44
#define NOTE_FS1 46
#define NOTE_G1  49
#define NOTE_GS1 52
#define NOTE_A1  55
#define NOTE_AS1 58
#define NOTE_B1  62
#define NOTE_C2  65
#define NOTE_CS2 69
#define NOTE_D2  73
#define NOTE_DS2 78
#define NOTE_E2  82
#define NOTE_F2  87
#define NOTE_FS2 93
#define NOTE_G2  98
#define NOTE_GS2 104
#define NOTE_A2  110
#define NOTE_AS2 117
#define NOTE_B2  123
#define NOTE_C3  131
#define NOTE_CS3 139
#define NOTE_D3  147
#define NOTE_DS3 156
#define NOTE_E3  165
#define NOTE_F3  175
#define NOTE_FS3 185
#define NOTE_G3  196
#define NOTE_GS3 208
#define NOTE_A3  220
#define NOTE_AS3 233
#define NOTE_B3  247
#define NOTE_C4  262
#define NOTE_CS4 277
#define NOTE_D4  294
#define NOTE_DS4 311
#define NOTE_E4  330
#define NOTE_F4  349
#define NOTE_FS4 370
#define NOTE_G4  392
#define NOTE_GS4 415
#define NOTE_A4  440
#define NOTE_AS4 466
#define NOTE_B4  494
#define NOTE_C5  523
#define NOTE_CS5 554
#define NOTE_D5  587
#define NOTE_DS5 622
#define NOTE_E5  659
#define NOTE_F5  698
#define NOTE_FS5 740
#define NOTE_G5  784
#define NOTE_GS5 831
#define NOTE_A5  880
#define NOTE_AS5 932
#define NOTE_B5  988
#define NOTE_C6  1047
#define NOTE_CS6 1109
#define NOTE_D6  1175
#define NOTE_DS6 1245
#define NOTE_E6  1319
#define NOTE_F6  1397
#define NOTE_FS6 1480
#define NOTE_G6  1568
#define NOTE_GS6 1661
#define NOTE_A6  1760
#define NOTE_AS6 1865
#define NOTE_B6  1976
#define NOTE_C7  2093
#define NOTE_CS7 2217
#define NOTE_D7  2349
#define NOTE_DS7 2489
#define NOTE_E7  2637
#define NOTE_F7  2794
#define NOTE_FS7 2960
#define NOTE_G7  3136
#define NOTE_GS7 3322
#define NOTE_A7  3520
#define NOTE_AS7 3729
#define NOTE_B7  3951
#define NOTE_C8  4186
#define NOTE_CS8 4435
#define NOTE_D8  4699
#define NOTE_DS8 4978
More Songs with Code Examples
When you have included the pitches.h file above, you can play a lot of different songs. Just update the arrays melody and noteDuration in the example code above. Below, I’ve listed a few common songs:
Jingle Bells
int melody[] = {
  NOTE_E4, NOTE_E4, NOTE_E4, NOTE_E4, NOTE_E4, NOTE_E4, NOTE_E4, NOTE_G4, NOTE_C4, NOTE_D4, NOTE_E4,
  NOTE_F4, NOTE_F4, NOTE_F4, NOTE_F4, NOTE_F4, NOTE_E4, NOTE_E4, NOTE_E4, NOTE_E4, NOTE_E4, NOTE_D4, NOTE_D4, NOTE_E4, NOTE_D4, NOTE_G4
};

int noteDurations[] = {
  8, 8, 4, 8, 8, 4, 8, 8, 8, 8, 2, 8, 8, 8, 8, 4, 8, 8, 8, 8, 4, 8, 8, 8, 2
};
Mary Had a Little Lamb
int melody[] = {
  NOTE_E4, NOTE_D4, NOTE_C4, NOTE_D4, NOTE_E4, NOTE_E4, NOTE_E4, NOTE_D4, NOTE_D4, NOTE_D4, NOTE_E4, NOTE_G4, NOTE_G4, NOTE_E4, NOTE_D4, NOTE_C4, NOTE_D4, NOTE_E4, NOTE_E4, NOTE_E4, NOTE_E4, NOTE_D4, NOTE_D4, NOTE_E4, NOTE_D4, NOTE_C4
};


int noteDurations[] = {
  4, 4, 4, 4, 4, 4, 2, 4, 4, 2, 4, 4, 2, 4, 4, 4, 4, 4, 4, 2, 4, 4, 4, 4, 4, 2
};
Twinkle Twinkle Little Star
int melody[] = {
  NOTE_C4, NOTE_C4, NOTE_G4, NOTE_G4, NOTE_A4, NOTE_A4, NOTE_G4, NOTE_F4, NOTE_F4, NOTE_E4, NOTE_E4, NOTE_D4, NOTE_D4, NOTE_C4
};

int noteDurations[] = {
  4, 4, 4, 4, 4, 4, 2, 4, 4, 4, 4, 4, 4, 2
};
Star Wars Main Theme
int melody[] = {
  NOTE_A4, 0, NOTE_A4, 0, NOTE_A4, 0, NOTE_F4, NOTE_C5, NOTE_A4, 0, NOTE_F4, NOTE_C5, NOTE_A4, 0, NOTE_E5, 0, NOTE_E5, 0, NOTE_E5, 0, NOTE_F5, NOTE_C5, NOTE_GS4, NOTE_F4, NOTE_C5, NOTE_A4, 0
};

int noteDurations[] = {
  500, 500, 500, 500, 500, 500, 350, 150, 500, 500, 350, 150, 650, 500,
  500, 500, 500, 500, 500, 350, 150, 500, 500, 350, 150, 650, 500
};
By following these steps, you should have a functioning musical Arduino project. Feel free to experiment with different melodies and note durations. And if you have any questions or suggestions, please leave a comment below!
Copyright Build Electronic Circuits


No comments:
Post a Comment